4
ENGLISH
•
Avoid contact of the power cord with hot and
sharp subjects.
•
If foreign smell or noise appears, stop using
the unit immediately.
•
Do not switch on the unit if the power cord or
the plug is damaged, if the unit malfunctions
or in case the unit fell. In this case contact
the authorized service center for checking or
repairing the unit.
•
For children safety do not leave polyethylene
bags, used as a packaging, unattended.
Attention!
Do not allow children to play with
polyethylene bags or packaging film.
Danger of
suffocation!
•
Do not allow children to use the unit as a toy.
•
Be especially careful if children or disabled
persons use the unit.
•
This unit is not intended for usage by children
or disabled persons unless they are given all
the necessary instructions by a person who
is responsible for their safety on safety mea-
sures and information about danger that can
be caused by improper usage of the unit.
THE UNIT IS INTENDED FOR HOUSEHOLD
USAGE ONLY
Usage
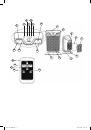
•
Place the fan heater on a flat and steady sur-
face so that the air inlets of the fan heater will
not be blocked by foreign objects.
ATTENTION: Provide that no other electrical
appliances with higher power consumption
are connected to the same outlet the fan
heater is connected to.
•
Insert the power cord (8) plug into the sock-
et, you will hear three sound signals, and the
icons on the display (3) will light up for a short
time.
Note:
Every pressing of the control panel (4) but-
tons is accompanied by two sound signals.
•
Touch the On/Off button (11) to switch on the
unit, you’ll hear two sound signals, and the fan
heater will switch to the previously set mode.
•
Pressing the button (14) choose the neces-
sary operation mode, the operation modes
are shown by icons on the display (3):
– Air room
low heating level
– Air room
high heating level
– «ECO» mode (15)
– «Fan» mode
(16)
– «Anti-freeze» freezing prevention mode
(19)
•
In «ECO» mode you can set the air tempera-
ture that the unit will maintain in the room
when operating. Switch on the unit by press-
ing the button (11) and pressing the button
(14), choose «ECO» mode, icons (15) and
(18) will light up on the display, and the room
air temperature will be shown. Pressing but-
tons (13) «+» «-» you can set necessary room
air temperature from +16
°С
to +32
°С
. When
the air temperature in the room decreases for
about 3 degrees, the unit will switch on auto-
matically into the air heating mode, in case of
exceeding the set air temperature by about 3
degrees the unit will switch off.
•
To ventilate the room, choose the «Fan» mode
«
» by pressing operating mode selection
button (14), the icon (16) will light up on
the display (3). In this mode the room is not
heated.
•
The unit has “Anti-freeze” mode, which
switches on at significant decrease of air tem-
perature in the room. Pressing the operating
mode selection button (14), choose the «Anti-
freeze» mode, the icons (18, 19) will light up
on the display and the preset temperature of
automatic unit switch-on +7
°С
will be shown.
The fan heater will switch on automatically if
the air temperature in the room is below +7 °С.
Note:
Before choosing the «Anti-freeze» mode,
set the necessary operation mode, for example,
air heating or ventilation, see the description of
operation modes above.
•
To switch on the fan heater oscillation function
while operating, press the button (10), to switch
off this function press the button (10) again.
•
You can set the operation time using the
timer, while the unit is operating. Press button
(12) to switch on the timer function, the icon
(17) will light up on the display (3). Pressing
the buttons (13) «+» «-» set the switch-off
time of the unit (possible time of operation
from 0,5 to 24 hours).
•
When the unit is switched off, but the power
cord (8) plug is in the socket, you can set the
necessary time of delayed start. To switch on
this function, press the button (12), an icon
(17) will light up on the display (3), by press-
ing buttons (13) «+» «-» set up the unit switch
on time. You can set the delayed start time
within the range between 0,5 and 24 hours.
Attention
! Before using the delayed start func-
tion you should choose the necessary operation
mode by pressing the button (14), for example,
VT-1751 IM.indd 4
04.06.2012 14:11:11