5
ENGLISH
times, when the humidity value passes 90%,
the current room air humidity will be shown
on the display.
Note:
–
If the humidifier operates in the automat-
ic humidity maintenance mode, the mist
release intensity control will be performed
automatically.
10.
You can set the operation time of the humidi-
fier with “Timer” button (6). By pressing the
button (6) set the required operation time
from 1 to 12 hours, which is shown as a digital
indication (20) on the display (7).
11.
After finishing the operation switch off the
unit by pressing the “Power” button (5), an
icon (21) will appear on the display (7), and
both room temperature (27) and humidity
(28) will be shown.
12.
When the water tank (10) becomes empty,
the humidifier will switch off automatically,
the indication (22) will light up on the display
(7) and you will hear sound signals.
Note:
–
Illumination (15) will help you to evaluate the
amount of water in the tank.
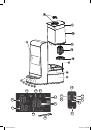
REMOTE CONTROL (17)
Use the remote control for convenient control of
the humidifier.
If there is an isolation insert in the battery
compartment, remove it, if the battery is
supplied separately, remove the holder of the
battery, by preliminary pressing the clamp,
insert the battery in the holder, strictly following
the polarity, insert the battery holder into the
remote control.
Cleaning and care
Warning! Always switch off and unplug the unit
before cleaning.
•
Hard water causes the appearance of min-
eral scale on the sprayer, on the inner parts
of the body and in the water tank; it leads
to improper operation of the humidifier and
appearance of white deposits on interior
objects.
•
To avoid this it is necessary to clean the
sprayer weekly and change water as often
as possible, as well as to perform cleaning of
the cartridge filter.
•
If you are not going to use the humidifier for
a long time, pour out water from the tank and
the operating chamber of the sprayer, wash
the water tank, wash and clean the operat-
ing chamber of the sprayer and the sprayer
itself, dry the unit carefully and take it away
for storage.
Weekly care
1.
Once a week wash the water tank (10) and
the operating chamber under the tank care-
fully with a neutral detergent solution.
2.
Then carefully rinse them with water.
3.
Add 5-10 drops of the detergent on the spray-
er (14); wait about 2-5 minutes. Remove the
deposit from the sprayer surface (14) with a
brush (18).
Note:
-
As a cleaning agent for the sprayer you can
use scale removal substances for kettles.
Do not immerse the humidifier body into water
or other liquids.
Filter cleaning
1.
Clean the filter (12) after passing of about
500 l water through it, and more often, if
using hard water or if white deposits appear
on furniture.
2.
Take the handle (9) and remove the water
tank (10) from the unit body (16).
3.
Turn over the tank (10), open the lid (13)
rotating it counterclockwise, remove the car-
tridge filter (12), rotating it counterclockwise.
4.
Put the cartridge filter (12) into a container
with vinegar for 10 minutes, then take the
cartridge filter (12) out and rinse it with run-
ning water.
5.
Install the cartridge filter (12) back in the lid
(13), rotating it clockwise.
Storage
•
If you are not going to use the unit for a long
time and want to take it away for storage, make
sure that all its parts are dry, including the oper-
ating chamber of the “sprayer”.
•
Do not store the unit with water in the water tank
or in the operating chamber of the sprayer.
•
Clean and dry the cartridge filter before tak-
ing it away for storage. Keep the cartridge
filter in a cool darkened place.
Keep the humidifier away from children in a dry
cool place.
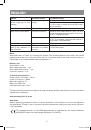
Troubleshooting
VT-1767.indd 5
6/13/12 9:46 AM