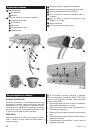
Инструкция для ZELMER 33Z011

(скачивание инструкции бесплатно)
Формат файла: PDF
Доступность: Бесплатно как и все руководства на сайте. Без регистрации и SMS.
Дополнительно: Чтение инструкции онлайн
background image

40

GW33-017_v02

How to use

IONIC CONDITIONING

Ionic  conditioning  switches  on  automatically  when  the  hair 

dryer  is  switched  on.  The  control  lamp 

(3)

  will  light  up. 

Negative ions are generated which reduce the gathering of 

electric charges on hair. They also allow hair to absorb more 

moisture thanks to which hair is softer and more shiny. 
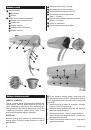
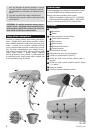
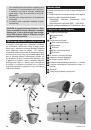
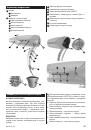
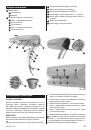
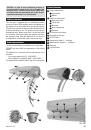
OPERATION

The  selected  operation  options  are  indicated  by  the  six 

colored control lamps on the appliance’s housing:

1

 Press and hold the ON/OFF button 

(5)

 for two seconds 

to switch on the hair dryer. Press and hold the button again 

to switch off the appliance.

The  control  lamp 


(3)

  is  green  which  indicates  that  the 

ionic function is active.

The blue control lamp lights up when cold shot is on.


Yellow control lamp – indicates warm airflow.


Bright  orange  control  lamp  –  indicates  the  first  heat 


intensity level.

Dark  orange  control  lamp  –  indicates  the  second  heat 


intensity level.

Red control lamp – hot airflow.


2

 To adjust the heat intensity level press the «Heat +/−» 

(6)

 buttons. To increase  the heat intensity  level  press  «+» 

and to decrease it press «−». Appropriate control lamps will 

light up.

3

 To  adjust  the  airflow  speed  press  the  «Speed  +/−» 

buttons 

(7)

. To increase the airflow speed press «+» and to 

decrease it press «−».


  There are 4 airflow speed settings.

4

 To switch on the cold shot function press 

(9)

, the blue 

control lamp will light up. Press again to resume hot airflow.

MEMORY FUNCTION

If the hair dryer operates for more than 1 minute the recently 

set operation options that is the heat intensity level and the 

airflow  speed  are  remembered  and  shall  be  applied  when 

the appliance is switched on once again. 

HAIR CARE

For best results wash hair, dry with a towel to remove excess 

moisture and comb before blow drying and styling.

QUICK BLOW DRYING

Using the buttons 

(6)

 set the second heat intensity level (the 

bright  orange  and  the  dark  orange  control  lamps  will  light 

up), using the buttons 

(7)

 select the desired airflow speed 

and dry hair. Remove excess moisture from hair with hand or 

towel and continue to blow dry.

STRAIGHTENING

Using  the  buttons 

(6)

  set  the  second  heat  intensity  level 

(the dark orange control lamp will light up) or the fourth heat 

intensity level (the red control lamp will light up), using the 

buttons 

(7)

  select  the  desired  airflow  speed  and  dry  hair. 

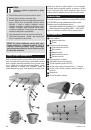
When hair is almost dry attach the concentrator 

(1a)

 to the 

end of the nozzle and lower the heat intensity level using the 

buttons 

(6)

. If necessary change the airflow speed as well 

(7)

Divide hair into sections and layers. Use a round or paddle 

brush to run down the length of the hair and simultaneously 

run the stream of hot air from the dryer. Slowly straighten 

each section from top to bottom. Repeat with all layers of 

hair.

NATURALLY CURLY HAIR

Using the buttons 

(6)

 set the first or second heat intensity 

level (the bright orange and the dark orange control lamps 

will light up), using the buttons 

(7)

 select the second or third 

airflow speed. Twirl strands of hair around your fingers, turn 

them in the direction of the natural curl and dry directing the 

airflow  between  fingers.  After  receiving  the  desired  result 

press the cold shot button 

(9)

 (the blue control lamp will light 

up) to set the style.

LIFTING AND ADDING VOLUME

Select  the  desired  heat  intensity  level  (1-4),  select  the 

second, third or fourth airflow speed. Dry hair at the roots 

starting from the back of your head. Divide hair into strands 

and direct the airflow up the shaft. This will lift the hair at the 

roots and add volume to your hair style. You can also use the 

diffuser 

(1b)

 to achieve such results.

STYLING HAIR

Using the buttons 

(6)

 set the warm airflow (the yellow control 

lamp will light up) or the first heat intensity level (the bright 

orange control lamp will light up), using the buttons 

(7)

 set 

the first or second airflow speed, attach the concentrator 

(1a)


to the end of the nozzle. Divide hair into strands and style 

using a brush. While styling, direct the airflow at hair in the 

desired direction. If necessary direct the airflow at each hair 

strand for 2-5 seconds to set style. The time required is to be 

chosen individually and depends on the hair type. 

THE COLD SHOT FUNCTION

This  model  is  equipped  with  a  cold  shot  function  which  is 

used to set style. Press the cold shot button 

(9)

 (the blue 

control lamp will light up). This will enable to set the desired 

hair  style. To  switch  off  the  cold  shot  press  the  button 

(9)


once again. The blue control lamp will go out.

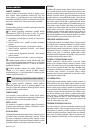
Cleaning and maintenance

The hair dryer is intended for household use only.


Always switch off the hair dryer using the button 


(5)

 and 

unplug the appliance.

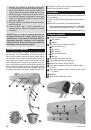
We  recommend  to  take  off  the  air  inlet  grill 


(4)

  every 

once in a while in order to clean it and to clean the filter 

net underneath the air inlet grill. 

Take off the air inlet grill by simultaneously pressing the 


grill release buttons 

(4)

 and carefully pulling it towards 

yourself. Clean the grill using a brush, clean the filter net 

located underneath the grill and replace the air inlet grill.

The housing can be wiped with a damp cloth, however it 


needs to be wiped dry afterwards.

1
2
3
4
5
6
7
8
9
10
11
12
13
14
15
16
17
18
19
20
21
22
23
24
25
26
27
28
29
30
31
32
33
34
35
36
37
38
39
40
41
42
43
44
Оглавление инструкции
  • Страница 1 из 45
    PL INSTRUKCJA UŻYTKOWANIA SUSZARKA DO WŁOSÓW Typ 33Z011 CZ NÁVOD K POUŽITÍ VYSOUŠEČ VLASŮ Typ 33Z011 SK NÁVOD NA OBSLUHU SUŠIČ NA VLASY Typ 33Z011 11–14 HU HASZNÁLATI UTASÍTÁS HAJSZÁRÍTÓ 33Z011 Típus 15–18 RO INSTRUCŢIUNI DE UTILIZARE USCĂTOR DE PĂR Tip 33Z011 19–22 RU ИНСТРУКЦИЯ ПО ЭКСПЛУАТАЦИИ
  • Страница 2 из 45
    PL Szanowni Klienci! Gratulujemy wyboru naszego urządzenia i witamy wśród użytkowników produktów Zelmer. W celu uzyskania najlepszych rezultatów rekomendujemy używanie tylko oryginalnych akcesoriów firmy Zelmer. Zostały one zaprojektowane specjalnie dla tego produktu. Prosimy o uważne przeczytanie
  • Страница 3 из 45
    ●● Nie zwijaj przewodu zasilającego wokół suszarki (ryzyko przerwania przewodu). ●● Nigdy nie wolno niczym przykrywać suszarki, ponieważ może to powodować akumulację ciepła w jej wnętrzu. ●● Nie stosuj nie zalecanych nasadek. Wskazówka Informacje o produkcie i wskazówki dotyczące użytkowania ●●
  • Страница 4 из 45
    Lampka kontrolna funkcji „Jonizacja” Zdejmowana osłona wlotu powietrza Przycisk włączenia/wyłączenia (ON/OFF) Przycisk wyboru stopnia nagrzewania (Heat +/−, 4 stopnie) 7 Przycisk wyboru prędkości nadmuchu powietrza (Speed +/−, 4 stopnie) 8 „Uszko” do zawieszania 9 Przycisk nadmuchu zimnego
  • Страница 5 из 45
    ●● Czerwona lampka kontrolna – gorący strumień powie- trza. 2 Regulowanie stopnia nagrzewania dokonuje się przyciskami (6) «Heat +/−». Aby zwiększyć stopień nagrzewania naciśnij «+», w celu zmniejszenia stopnia nagrzewania naciśnij przycisk «−», zapalą się odpowiednie lampki kontrolne. 3
  • Страница 6 из 45
    PRZECHOWYWANIE ●● Jeżeli nie używa się suszarki, należy zawsze wyciągać przewód z gniazdka. ●● Po użyciu odczekaj aż suszarka ostygnie i schowaj ją w suchym, chłodnym, niedostępnym dla dzieci miejscu. ●● Nigdy nie zwijać przewodu zasilającego wokół suszarki, ponieważ powoduje to ryzyko
  • Страница 7 из 45
    CZ Vážení zákazníci Blahopřejeme Vám k nákupu našeho přístroje a vítáme Vás mezi uživateli výrobků Zelmer. Pro dosažení nejlepších výsledků Vám doporučujeme používat pouze originální příslušenství firmy Zelmer. Bylo vyvinuto speciálně pro tento výrobek. Přečtěte si prosím pečlivě tento návod k
  • Страница 8 из 45
    musí být odstraněn dle platných předpisů o ochraně životního prostředí a zákona o odpadovém hospodářství. Kontaktujte místní středisko pro odpadové hospodářství. ●● Po použití vysoušeč vždy odpojte z elektrické sítě. ●● Používejte přístroj pouze v souladu s jejím určením dle tohoto návodu.
  • Страница 9 из 45
    Funkce a obsluha FUNKCE „IONIZACE“ Funkce ionizace se automaticky zapíná při zapnutí vysoušeče. Zapnutí funkce signalizuje kontrolka (3). Díky této funkci dochází k tvorbě záporných iontů, které snižuje jev hromadění se elektrických nábojů na vlasech a které zvyšují pohlcování vlhkosti vlasy. Vlasy
  • Страница 10 из 45
    Čištění a údržba ●● Vysoušeč je určen výhradně pro domácí použití. ●● Vysoušeč vypínejte vždy tlačítkem (5) a zástrčku vytahujte ze zásuvky. ●● Doporučuje se sundávat pravidelně krytku otvoru, kde proudí vzduch (4) za účelem vyčištění krytky a filtru nacházejícího se pod krytkou. ●● Sundejte krytku
  • Страница 11 из 45
    SK Vážení zákazníci! Blahoželáme Vám k výberu nášho zariadenia a vítame Vás medzi používateľmi výrobkov Zelmer. Ak chcete získať najlepšie výsledky, odporúčame Vám používať len originálne príslušenstvo firmy Zelmer. Príslušenstvo bolo navrhnuté špeciálne pre tento výrobok. Prosíme, pozorne si
  • Страница 12 из 45
    Pokyn Informácia o výrobku a pokyny, ktoré sa týkajú používania ●● Sušič môžete používať výlučne na sušenie vlasov. ●● Sušič je určený výlučne pre domáce účely. ●● Ak sušič dáte inej osobe, odovzdajte jej prosím aj tieto pokyny. Sušiče, ktoré už nebudete používať, musíte odovzdať v súlade s
  • Страница 13 из 45
    Obsluha a fungovanie sušiča FUNKCIA „IONIZÁCIA“ Funkcia „Ionizácia“ sa zapína automaticky, pri zapnutí sušiča sa rozsvieti kontrolka (3). Vďaka tejto funkcii vznikajú záporné ióny, ktoré obmedzujú zhromažďovanie sa elektrických nábojov na vlasoch a zvyšujú pohlcovanie vlhkosti vlasmi, vďaka čomu
  • Страница 14 из 45
    Čistenie a údržba sušiča ●● Sušič je určený iba na domáce použitie. ●● Vždy vypínajte sušič tlačidlom (5) a vyťahujte zástrčku zo zásuvky. ●● Odporúčame periodicky sňať kryt výstupu vzduchu (4) pre jeho očistenie a očistenie mriežky, ktorá sa nachádza pod krytom. ●● Kryt výstupu vzduchu je možné
  • Страница 15 из 45
    HU Tisztelt Vásárlók! Gratulálunk a készülék kiválasztásához és üdvözöljük a Zelmer termékek felhasználói között. A legjobb hatások elérése érdekében javasoljuk, hogy használjon eredeti Zelmer tartozékokat. Kifejezetten ehhez a termékhez lettek kifejlesztve. Kérjük figyelmesen olvassa el az alábbi
  • Страница 16 из 45
    tót a Hulladék Kezelési Rendeletnek megfelelően lehet hasznosítani, a környezetvédelmet szem előtt tartva. A hajszárítót nem szabad háztartási hulladékokkal együtt kidobni. Vegye fel a kapcsolatot a helyi hulladékkezelővel. ●● Használat után mindig kapcsolja ki és áramtalanítsa a hajszárítót. ●● A
  • Страница 17 из 45
    A hajszárító kezelése és működése „IONIZÁCIÓ” FUNKCIÓJA Az „ionizáció” funkciója a hajszárító bekapcsolásának pillanatában automatikusan bekapcsol, és felgyullad a jelzőlámpa (3). Ennek a funkciónak köszönhetően a készülék negatív ionokat bocsát ki, amelyek csökkentik a hajon az elektromos töltetek
  • Страница 18 из 45
    a hajra, a megfelelő irányban. Szükség esetén a haj formázása céljából a légáramlatot 25 másodpercen keresztül irányítsa külön-külön minden egyes tincsre. A haj formázási ideje tetszés szerinti és a hajtípustól függ. HIDEG LEVEGŐ FÚJÁSA Az adott modell a hideg levegő fújási funkciójával
  • Страница 19 из 45
    RO Stimaţi Clienţi! Vă felicităm pentru că aţi ales aparatul nostru şi vă urăm bunvenit în rândul utilizatorilor de produse ale firmei Zelmer. Pentru a obţine cele mai bune rezultate vă recomandăm să folosiţi doar accesoriile originale fabricate de firma Zelmer. Accesoriile au fost proiectate
  • Страница 20 из 45
    persoane să-i înmânaţi de asemenea instrucţiunile. În cazul uscătoarelor cu durata de utilizare epuizată vă trebuie să le îndepărtaţi conform normelor legislative în vigoare referitoare la protecţia mediului aşa cum sunt definite de Legea de Gestionare a Deşeurilor. Aruncarea uscătorului împreună
  • Страница 21 из 45
    Modalitatea de utilizare şi funcţionarea uscătorului FUNCŢIA “IONIZARE” Funcţia “Ionizare” se porneşte în mod automat la punerea în funcţiune a aparatului; se aprinde becul de control (3). Datorită acestei funcţii, se creează ioni negativi care micşorează fenomenul de acumulare de sarcini electrice
  • Страница 22 из 45
    CURENTUL DE AER RECE Modelul de faţă a fost prevăzut cu funcţia curent de aer rece, pentru a da rezistenţă coafurii. Apăsaţi butonul pentru curentul de aer rece (9) (se aprinde becul albastru de control), care permite păstrarea coafurii dorite. Pentru a opri producerea de aer rece, apăsaţi încă o
  • Страница 23 из 45
    RU Уважаемые Пользователи! Поздравляем Вас с выбором нашего устройства и приветствуем среди пользователей товарами Zelmer. Чтобы достичь наилучших результатов, мы рекомендуем использовать только оригинальные аксессуары компании Zelmer. Они спроектированы специально для этого продукта. Просим
  • Страница 24 из 45
    с внешним реле времени или отдельной системы дистанционного управления. ●● Держите шнур электропитания вдали от горячих поверхностей. ●● Перед тем как отложить фен, позвольте ему остыть. ●● Для того, чтобы вынуть вилку из розетки, не тяните за шнур, а только за саму вилку. ●● Не накручивайте шнур
  • Страница 25 из 45
    Индикатор функции «Ионизация» Съемная решетка воздухозаборника Кнопка включения/выключения (ON/OFF) Переключатель температурного режима (Heat +/−, 4 режима) 7 Переключатель скорости подачи воздуха (Speed +/−, 4 скорости) 8 Петля для подвешивания 9 Кнопка подачи холодного воздуха 3 4 5 6 Устройство
  • Страница 26 из 45
    2 Выбор температурного режима осуществляется кнопками (6) «Heat +/−». Чтобы повысить степень нагрева воздуха, нажмите на «+». Чтобы уменьшить степень нагрева, нажмите на кнопку «−». При этом загорятся соответствующие светоиндикаторы. 3 Регулирование скорости подачи потока воздуха осуществляется
  • Страница 27 из 45
    ХРАНЕНИЕ ●● Всегда выключайте и отсоединяйте прибор от сети, если им не пользуетесь. ●● Перед тем как убрать фен на хранение, дайте ему остыть. Храните фен в сухом, прохладном, недоступном для детей месте. ●● Не обматывайте сетевой питающий провод вокруг прибора (во избежание повреждения провода).
  • Страница 28 из 45
    BG Уважаеми клиенти! Поздравяваме Ви за избора и добре дошли сред потребителите на продукти Zelmer. За постигане на най-добри резултати Ви препоръчваме да използвате само оригинални аксесоари от фирмата Zelmer. Те са проектирани специално за тези продукти. Моля прочетете внимателно тази инструкция
  • Страница 29 из 45
    ●● Държете захранващия кабел далече от горещи повърхности. ●● Преди да отложите фена, оставете го да изстине. ●● Не изтегляйте захранващия щепсел, като дърпате захранващия кабел, а единствено самия щепсел. ●● Не увивайте захранващия кабел наоколо фена (риск от скъсване на кабела). ●● Никога не бива
  • Страница 30 из 45
    Контролна лампа на функцията “йонизиране” Свалящо се капаче на входящия отвор на въздуха Бутон за включване/изключване (ON/OFF) Бутон за избор на степента на нагряване (Heat +/−, 4 степени) 7 Бутон за избор на скорост на въздушната струя (Speed +/−, 4 степени) 8 Халка за окачване 9 Бутон на
  • Страница 31 из 45
    ●● Червена контролна лампа - гореща въздушна струя. 2 Регулирането на степента на нагряване става с бутоните (6) «Heat +/−». За да увеличите степента на нагряване, натиснете «+», за да намалите степента на нагряване, натиснете бутона «−», ще светнат съответните контролни лампи. 3 Регулирането на
  • Страница 32 из 45
    менти на капачето (4) и го дръпнете към себе си, почистете капачето с помощта на четка, почистете мрежестия филтър, намиращ се под капачето, и сложете обратно капачето на мястото му. ●● Корпусът на сешоара може да се изтрие с влажна кърпа, а след това да се подсуши. СЪХРАНЕНИЕ ●● Ако сешоарът не се
  • Страница 33 из 45
    UA Шановні Клієнти! Вітаємо Вас із вибором нашого пристрою та ласкаво просимо до спільноти користувачів товарів Zelmer. Для того, щоб отримати найкращі результати, ми рекомендуємо використовувати тільки оригінальні аксесуари компанії Zelmer. Вони спроектовані спеціально для цього продукту. Просимо
  • Страница 34 из 45
    ●● Тримайте кабель електроживлення подалі від гаря- чих поверхонь. ●● Перед відкладенням ручного фену дайте йому охолонути. ●● Не виймайте штепсельну вилку, тягнучи за кабель електроживлення, а лише за саму штепсельну вилку. ●● Не намотуйте кабель електроживлення довкола фену (небезпека обривання
  • Страница 35 из 45
    Контрольна лампочка функції «Іонізація» Захист входу повітря, що знімається Кнопка включення/виключення (ON/OFF) Кнопка вибору ступені нагріву (Heat +/−, 4 ступені) Кнопка вибору швидкості надуву повітря Speed +/−, 4 ступені) 8 „Вушко” для підвішування 9 Кнопка надуву холодного повітря 3 4 5 6 7
  • Страница 36 из 45
    3 Регулювання швидкості надуву потоку повітря здійснюється кнопками (7) «Speed +/−». Для збільшення швидкості надуву потоку повітря натисніть кнопку «+», для зменшення швидкості надуву потоку повітря натисніть кнопку «−». Були передбачені 4 швидкості надуву потоку повітря. 4 Для включення надуву
  • Страница 37 из 45
    ЗБЕРІГАННЯ ●● Якщо не користуєтесь феном, вийміть кабель з розетки. ●● Після користування зачекайте до охолодження фена i покладіть його у сухому, холодному, недоступному для дітей місці. ●● Забороняється змотувати живильний кабель навколо фена, тому що це несе ризик передчасного зносу і прориву
  • Страница 38 из 45
    EN Dear Customers! Congratulations on your choice of our appliance, and welcome among the users of Zelmer products. In order to achieve best possible results we recommend using exclusively original Zelmer accessories. They have been specially designed for this product. Please read these
  • Страница 39 из 45
    CAUTION: In order to ensure additional protection it is recommended to equip electric circuit supplying the bathroom with a residual current device (RCD) with a residual current not exceeding 30 mA. In this respect a specialized electrician is to be addressed. Safety instructions This hair dryer is
  • Страница 40 из 45
    How to use IONIC CONDITIONING Ionic conditioning switches on automatically when the hair dryer is switched on. The control lamp (3) will light up. Negative ions are generated which reduce the gathering of electric charges on hair. They also allow hair to absorb more moisture thanks to which hair is
  • Страница 41 из 45
    STORAGE ●● When not in use, unplug the appliance. ●● After use allow the hair dryer to cool and store out of reach of children in a dry and cool place. ●● Never wrap the cord around the appliance, as this will cause the cord to wear prematurely and break. Handle the cord carefully to ensure its
  • Страница 42 из 45
    GW33-017_v02
  • Страница 43 из 45
    GW33-017_v02
  • Страница 44 из 45
    GW33-017_v02
  • Страница 45 из 45