6
GB
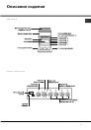
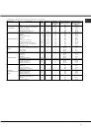
Cooking modes
! A temperature value can be set for all cooking modes
between 50°C and Max, except for the following modes
• GRILL and DOUBLE GRILL (recommended: set
only to MAX power level).
• FAN-ASSISTED DOUBLE GRILL (recommended:
do not exceed 200°C).
a
a
a
a
a
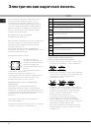
STATIC OVEN
STATIC OVEN
STATIC OVEN
STATIC OVEN
STATIC OVEN
mode
Both the top and bottom heating elements will be
activated. When using this traditional cooking mode,
it is best to use only one rack at a time, otherwise
the heat will not be distributed evenly.
b
b
b
b
b
FAN OVEN
FAN OVEN
FAN OVEN
FAN OVEN
FAN OVEN
mode
The top and bottom heating elements will switch on
and the fan will begin to operate. Since the heat
remains constant throughout the oven, the air cooks
and browns food in a uniform manner. A maximum
of two racks may be used at the same time.
c
c
c
c
c
GRILL
GRILL
GRILL
GRILL
GRILL
mode
The central part of the top heating element is
switched on. The high and direct temperature of the
grill is recommended for food that requires a high
surface temperature (veal and beef steaks, fillet
steak and entrecôte). This cooking mode uses a
limited amount of energy and is ideal for grilling
small dishes. Place the food in the centre of the
rack, as it will not be cooked properly if it is placed
in the corners.
2
2
2
2
2
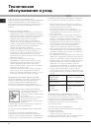
DOUBLE GRILL
DOUBLE GRILL
DOUBLE GRILL
DOUBLE GRILL
DOUBLE GRILL
mode
The top heating element and the rotisserie spit will
be activated.
This provides a larger grill than the normal grill
setting and has an innovative design that improves
cooking efficiency by 50% and eliminates the cooler
corner areas. Use this grilling mode to achieve a
uniform browning on top of the food.
T
T
T
T
T
DOUBLE GRILL
mode
The top heating element and the turnspit are
activated and the fan begins to operate. This
combination of features increases the effectiveness of
the unidirectional thermal radiation of the heating
elements through forced circulation of the air
throughout the oven. This prevents the food from
burning on top by enabling heat to penetrate into the
food more effectively; it is therefore an ideal way of
cooking food quickly under the grill or for grilling large
pieces of meat without having to use the turnspit.
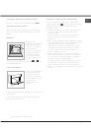
! The GRILL, DOUBLE GRILL and FAN-ASSISTED
DOUBLE GRILL cooking modes must be performed
with the oven door shut.
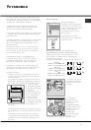
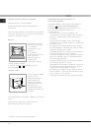
! When using the GRILL and DOUBLE GRILL cooking
modes, place the rack in position 5 and the dripping pan
in position 1 to collect cooking residues (fat and/or
grease). When using the FAN-ASSISTED DOUBLE GRILL
cooking mode, place the rack in position 2 or 3 and the
dripping pan in position 1 to collect cooking residues.
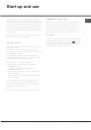
Electronic timer
This function displays the time and works as a timer
which counts down to zero.
! All functions will be implemented approximately 7
seconds after they have been set.
Resetting the clock
After the appliance has been connected to the power
supply, or after a power cut, the clock display will
begin to blink, showing the figure: 0:00
0:00
0:00
0:00
0:00
• Press button
G
G
G
G
G
and then buttons
-
and
+
to set
the exact time. Press and hold the buttons to
quicken the count upwards.
Any necessary modifications can be made by
repeating the above process.
Timer feature
This function may be accessed by pressing the
nnnnn
button, after which the display will show the symbol
nnnnn
. Every time the
+
button is pressed it corresponds
to a time increase of 10 seconds, until it reaches 99
minutes and 50 seconds. After this point, each press
of the button represents an increase of one minute,
up to a maximum of 10 hours.
Pressing the
-
button reduces the time.
After the time period has been set, the timer will
begin to count down. When the timer reaches zero,
the buzzer will sound (this may be stopped by
pressing any button).
The time may be displayed by pressing the
G
G
G
G
G
button, and the
nnnnn
symbol indicates that the timer
function has been set. After approximately 7 seconds,
the display will automatically revert to the timer.