P4)
ON/+ Motor:
Liga o motor e aumenta a velocidade do motor até à velocidade máxima
P5)
ON/OFF:
Activa/desactiva o Sensor( modo de funcionamento AUTOMÁTICO ou MANUAL).
No modo de funcionamento Automático o Led L2 está aceso e o led L1 indica a velocidade que está em execução.
No modo de funcionamento manual o Led 2 está apagado
L1)
4 Leds:
são 4 leds VERDES.
Indicam a velocidade definida
L2)
4 Leds:
VERDE indica o Modo de funcionamento AUTOMÁTICO
APAGADO indica o Modo de funcionamento MANUAL
VERMELHO indica Reset dos Filtros
RESET FILTROS:
aparece indicado, durante 30", quando o Motor estiver Desligado:
Ao fim de 30h o led L2 passa a VERMELHO fixo.
Ao fim de 120h o led L2 passa a VERMELHO intermitente
É feito o reset através de P3
SENSIBILIDADE:
Premindo P5 e P4 ao mesmo tempo quando se estiver no modo manual, entra se no modo de
funcionamento sensibilidade. A sensibilidade definida será evidenciada através dos 4 leds verdes.
Utilizando os botões P3(-) e P4(+), o utilizador poderá definir a sensibilidade desejada (Fig.21/A).
Premindo P5, o utilizador memoriza a sensibilidade e regressa ao modo de funcionamento manual
Filtros anti-gordura
: os filtros anti-gordura necessitam de atenção especial, porque devem de ser limpos
periodicamente, ou seja, sempre que aparecer o alarme dos filtros anti-gordura. Para instruções sobre o Alarme dos filtros
consultar o parágrafo intitulado Comandos. Desmontar os filtros como indicado no ponto 1 e lavá-los com detergente neutro.
Filtros de carvão
: em caso de utilização do aparelho na versão filtrante, é necessário substituir os filtros de carvão
periodicamente, ou seja, sempre que aparecer o alarme dos filtros de carvão. Para instruções sobre o Alarme dos filtros
consultar o parágrafo intitulado Comandos. Desmontagem do filtro de carvão: antes de mais, começar por desmontar os
filtros anti-gordura. Empurrar o retentor do filtro para dentro (Fig. 18) e retirar o filtro de carvão das respectivas sedes
de encaixe. Colocar o filtro de carvão novo, que deve ser do mesmo tipo, invertendo a ordem de sucessão das operações
descritas.
Iluminação
: para substituir as lâmpadas halogénias abrir a tampa fazendo alavanca nas fendas apropriadas (Fig.22).
Substituir com lâmpadas do mesmo género.
NEDERLANDS
BESCHRIJVING
Deze afzuigkap is voorzien van een volledig automatisch systeem (Advanced Sensor Control) om alle
functies van de afzuigkap te besturen. Dankzij de Advanced Sensor Control, wordt de lucht in de keuken altijd
schoon en vrij van luchtjes gehouden, zonder dat de gebruiker ook maar iets hiervoor hoeft te doen. De
geavanceerde sensoren kunnen elke soort van lucht, damp, rook of warmte opvangen die veroorzaakt wordt
door het kookproces. De ASC vangt ook een eventuele en abnormale aanwezigheid op van GAS in het vertrek.
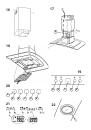
Het apparaat kan in de filterversie, de afzuigversie en in de versie met een externe motor gebruikt worden. In de
filtreerversie
worden de door het apparaat aangezogen lucht en dampen gezuiverd in het koolstoffilter en via luchtroosters
in de pijp (Fig. 1) weer in het vertrek geleid. LET OP: Bij het gebruik in de filterversie dient er een koolstoffilter en een
luchtgeleideplaat (Fig. 1A) gebruikt te worden, die in het bovenste gedeelte van het frame geplaatst moet worden, zodat
de lucht weer in het vertrek kan stromen. In de
afzuigversie
worden de kookluchtjes en –dampen via een afvoerpijp door
de muur of het plafond rechtstreeks naar buiten geleid (Fig. 2).
In de
versie met een externe motor
(Fig. 3) dient er een
afzonderlijk werkende afzuigregeleenheid op het apparaat aangesloten te worden, waarbij het apparaat als verbindingsbasis
van de af te voeren lucht gebruikt wordt.
Gebruik uitsluitend de regeleenheden die in de originele catalogus staan
vermeld
.
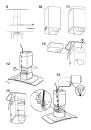
INSTALLATIE
LET OP: Dit apparaat moet door minstens twee personen gemonteerd worden. De installatie kan het beste
overgelaten worden aan vakmensen. Bovendien raden wij u aan om alle montagefases zorgvuldig op te volgen en
na de installatie te controleren of het apparaat stevig vastzit.
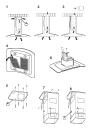
Alvorens het apparaat te monteren moet u de
antivetfilters
verwijderen zodat u het apparaat makkelijker kunt hanteren:
duw ter hoogte van de handgreep de pal naar binnen en trek het filter naar beneden (Fig. 4).
Essentiële eisen voor de montage: – Bereid de elektrische voeding voor binnen in de uitschuifbare buis. – Als uw
apparaat in de afzuigversie of in de versie met een externe motor geïnstalleerd moet worden dan moet er een luchtafvoergat
gemaakt worden.
Om zowel in de afzuigversie als in de versie met een externe motor optimale omstandigheden te creëren, dient er
een
luchtafvoerpijp
gebruikt te worden die de volgende eigenschappen heeft: minimum benodigde lengte, zo min mogelijk
bochten (maximaal toegestane hoek van de bochten: 90°), het materiaal moet goedgekeurd zijn volgens de voorschriften