CLOCK
[MENU’] > [+/-] > ”To select CLOCK: key OK. For other function: +/-”
[OK] > “To adjust +/-, OK to confirm. “
AIR-REFRESH
[MENU’] > [+/-] > ”To select AIR-REFRESH: key OK. For other function: +/-”
SENSOR SENSIBILITY LEVEL
[MENU’] > [+/-] > ”To select SENSOR SENSIBILITY: key OK. For other function: +/-”
[OK] > “To adjust +/-, OK to confirm.”
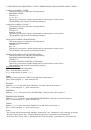
LANGUAGE
[MENU’] > [+/-] > ”To select LANGUAGE: key OK. For other function: +/-”
[OK] > “To set +/-, OK to confirm. “
Note:
- If the fonction is active replace “To select” by “To deactivate” (except for the language).
- Reset 30h: “Cleaning the grease filters. To reset: key OK”.
- Reset 120h: “Replacing the charcoal filters. To reset: key OK”.
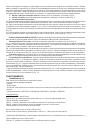
Remote Control (OPTIONAL):
Fig. 19
Key A = motor ON/OFF.
Key B = makes speed of motor higher.
Key C = speed of motor lower.
Key D = lights ON/OFF.
Attention: the remote control needs a special care. Avoid it to come into contact with water and clean it periodically
in order to avoid any grease deposit. The remote control must be fed by a 9V, “Transistor” type battery. To get to
the battery seat, pull the cover of the remote control (as indicated in Figure 20) making it slip towards the outside.
Get rid of the empty batteries safely, using the appropriate containers. In case you would have to eliminate the remote
control, remember that you should first take the batteries off.
Grease filters: special attention must be given to the grease filters which must be periodically cleaned, whenever
the grease filter alarm trips (sliding writings).
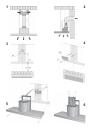
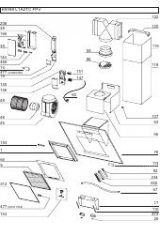
Removing the grease filter/s : refer to Fig.12 or Fig.13 depending on the model purchased.
Fig.12: Remove the grease filters by pushing the catch towards the rear of the hood and turning the filters outwards.
Fig.13: Turn the panel gripping it from the font part of the hood. Remove the grease filters by pushing the catch towards
the rear of the hood and turning the filter outwards.
Wash the grease filter/s with neutral detergent.
Charcoal filter: if the filtering version appliance is used, the charcoal filter will have to be periodically replaced when
the charcoal filters alarm trips (sliding writings).
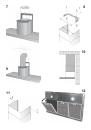
Removing the charcoal filter: refer to Fig.12 or Fig.13 depending on the model purchased.
Fig.12: Remove the grease filters by pushing the catch towards the rear of the hood and turning the filters outwards.
Then remove the charcoal filter (Fig. 14). Push the catch towards the inside and turn the filter so that the 2 filter clips
slip out of their seats.
Fig.13: Turn the panel gripping it from the front part of the hood. Remove the grease filter by pushing the catch towards
the rear of the hood and turning the filter outwards. Then remove the charcoal filter (Fig. 14). Push the catch towards
the inside and turn the filter so that the 2 filter clips slip out of their seats.
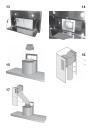
Lighting:to replace the halogen lamps, open the cover by prising in the slots (Fig. 21). Replace with lamps of the
same type. WARNING: Do not touch the new lamp with bare hands.
IMPORTANT
Only for models with perimeter extraction (example the model shown in Fig.13 with opening panel): in the event of strong
vapour concentrations, condensation could form in the lower part of the hood; this is not a defect, nor does it affect normal
operation of the hood.