Инструкция для DIMPLEX Alexandria Cavendish

(скачивание инструкции бесплатно)
Формат файла: PDF
Доступность: Бесплатно как и все руководства на сайте. Без регистрации и SMS.
Дополнительно: Чтение инструкции онлайн
background image

Installation Instructions


Before installing this appliance, we recommend that;

1. You have your chimney cleaned by a competent 

chimney sweep.

2. You block off the chimney flue. 

This procedure is important for the efficient operation 

of the heating unit and will also reduce heat loss up the 

chimney.

Installation.

Ensure that all packing items are removed (read any 

warning labels carefully).

Retain all packing for possible future use, in the event 

of moving or returning the appliance to your supplier.

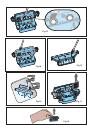
To install the appliance;

1. Remove the fireplace grate, ashpan etc.

2. The ashbed grate should be stored away for possible 

future use.

3. Clean the hearth of any ash residue or dust etc.

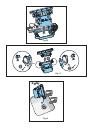
At the rear of the appliance, two adjustable supports are 

provided for levelling, where the base of the fireplace 

opening is raised above the level of the hearth.

You are now ready to install the electric fire into your 

fireplace.

Make sure the unit is switched 

OFF.

Hold the fire by the sides of surround and gently 

manoeuvre into position. Plug the fire into a 13amp/240 

volt outlet. Ensure that the supply cable exits at the front 

of the fire, at the right or left hand corner to suit your 

supply socket location and is not trapped under the fire 

such that it might cause it to be damaged.

Before using the manual controls firstly fill the water 

tank (See ‘Maintenance’, ‘Filling the water tank’).
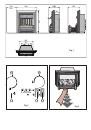
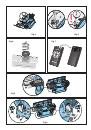
Manual Controls.


The Opti-myst Manual controls are located beneath the 

hinged canopy cover. Raise the canopy cover to access the 

controls. (See Fig.2 for Manual Control lay out)

Switch ‘A’:- Controls the electricity supply to the heater.

Note: This switch must be in the ‘ON’ ( 

) position for the 

heater to operate with or without heat.

Switch ‘B’:- Controls the function of the fire. 

Press   once to turn on flame effect

. This will be  

indicated by one beep.

Although the main lights operate immediately it will 

take a further 30 seconds before the flame effect 

starts.

Press   again to give flame effect and half heat.


This will be indicated by two beeps.

Press   again to give flame effect and full heat

This will be indicated by three beeps.

Press   again to return to flame effect only

.

This will be indicated by one beep.

Press   to put fire in to standby mode. 

This will be indicated by one beep.

Control Knob ‘C’:- Controls the intensity of the flame


effect. 

Turning the control knob Clockwise increases 

the flame effect, turning the control knob Anti 

Clockwise will decrease the flame effect.

Control Knob ‘D’:- Controls the Electronic Thermostat 

setting. 

Turning the control knob Clockwise will decrease 

the temperature setting, turning the control knob 

Anti Clockwise will increase the temperature setting.

LED ‘E’:- When this is illuminated it indicates that the water 

tank is empty. You will hear two beeps.

When the water is empty the main lamps go out. See 

instructions under ‘Maintenance’, ‘Filling the water tank’. 

When this procedure is complete, the main lamps will 

illuminate but it will take 30 seconds before the flames 

return. 


Electronic Thermostat


The thermostat controls the heat output according to the 

room temperature. This ensures that the heater will not 

produce heat unnecessarily when the room is warm.

To set the temperature you require, turn the thermostat 

control knob ‘D’ (See Fig.2)  Anti-Clockwise until the 

desired temperature is reached. Alternatively to heat 

a cold room quickly, turn the thermostat control knob 

‘D’ (See fig.2)  up fully. When the room has reached the 

desired temperature, turn the thermostat control knob 

‘D’ (See Fig.2) clockwise until the desired heat setting is 

achieved.

The heater will now automatically operate at this 

temperature.

Remote Control Operation

On the control panel, Switch A (see Fig.2) must be in the 

‘ON’ 

( I )

 position in order for the remote control to oper-

ate. There are 3 buttons on the remote control. (See Fig.7)

To operate correctly the remote must be pointed towards 

the front fuel effect.

The remote control functions are as follows:

Press once to turn on Flame effect only.

This will be indicated by one beep.

Press once to turn on Half heat and Flame 

effect.

This will be indicated by two beeps.

Press again to turn on Full heat and Flame 

effect

.

This will be indicated by three beeps.       

Standby 

This will be indicated by one beep.


1
2
3
4
5
6
7
8
9
10
11
12
13
14
15
16
Оглавление инструкции
  • Страница 1 из 17
    Cavendish CSH20, Chesford CSD20 UK RU 08/50894/0 Issue 0 The product complies with the European Safety Standards EN60335-2-30 and the European Standard Electromagnetic Compatibility (EMC) EN55014, EN60555-2 and EN60555-3 These cover the essential requirements of EEC Directives 2006/95/EC and
  • Страница 2 из 17
    590 310 350 160 657 300 Min. 405 310 Fig.1 Fig.2 Fig.3
  • Страница 3 из 17
    Fig.5 Fig.4 Fig.6 Fig.7 Fig.8 Fig.9
  • Страница 4 из 17
    Fig.10 Fig.11 Fig.12
  • Страница 5 из 17
    Fig.13 Fig.14 Fig.15 Fig.16 Fig.17 Fig.18
  • Страница 6 из 17
    Dimplex Opti-myst Inset Fires Model: Cavendish CSH20 (Brass Inset), Chesford CSD20 (Titanium Inset) UK IMPORTANT: THESE INSTRUCTIONS SHOULD BE READ CAREFULLY AND RETAINED FOR FUTURE REFERENCE Important Safety Advice: When using electrical appliances, basic precautions should always be followed to
  • Страница 7 из 17
    Installation Instructions Before installing this appliance, we recommend that; 1. You have your chimney cleaned by a competent chimney sweep. 2. You block off the chimney flue. This procedure is important for the efficient operation of the heating unit and will also reduce heat loss up the chimney.
  • Страница 8 из 17
    Battery Information. 1. Unclip the battery cover on the back of the remote control. (See Fig.7) 2. Install AAA batteries into the remote control. 3. Replace the battery cover. Discard leaky batteries. Dispose of batteries in the proper manner according to provincial and local regulations. Any
  • Страница 9 из 17
    Cleaning. WARNING – ALWAYS DISCONNECT FROM THE POWER SUPPLY BEFORE CLEANING THE HEATER. We Recommend cleaning the following components once every 2 weeks, particularly in hard water areas:Water Tank, Sump and Seal, Sump lid, Tank cap and seal, Air filter. For general cleaning use a soft clean
  • Страница 10 из 17
    Troubleshooting Symptom Cause Corrective Action The flame effect will not start. Mains plug is not plugged in. Check plug is connected to wall socket correctly. Switch A is in the ‘ON’ (I) position, but mode Switch B has not been pressed. (See Fig.2) Low water level. Press Switch B once for flame
  • Страница 11 из 17
    Встраиваемые камины Dimplex Opti-myst Модель: Cavendish CSH20 (вставка латунь), Chesford CSD20 (вставка титан) RU ВАЖНАЯ ИНФОРМАЦИЯ. ВНИМАТЕЛЬНО ПРОЧИТАЙТЕ ЭТИ ИНСТРУКЦИИ И СОХРАНИТЕ ИХ ДЛЯ ИСПОЛЬЗОВАНИЯ В БУДУЩЕМ Важная информация по технике безопасности: Чтобы снизить риск воспламенения,
  • Страница 12 из 17
    Указания по установке Перед установкой прибора рекомендуется следующее: 1. Прочистить дымовую трубу - чистка выполняется специалистами специализированной службы. 2. Заблокируйте дымоход. Данная процедура важна в рамках обеспечения эффективной работы нагревательного элемента и уменьшения теплопотерь
  • Страница 13 из 17
    Использование пульта дистанционного управления В режиме дистанционного управления выключатель А (см. рис. 2) на панели управления должен находиться в положении ‘ON’ ( I ). На пульте ДУ имеются 3 кнопки. (См. рис.7) Чтобы обеспечить надлежащую работу пульта ДУ, направляйте его на переднюю панель
  • Страница 14 из 17
    Заполнение бака для воды Если во время первого использования прибора или же в случае включения индикатора уровня воды отсутствует вода и необходимо заполнить бак, прибор подаст 2 звуковых сигнала; в этом случае выполните следующий порядок действий. 1. Нажмите выключатель ‘A’ в положение (0) (см.
  • Страница 15 из 17
    Устранение неисправностей Признак Причина Способ устранения Эффект пламени не включается. Штепсельная вилка не вставлена в розетку сети питания. Убедитесь в том, что штепсельная вилка вставлена в розетку сети питания. Выключатель A находится в положении ‘ON’ (I), при этом, выключатель B не нажат.
  • Страница 16 из 17
    Opti-myst is a trade mark of Dimplex UK Ltd This product is protected by one or more of the following patents : PCT/ EP2005/009774, PCT/ EP2007/002207, GB0717773.6, GB0717772.8, GB0717770.2, GB0809322.1The design of this product is protected by EU Design Rights Opti-myst является торговой маркой
  • Страница 17 из 17