Battery Information.
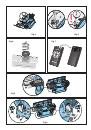
1. Unclip the battery cover on the back of the remote
control. (See Fig.7)
2. Install AAA batteries into the remote control.
3. Replace the battery cover.
Discard leaky batteries
.
Dispose of batteries in the proper manner according to
provincial and local regulations.
Any battery may leak electrolyte if mixed with a different
battery type, if inserted incorrectly, if all the batteries are
not replaced at the same time, if disposed of in a fire, or if
an attempt is made to charge a battery not intended to be
recharged.
Thermal safety cut-out
A thermal safety cut-out is incorporated in the fan heater
to prevent damage due to overheating. This can happen if
the heat outlet was restricted in any way or if the chimney
flue has not been blocked off effectively. If the cut-out
operates, unplug the heater from the socket outlet and
allow approximately 10 minutes before reconnecting.
Before switching the heater back on remove any
obstruction that may be restricting the heat outlet, then
continue normal operation.
Tips for using your appliance.
1. Only pull out the drawer when its time to refill the
water tank or change a lamp, otherwise it may lead to
excess water in the sump and reduced flame effect. If this
happens empty the water from the sump as instructed
under ‘Maintenance’.
2. With the flame setting on minimum the unit will use
approximately 40ml of water per hour and will last 3 times
as long than when it is at maximum flame setting.
3. Do not tilt or move the fire while there is water in the
tank or sump.
4. Make sure that the fire is on a level floor.
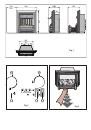
5. The flame control knob ‘C’ Fig.2 may be turned up or
down to give a more realistic effect.
6. Sometimes the flames appear more real when the flame
control knob is turned down.
7. Give the flame generator some time to react to
changes you may make on the flame control knob.
Maintenance
WARNING: ALWAYS DISCONNECT FROM THE POWER
SUPPLY BEFORE ATTEMPTING ANY MAINTENANCE
Changing lamps.
If a large amount of the smoke appears grey or colourless
it may be that one or more lamps have failed.
You can check for lamp failure as follows.
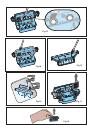
1. Leaving the flame effect on, gently pull the drawer fully
out by the tab. (See Fig.3)
2. View the lamps from a distance in front of the fire and
observe which lamp needs to be changed.
3. Put Switch ‘A’ in the ‘OFF’ position, and unplug the fire
from the mains.
4. Leave the appliance for 20 minutes to allow the lamps
to cool down before removing them.
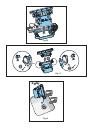
5. Remove the water tank by lifting upwards and place in
a sink.
6. Remove the sump as described in the Cleaning Section.
7. Remove the defective lamp, by gently lifting vertically
and disengaging the pins from the lamp holder, (See Fig.4
and 5). Replace with a Dimplex Opti-myst, 12V, 50W, Gu5.3
base, 8º beam angle, coloured lamp. (Purchased from
www.dimplex.co.uk under the section ‘After Sales Service’,
details of how to purchase the lamps are contained
therein.)
8. Carefully insert the two pins of the new lamp into the
two holes in the lamp holder. Push firmly in place. (See
Fig.4 and 5).
9. Replace the Sump and water tank and carefully close
the drawer.
10. Switch on.
Filling the water tank.
When using the appliance for the first time or when the
water level warning light comes on, you will hear 2 audible
‘beeps’ when the water is empty and the tank needs
refilling, follow these steps.
1. Press Switch ‘A’ to
(0)
(See Fig.2)
2. Gently pull out the drawer as far as possible by the tab.
(See Fig.3)
3. Remove the water tank by lifting upwards and
outwards.
4. Place the water tank in sink and remove cap, Anti-
clockwise to open. (See Fig.6)
5. Fill tank with
filtered tap water only
.
This is necessary
to prolong the life of the flame and smoke producing unit.
The water should be filtered through a conventional
domestic water filter unit and the filter should be replaced
regularly.
6. Screw the cap back on,
do not overtighten
.
7. Return the tank to the sump, with the tank cap facing
down and the flat side of the tank facing outward.
8. Gently push the drawer back in as far as it will go.
9. Press Switch ‘A’ to ‘ON’ (
I
) position (See Fig.2)
10. Press Switch
‘
B’ once to turn on flame effect. (See
manual control section and Fig.2)


Инструкции и руководства похожие на DIMPLEX Alexandria Cavendish


Другие инструкции и руководства из категории каминокомплект