INSTRUCTIONS FOR USE
EN
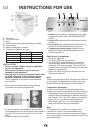
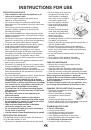
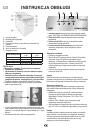
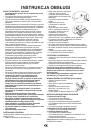
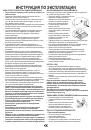
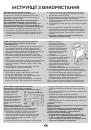
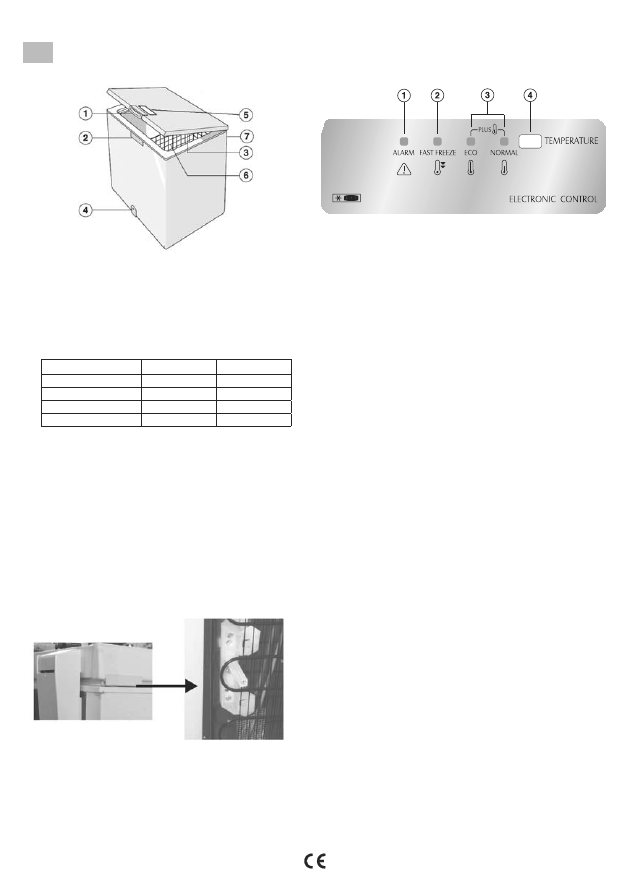
1.
Lid handle.
2.
Lock (if provided).
3.
Seal.
4.
Defrost water drain plug (depending on model).
5.
Control panel.
6.
Basket (depending on model).
7.
Condenser (located at the rear).
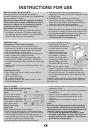
INSTALLATION
•
Refer to chapter “Before using the appliance”.
• Unpack the appliance.
• Remove the 4 protection pieces inserted
between lid and appliance.
• Warning: two of the four protection pieces must
¸»ŰÊÊ»º¿Äʾ»É»·Êżʾ»¹Åĺ»ÄÉ»ÈÆ·ÉÊ¿¹
supports, located at the rear of the product.
This is necessary to ensure the correct distance
from the wall.
• Ensure that the defrosting water drainage plug
(if provided) is correctly positioned (
4
).
• For best operation of the appliance and in order to
avoid damage when the lid is opened, leave a space
of at least 7 cm from the rear wall and 7 cm at the
sides.
• Fit the accessories (if provided).
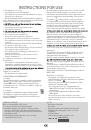
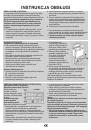
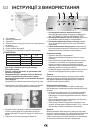
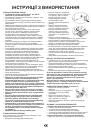
1.
Red LED:
;»ÄŲ·É¾¿Ä½Ƒ¿Ê¿Äº¿¹·Ê»Éʾ·Ê·Ä·Â·ÈÃ
condition is present (see “TROUBLESHOOTING
GUIDE”.
2.
Yellow LED:
indicates that the fast freeze function
is active.
3.
Green LEDS:
they indicate that the appliance is in
operation, and the temperature has been set.
4.
Temperature setting button:
to adjust the set
temperature and to activate/deactivate the fast
freezing operations.
Switching on the appliance
• Plug in the appliance.
• The green LED lights up (“Normal”).
Ʒ ¾»È»ºƺ¿¼ÆȻɻÄÊƻŲ·É¾»ÉÊſĺ¿¹·Ê»Ê¾·Ê
the temperature inside the appliance is not yet
ÉËů¹¿»ÄÊÂÏÂÅͼÅȼÅźÉÊÅÈ·½»Ɣ¾»È»ºÍ¿ÂÂ
ÄÅÈ÷ÂÂÏÉͿʹ¾ÅŮͿʾ¿Äʾ»ŰÈÉÊɿξÅËÈÉ·¼Ê»Èʾ»
appliance is switched on.
• Place food inside the product only when the red
¾·ÉÉͿʹ¾»ºÅŮƔ
Note:
¾·ÄÁÉÊÅʾ»»ů¹¿»ÄÊ¿ºÉ»·ÂƑʾ»·ÆÆ¿·Ä¹»Â¿ºÍ¿ÂÂÄÅÊ
re-open easily immediately after closing. Wait a few
minutes before re-opening the lid of the appliance.
Temperature adjustment
Use the key (
4
) to select the desired temperature.
To adjust the internal temperature, proceed as follows:
• Repeatedly press the key (
4
). Each time the key is
pressed, the set temperature is updated, displaying
the “Normal”, “Eco” and “Plus” values in succession.
• Select “Plus” for a colder storage temperature.
• With partial loads “Eco” is recommended: this
setting will optimize energy consumption.
Note:
The settings will be saved in the memory even
if a power cut occurs. The time needed for the
temperature inside the freezer to reach the set value,
can vary depending on climatic conditions and the set
temperature itself.
Climatic Class
Amb. T. (°C)
Amb. T. (°F)
SN
From 10 to 32 From 50 to 90
N
From 16 to 32 From 61 to 90
ST
From 16 to 38 From 61 to 100
T
From 16 to 43 From 61 to 110