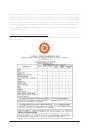
- 81 -
Appendix
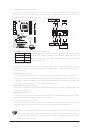
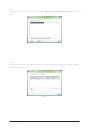
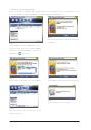
Step 2:
Save changes and exit BIOS Setup.
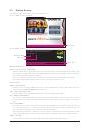
5-1-2 Configuring JMicron JMB362 SATA Controller
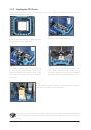
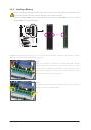
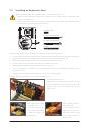
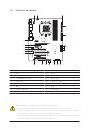
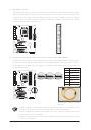
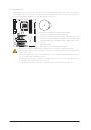
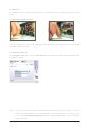
A. Installing SATA hard drive(s) in your computer
Attach one end of the SATA signal cable to the rear of the SATA hard drive and the other end to available
SATA port on the motherboard. The JMicron JMB362 SATA controller controls the eSATA ports on the back
panel. Then connect the power connector from your power supply to the hard drive.
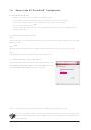
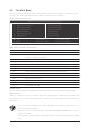
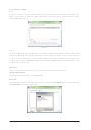
B. Configuring SATA controller mode in BIOS Setup
Make sure to configure the SATA controller mode correctly in system BIOS Setup.
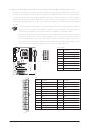
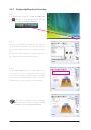
Step 1:
Turn on your computer and press <Delete> to enter BIOS Setup during the POST (Power-On Self-Test).
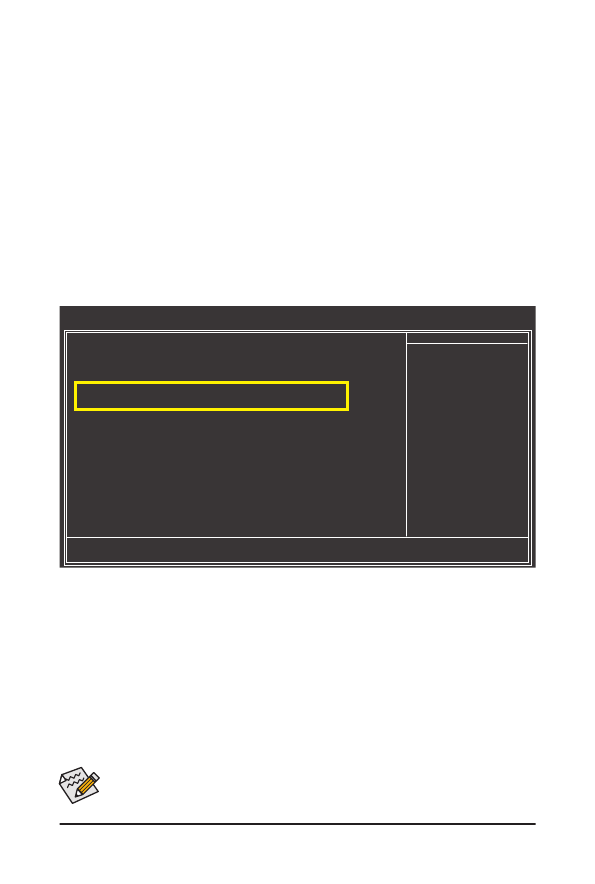
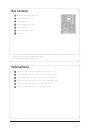
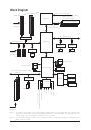
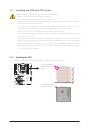
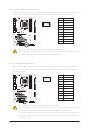
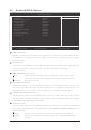
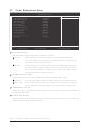
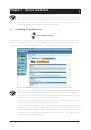
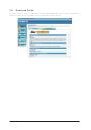
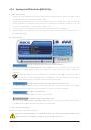
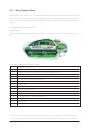
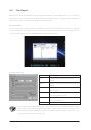
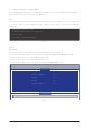
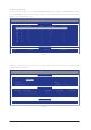
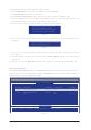
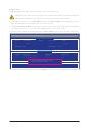
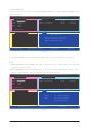
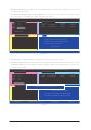
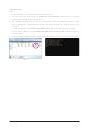
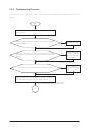
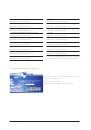
Make sure Onboard ESATA Controller under the Integrated Peripherals menu is enabled (Figure 1). To
create RAID, set Onboard ESATA Mode to RAID.
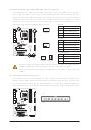
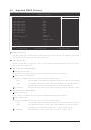
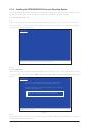
Figure 1
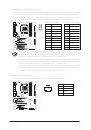
The BIOS Setup menus described in this section may differ from the exact settings for your moth-
erboard. The actual BIOS Setup menu options you will see shall depend on the motherboard you
have and the BIOS version.
CMOS Setup Utility-Copyright (C) 1984-2009 Award Software
Integrated Peripherals
OnChip IDE Channel
[Enabled]
OnChip SATA Controller
[Enabled]
OnChip SATA Type
[RAID]
OnChip SATA Port4/5 Type
[As SATA Type]
Onboard USB 3.0 Controller
[Enabled]
Onboard ESATA Controller
[Enabled]
Onboard ESATA Mode
[RAID]
Onboard LAN Function
[Enabled]
Onboard LAN Boot ROM
[Disabled]
SMART LAN
[Press Enter]
Onboard Audio Function
[Enabled]
Onboard 1394 Function
[Enabled]
Legacy USB storage detect
[Enabled]
Onboard Serial Port 1
[3F8/IRQ4]
OnChip USB Controller
[Enabled]
USB EHCI Controller
[Enabled]
higf
: Move
Enter: Select
+/-/PU/PD: Value
F10: Save
ESC: Exit
F1: General Help
F5: Previous Values
F6: Fail-Safe Defaults
F7: Optimized Defaults
Item Help
Menu Level
 1
1
 2
2
 3
3
 4
4
 5
5
 6
6
 7
7
 8
8
 9
9
 10
10
 11
11
 12
12
 13
13
 14
14
 15
15
 16
16
 17
17
 18
18
 19
19
 20
20
 21
21
 22
22
 23
23
 24
24
 25
25
 26
26
 27
27
 28
28
 29
29
 30
30
 31
31
 32
32
 33
33
 34
34
 35
35
 36
36
 37
37
 38
38
 39
39
 40
40
 41
41
 42
42
 43
43
 44
44
 45
45
 46
46
 47
47
 48
48
 49
49
 50
50
 51
51
 52
52
 53
53
 54
54
 55
55
 56
56
 57
57
 58
58
 59
59
 60
60
 61
61
 62
62
 63
63
 64
64
 65
65
 66
66
 67
67
 68
68
 69
69
 70
70
 71
71
 72
72
 73
73
 74
74
 75
75
 76
76
 77
77
 78
78
 79
79
 80
80
 81
81
 82
82
 83
83
 84
84
 85
85
 86
86
 87
87
 88
88
 89
89
 90
90
 91
91
 92
92
 93
93
 94
94
 95
95
 96
96
 97
97
 98
98
 99
99
 100
100
 101
101
 102
102
 103
103
 104
104
 105
105
 106
106
 107
107
 108
108
 109
109
 110
110
 111
111
 112
112