Appendix
- 86 -
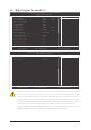
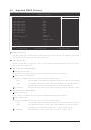
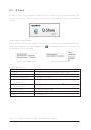
Model Name
RAID Level
Capacity
Status
Members(HDDx)
RDD0: GRAID
0-Stripe
240 GB
Normal
01
[fgTAB]-Switch Window
[hi]-Select ITEM
[ENTER]-Action
[ESC]-Exit
[ RAID Disk Drive List ]
[ Main Menu ]
[ Hard Disk Drive List ]
GIGABYTE Technology Corp. PCIE-to-SATAII/IDE RAID Controller BIOSv1.06.59
Create RAID Disk Drive
Delete RAID Disk Drive
Revert HDD to Non-RAID
Solve Mirror Conflict
Rebuild Mirror Drive
Save And Exit Setup
Exit Without Saving
Model Name
Capacity
Type/Status
HDD0: ST3120026AS
120 GB
RAID Inside
HDD1: ST3120026AS
120 GB
RAID Inside
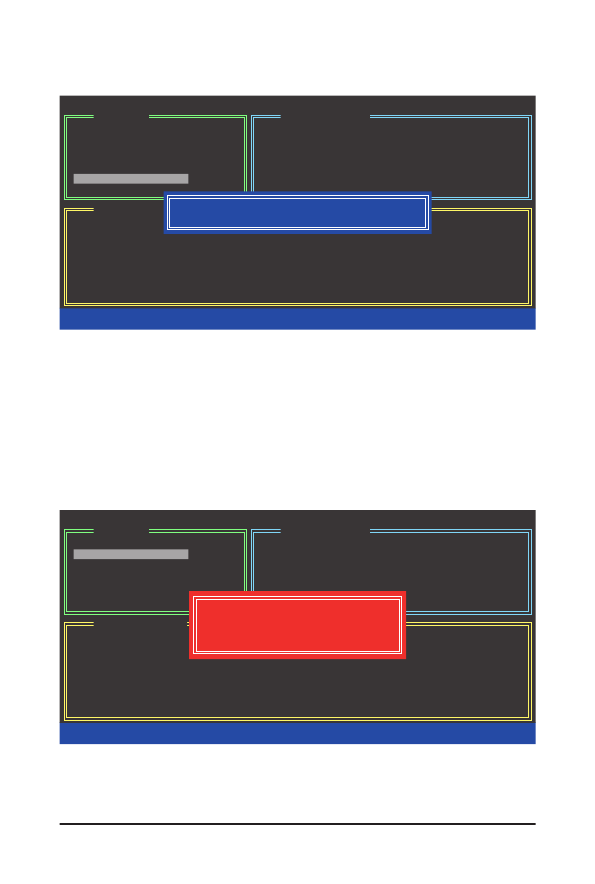
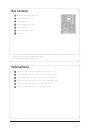
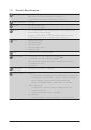
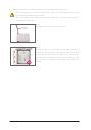
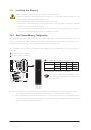
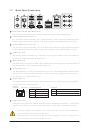
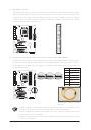
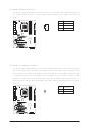
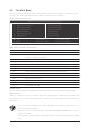
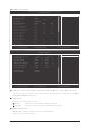
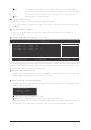
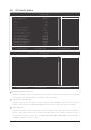
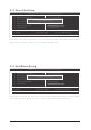
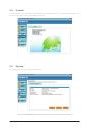
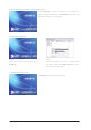
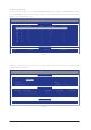
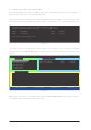
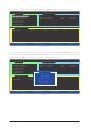
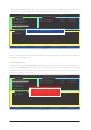
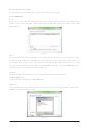
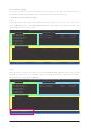
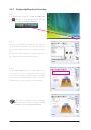
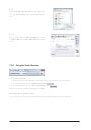
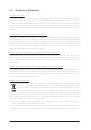
7. Save and Exit Setup: After configuring the RAID array, select the Save And Exit Setup item in the main
screen to save your settings before exiting the RAID BIOS utility, then press <Y> (Figure 10).
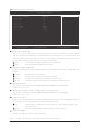
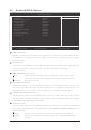
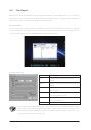
Model Name
RAID Level
Capacity
Status
Members(HDDx)
RDD0: GRAID
0-Stripe
240 GB
Normal
01
[hi]-Select RAID
[SPACE]-Mark Delete
[DEL]-Confirm
[ESC]-Abort
[ RAID Disk Drive List ]
[ Main Menu ]
[ Hard Disk Drive List ]
GIGABYTE Technology Corp. PCIE-to-SATAII/IDE RAID Controller BIOSv1.06.59
Create RAID Disk Drive
Delete RAID Disk Drive
Revert HDD to Non-RAID
Solve Mirror Conflict
Rebuild Mirror Drive
Save And Exit Setup
Exit Without Saving
Model Name
Capacity
Type/Status
HDD0: ST3120026AS
120 GB
RAID Inside
HDD1: ST3120026AS
120 GB
RAID Inside
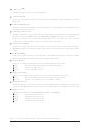
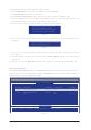
Now, you may proceed to create the SATA RAID/AHCI driver diskette and the installation of the SATA RAID/
AHCI driver and operating system.
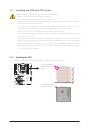
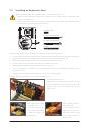
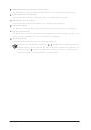
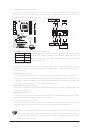
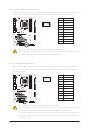
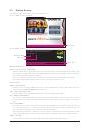
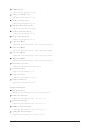
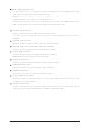
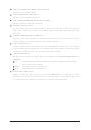
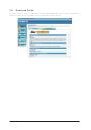
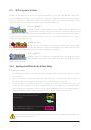
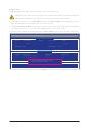
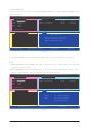
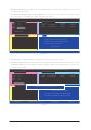
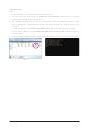
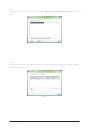
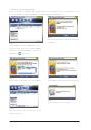
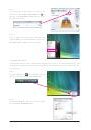
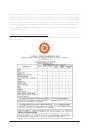
Delete the RAID Array:
To delete the array, select Delete RAID Disk Drive in the main menu and press <Enter>. The selection bar
will move to the RAID Disk Drive List block. Press the space bar on the array to be deleted; a small triangle
will appear to mark the selected array. Press <Delete>. When prompted to confirm your selection (Figure 11),
press <Y> to confirm or <N> to cancel.
Figure 10
Figure 11
Save to Disk & Exit (Y/N) ? Y
ALL DATA ON THE RAID WILL LOST!!
ARE YOU SURE TO DELETE (Y/N) ? N
 1
1
 2
2
 3
3
 4
4
 5
5
 6
6
 7
7
 8
8
 9
9
 10
10
 11
11
 12
12
 13
13
 14
14
 15
15
 16
16
 17
17
 18
18
 19
19
 20
20
 21
21
 22
22
 23
23
 24
24
 25
25
 26
26
 27
27
 28
28
 29
29
 30
30
 31
31
 32
32
 33
33
 34
34
 35
35
 36
36
 37
37
 38
38
 39
39
 40
40
 41
41
 42
42
 43
43
 44
44
 45
45
 46
46
 47
47
 48
48
 49
49
 50
50
 51
51
 52
52
 53
53
 54
54
 55
55
 56
56
 57
57
 58
58
 59
59
 60
60
 61
61
 62
62
 63
63
 64
64
 65
65
 66
66
 67
67
 68
68
 69
69
 70
70
 71
71
 72
72
 73
73
 74
74
 75
75
 76
76
 77
77
 78
78
 79
79
 80
80
 81
81
 82
82
 83
83
 84
84
 85
85
 86
86
 87
87
 88
88
 89
89
 90
90
 91
91
 92
92
 93
93
 94
94
 95
95
 96
96
 97
97
 98
98
 99
99
 100
100
 101
101
 102
102
 103
103
 104
104
 105
105
 106
106
 107
107
 108
108
 109
109
 110
110
 111
111
 112
112