English
11
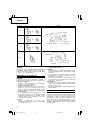
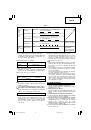
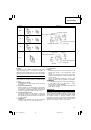
(2) Regarding the temperatures of the rechargeable
battery
The temperatures for rechargeable batteries are as
shown in
Table 2
, and batteries that have become
hot should be cooled for a while before being
recharged.
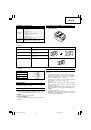
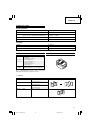
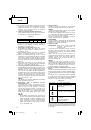
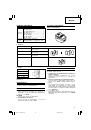
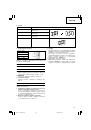
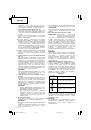
Table 2
Recharging ranges of batteries
(3) Regarding recharging time
Depending on the combination of the charger and
batteries, the charging time will become as shown
in
Table 3
.
Table 3
Charging time (At 20°C)
NOTE:
The charging time may vary according to
temperature and power source voltage.
4. Disconnect the charger’s power cord from the
receptacle.
5. Hold the charger firmly and pull out the battery.
NOTE:
After operation, pull out batteries from the charger
first, and then keep the batteries properly.
How to make the batteries perform longer
(1) Recharge the batteries before they become
completely exhausted.
When you feel that the power of the tool becomes
weaker, stop using the tool and recharge its battery.
Temperatures at
Rechargeable batteries
which the battery
can be recharged
BSL1430
0°C – 40°C
Charger
UC18YRSL
Battery
BSL1430
Approx. 45 min.
If you continue to use the tool and exhaust the
electric current, the battery may be damaged and
its life will become shorter.
(2) Avoid recharging at high temperatures.
A rechargeable battery will be hot immediately after
use. If such a battery is recharged immediately after
use, its internal chemical substance will deteriorate,
and the battery life will be shortened. Leave the
battery and recharge it after it has cooled for a
while.
CAUTION:
䡬
When the battery charger has been continuosly
used, the battery charger will be heated, thus
constituting the cause of the failures. Once the
charging has been completed, give 15 minutes rest
until the next charging.
䡬
If the battery is recharged when it is warm due to
battery use or exposure to sunlight, the pilot lamp
map light in green.
The battery will not be recharged. In such a case,
let the battery cool before charging.
䡬
When the pilot lamp flickers in red (at 0.2-second
intervals), check for and take out any foreign objects
in the charger’s battery installation hole. If there are
no foreign objects, it is probable that the battery
or charger is malfunctioning. Take it to your
authorized Service Center.
PRIOR TO OPERATION
1. Preparing and checking the work environment
Make sure that the work site meets all the conditions
laid forth in the precautions.
2. Checking the battery
Make sure that the battery is installed firmly. If it
is at all loose it could come off and cause an
accident.
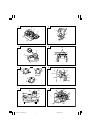
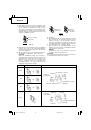
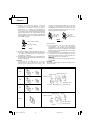
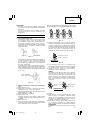
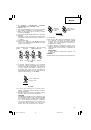
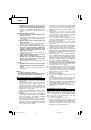
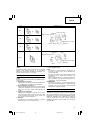
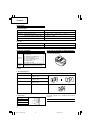
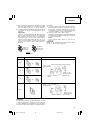
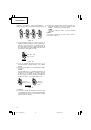
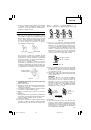
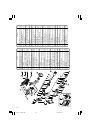
3. Setting the forward/reverse switching button
(1) Push the forward/reverse switching button from the
right as shown in
Fig. 5 (a)
. Cutting is possible.
(2) By setting the forward/reverse switching button in
the lock position as shown in
Fig. 5 (b)
, the motor
will not operate even if the trigger switch is pulled.
When carrying or storing the main unit or when
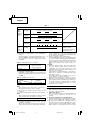
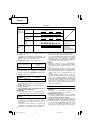
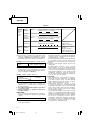
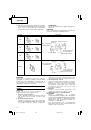
Table 1
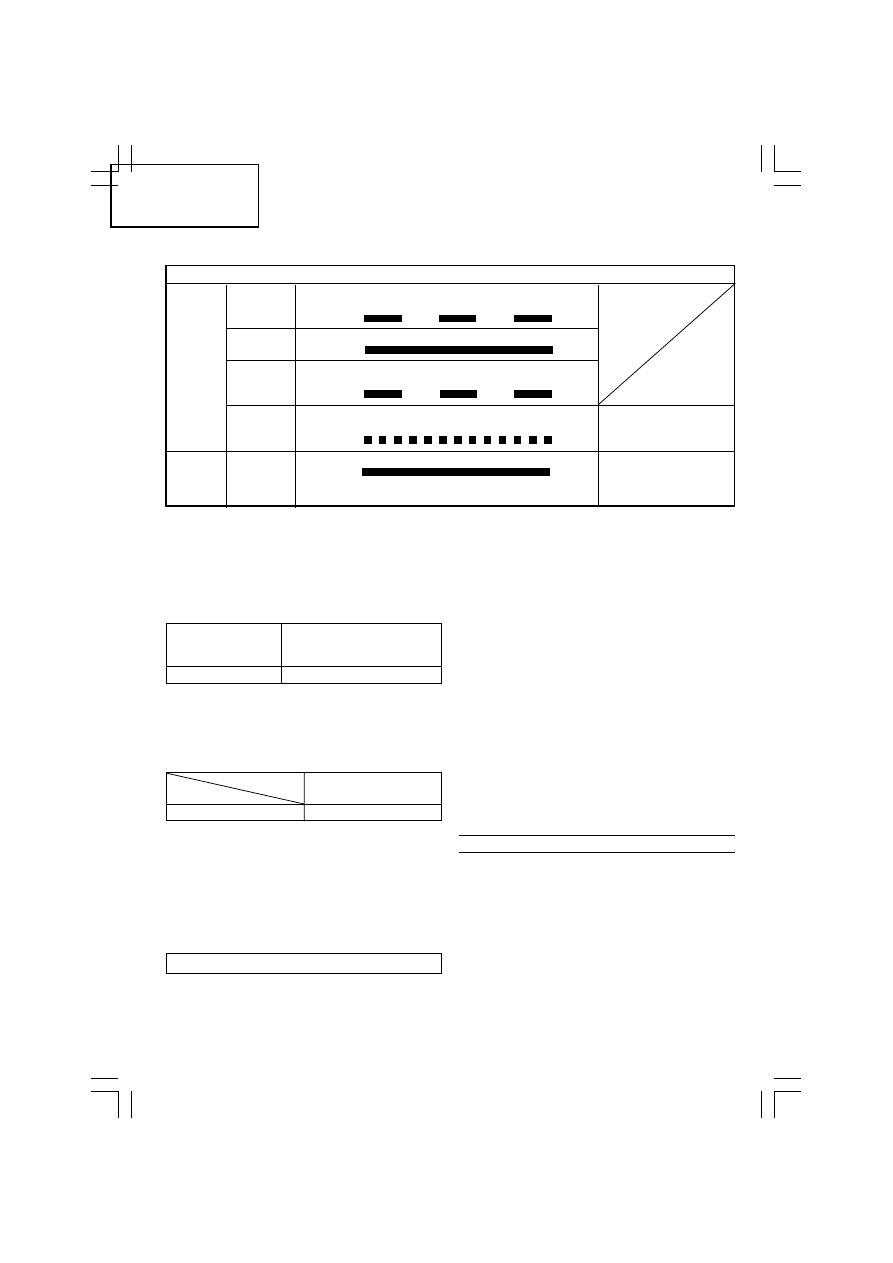
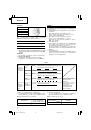
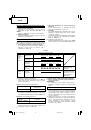
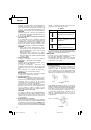
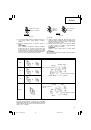
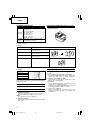
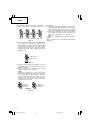
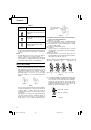
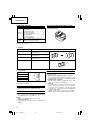
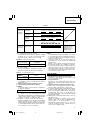
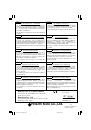
Indications of the pilot lamp
Lights for 0.5 seconds. Does not light for 0.5
seconds. (off for 0.5 seconds)
Lights continuously
Lights for 0.5 seconds. Does not light for 0.5
seconds. (off for 0.5 seconds)
Lights for 0.1 seconds. Does not light for 0.1
seconds. (off for 0.1 seconds)
Lights continuously
Before
charging
While
charging
Charging
complete
Charging
impossible
Blinks
Lights
Blinks
Flickers
Lights
Malfunction in the
battery or the charger
Battery overheated.
Unable to charge
(Charging will commence
when battery cools).
Overheat
standby
The
pilot
lamp
lights or
blinks in
red.
The pilot
lamp
lights in
green.
01Eng_CL14DSL_EE
08/3/26, 18:30
11
 1
1
 2
2
 3
3
 4
4
 5
5
 6
6
 7
7
 8
8
 9
9
 10
10
 11
11
 12
12
 13
13
 14
14
 15
15
 16
16
 17
17
 18
18
 19
19
 20
20
 21
21
 22
22
 23
23
 24
24
 25
25
 26
26
 27
27
 28
28
 29
29
 30
30
 31
31
 32
32
 33
33
 34
34
 35
35
 36
36
 37
37
 38
38
 39
39
 40
40
 41
41
 42
42
 43
43
 44
44
 45
45
 46
46
 47
47
 48
48
 49
49
 50
50
 51
51
 52
52
 53
53
 54
54
 55
55
 56
56
 57
57
 58
58
 59
59
 60
60
 61
61
 62
62
 63
63
 64
64
 65
65
 66
66
 67
67
 68
68
 69
69
 70
70
 71
71
 72
72
 73
73
 74
74
 75
75
 76
76
 77
77
 78
78
 79
79
 80
80
 81
81
 82
82
 83
83
 84
84
 85
85
 86
86
 87
87
 88
88
 89
89
 90
90
 91
91
 92
92
 93
93
 94
94
 95
95
 96
96
 97
97
 98
98
 99
99
 100
100
 101
101
 102
102
 103
103
 104
104
 105
105
 106
106
 107
107
 108
108
 109
109
 110
110
 111
111
 112
112