9
English
CAUTION
If the pilot lamp does not light up, pull out the
power cord from the receptacle and check the
battery mounting condition.
The pilot lamp goes off to indicate that the battery is
fully charged.
CAUTION
If the battery is heated due to direct sunlight, etc.,
just after operation, the charger pilot lamp may
not light. At that time cool the battery first, then
start charging.
䡬
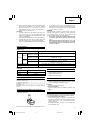
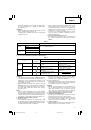
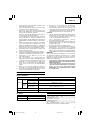
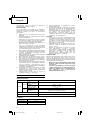
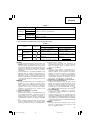
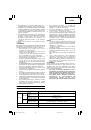
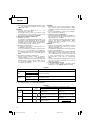
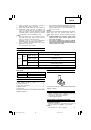
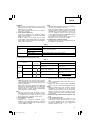
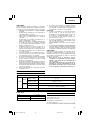
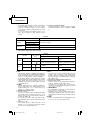
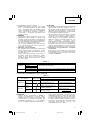
Regarding recharging time
Table 1
shows the recharging time required according
to the type of battery.
NOTE:
The recharging time may vary according to the
ambient temperature.
3. Disconnect the charger’s power cord from the
receptacle.
4. Hold the charger firmly and pull out the battery.
NOTE
Be sure to pull out the battery from the charger after
use, and then keep it.
Regarding electric discharge in case of new
batteries, etc.
As the internal chemical substance of new batteries
and batteries that have not been used for an extended
period is not activated, the electric discharge might
be low when using them the first and second time.
This is a temporary phenomenon, and normal time
required for recharging will be restored by recharging
the batteries 2 – 3 times.
How to make the batteries perform longer
(1) Recharge the batteries before they become completely
exhausted.
When you feel that the power of the tool becomes
weaker, stop using the tool and recharge its battery.
If you continue to use the tool and exhaust the electric
current, the battery may be damaged and its life will
become shorter.
(2) Avoid recharging at high temperatures.
A rechargeable battery will be hot immediately after
use. If such a battery is recharged immediately after
use, its internal chemical substance will deteriorate,
and the battery life will be shortened. Leave the battery
and recharge it after it has cooled for a while.
CAUTION:
䡬
When the battery charger has been continuously used,
the battery charger will be heated, thus constituting
the cause of the failures. Once the charging has been
completed, give 15 minutes rest until the next
charging.
䡬
If the battery charger does not work while the battery
is mounted correctly, it is probable that the battery or
charger is malfunctioning. Take it to your authorized
Service Center.
PRIOR TO OPERATION
1. Setting up and checking the work environment
Check if the work environment is suitable by following
the precautions.
HOW TO USE
How to make the batteries perform longer
䡬
Recharge the batteries before they become completely
exhausted.
When you feel that the power of the tool becomes
weaker, stop using the tool and recharge its battery.
If you continue to use the tool and exhaust the electric
current, the battery may be damaged and its life will
become shorter.
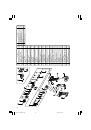
1. Confirm the clutch dial position (See Fig. 4)
The tightening torque of this unit can be adjusted
according to the clutch dial position, at which the
clutch dial is set.
(1) When using this unit as a screwdriver, line up the one
of the numbers “1, 5, 9 ... 21” on the clutch dial, or the
dots, with the triangle mark on the outer body.
(2) When using this unit as a drill, align the clutch dial
drill mark “
” with the triangle mark on the outer
body.
CAUTION
䡬
The clutch dial cannot be set between the numerals
“1, 5, 9 ... 21” or the dots.
䡬
Do not use with the clutch dial numeral between
“21” and the line at the middle of the drill mark.
Doing so may cause damage (See
Fig. 5
).
2. Tightening torque adjustment
(1) Tightening torque
Tightening torque should correspond in its intensity
to the screw diameter. When too strong torque is
used, the screw head may be broken or be injured.
Be sure to adjust the clutch dial position according to
the screw diameter.
(2) Tightening torque indication
The tightening torque differs depending on the type
of screw and the material being tightened.
The unit indicates the tightening torque with the
numbers “1, 5, 9 ... 21” on the clutch dial, and a dots.
The tightening toque at position “1” is the weakest
and the torque is strongest at the highest number
(See
Fig. 4
).
(3) Adjusting the tightening torque
Rotate the clutch dial and line up the numbers “1, 5, 9
... 21” on the clutch dial, or the dots, with the triangle
mark on the outer body. Adjust the clutch dial in the
weak or the strong torque direction according to the
torque you need.
CAUTION
䡬
The motor rotation may be locked to cease while the
unit is used as drill. While operating the driver drill,
take care not to lock the motor.
䡬
Too long hammering may cause the screw broken
due to excessive tightening.
3. Change rotation speed
Operate the shift knob to change the rotational speed.
Move the shift knob in the direction of the arrow (See
Figs. 8
and
9
).
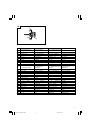
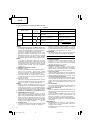
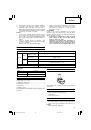
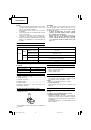
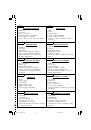
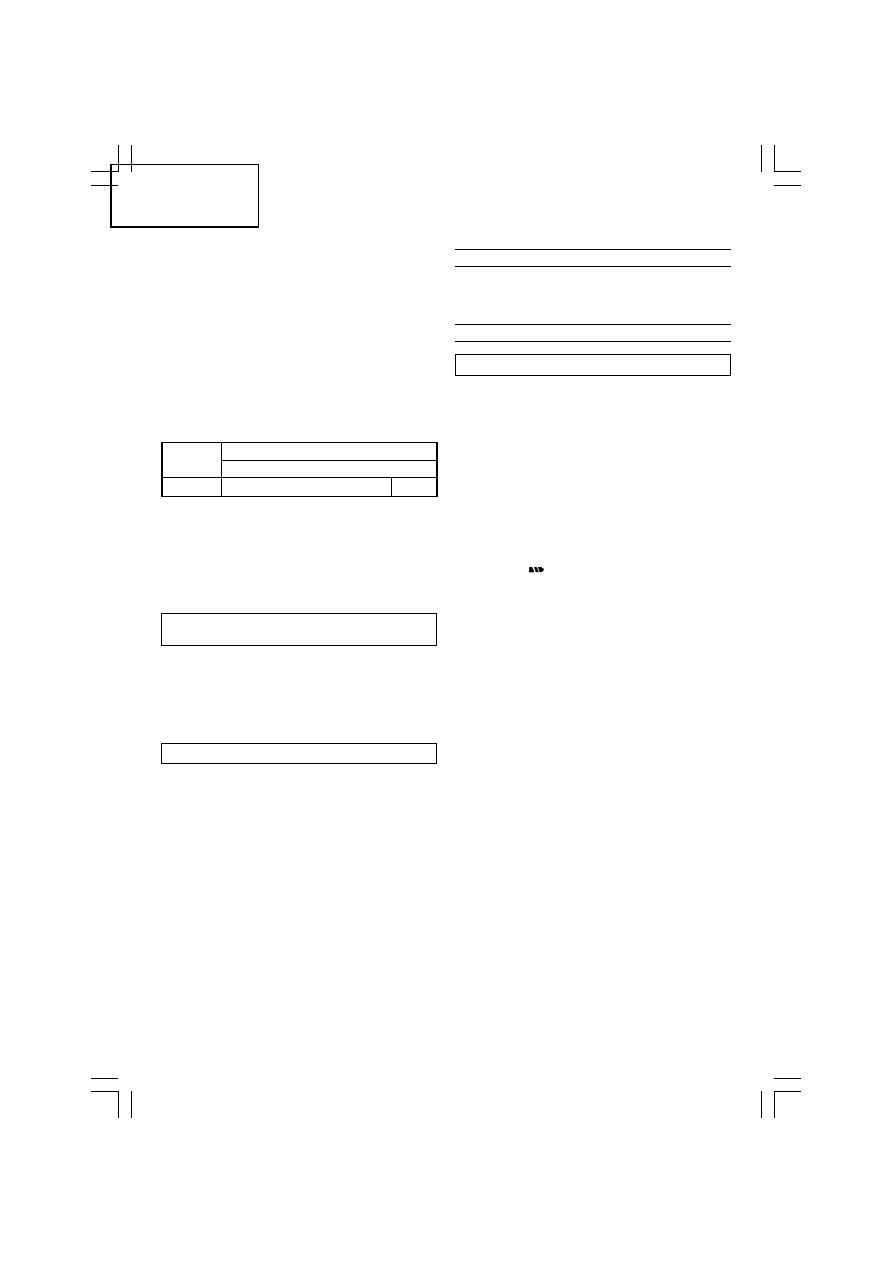
Table 1
Recharging time (approx. min.) at 20°C
Battery
voltage
(V)
Battery capacity (Ah)
1.5 Ah
10.8 V
BCL1015
40 min.
01Eng_DS10DFL_EE
10/4/30, 09:50
9