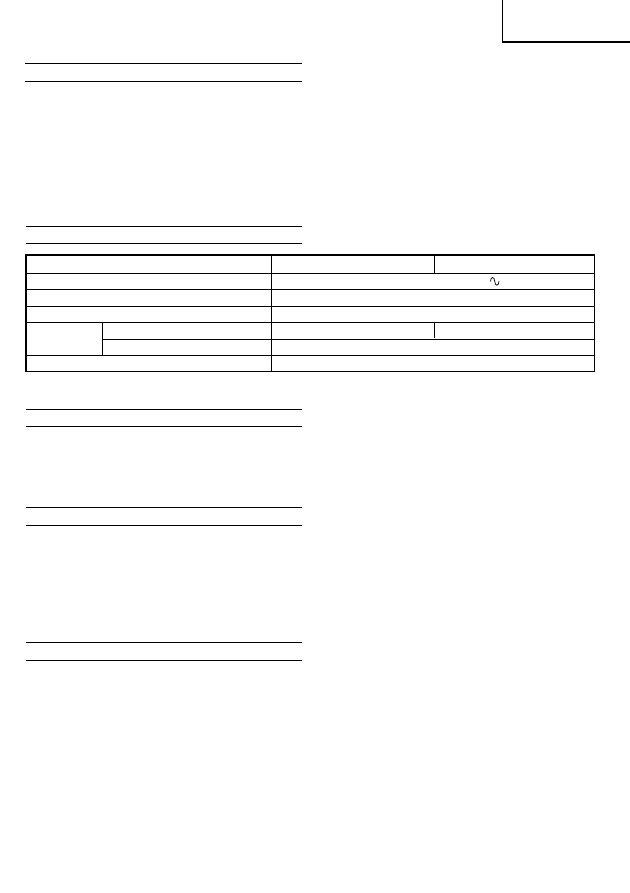
Инструкция для HITACHI G13SE2

(скачивание инструкции бесплатно)
Формат файла: PDF
Доступность: Бесплатно как и все руководства на сайте. Без регистрации и SMS.
Дополнительно: Чтение инструкции онлайн
background image

5

English

SPECIFICATIONS

*Be sure to check the nameplate on product as it is subject to change by areas.

STANDARD ACCESSORIES

(1) Depressed center wheel .......................................... 1
(2) Wrench ........................................................................ 1
(3) Side handle ................................................................ 1
Standard accessories are subject to change without
notice.

APPLICATIONS

Removal of casting fin and finishing of various
types of steel, bronze and aluminum materials and
castings.

Grinding of welded sections or sections cut by
means of a cutting torch.

Grinding of synthetic resins, slate, brick, marble, etc.

Cutting of synthetic concrete, stone, brick, marble,
and similar materials.

PRIOR TO OPERATION

1. Power source

Ensure that the power source to be utilized conforms
to the power requirements specified on the product
nameplate.

2. Power switch

Ensure that the power switch is in the OFF position.
If the plug is connected to a receptacle while the
power switch is in the ON position, the power tool
will start operating immediately, which could cause
a serious accident.

3. Extension cord

When the work area is removed from the power
source, use an extension cord of sufficient thickness
and rated capacity. The extension cord should be
kept as short as practicable.

4. Fitting and adjusting the wheel guard

The wheel guard is a protective device to prevent
injury should the depressed center wheel be
shattered during operation. Ensure that the wheel
guard is properly fitted and fastened before
commencing grinding operation.

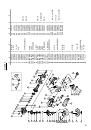
[How to attach and adjust the wheel guard](Fig. 2)

Set the wheel ass’y to the packing gland.

Tighten M5 screw to secure the wheel guard while
the lever is in closed position.

Perform the adjustment of the wheel guard while
the lever is released. (Loosen M5 screw and readjust
if the wheel guard does not rotate smoothly.)

After adjustment, if grinder operation is required,
perform the operation only after setting the lever
in closed position.

Lubricate the sliding section of the set piece (B) and
the lever if the lever does not move smoothly.

5. Ensure that mounted wheels and points are fitted

in accordance with the manufacturer’s instructions.
Ensure that the depressed center wheel to be utilized
is the correct type and free of cracks or surface
defects. Also ensure that the depressed center wheel
is properly mounted and the wheel nut is securely
tightened, Refer to the section on “Depressed Center
Wheel Assembly”
Ensure that blotters are used when they are provided
with the bonded abrasive product and when they
are required.
Do not use separate reducing bushings or adaptors
to adapt large hole abrasive wheels.
For tools intended to be fitted with threaded hole
wheel, ensure that the thread in the wheel is long
enough to accept the spindle length.
Do not use cutting off wheel for side grinding.

Model

G12SE2

G13SE2

Voltage (by areas)*

(110V, 120V, 230V, 240V)

Power Input*

1200 W

No-load speed*

11000 min

-1

Wheel

outer dia. 

×

 hole dia.

115 

×

 22 mm

125 

×

 22 mm

peripheral speed

80 m/s

Weight (only main body)

1.9 kg

PRECAUTIONS ON USING DISC GRINDER

1. Never operate these power tools without Wheel

Guards.

2. Check that speed marked on the wheel is equal to

or greater than the rated speed of the grinder.
Use only depressed center wheels rated at 80m/s
or more.

3. Ensure that the wheel dimensions are compatible

with the grinder and that the wheel fits the spindle.

4. Abrasive wheels shall be stored and handled with

care in accordance with manufacturer’s instructions.

5. Inspect the depressed center wheel before use, do

not use chipped, cracked or otherwise defective
products.

6. Always hold the body handle and side handle of

the power tool firmly. Otherwise the counterforce
produced may result in inaccurate and even
dangerous operation.

7. Do not use cutting-off wheels for side grinding.
8. Do not use of separate reducing bushings or adapters

to adapt large hole abrasive wheels.

9. The wheel continues to rotate after the tool is

switched off.

1
2
3
4
5
6
7
8
9
10
11
12
13
14
15
16
17
18
19
20
21
22
23
24
25
26
27
28
29
30
31
32
33
34
35
36
37
38
39
40
41
42
43
44
45
Оглавление инструкции
  • Страница 1 из 46
    Disc Grinder Winkelschleifer °ˆÓÈ·Îfi˜ ÙÚÔ¯fi˜ ÏÂÈ¿ÓÛˆ˜/ÎÔ‹˜ Szlifierka kątowa Sarokcsiszoló Úhlová bruska Taßlama ìÖÎoÇaÓ åÎËÙoÇaÎëÌaÓ ÏaåËÌa G 12SE2 • G 13SE2 G13SE2 Read through carefully and understand these instructions before use. Diese Anleitung vor Benutzung des Werkzeugs sorgfältig
  • Страница 2 из 46
    1 2 1 2 0 8 3 A 9 4 6 5 7 3 4 (b)E (a) D C B 5 6 F 6 mm G 17 mm I J 1 G 88 76 IJ K H
  • Страница 3 из 46
    1 2 English Wrench Wheel nut Deutsch Schlüssel Mutter für die Schleifscheibe 3 Depressed center wheel Schleifscheibe 4 5 6 7 G H Wheel washer Wheel guard Spindle Push button Diamond wheel M5 screw Lever Set piece (B) Tail cover Paddle lever Lock lever Switch with locking mechanism Wear limit No. of
  • Страница 4 из 46
    Symbols The following show symbols used for the machine. Be sure that you understand their meaning before use. Symbole Die folgenden Symbole werden für diese Maschine verwendet. Achten Sie darauf, diese vor der Verwendung zu verstehen. ™‡Ì‚ÔÏ· Τα παρακάτω δεί νυν τα σύµλα πυ ρησιµπιύνται στ
  • Страница 5 из 46
    English GENERAL SAFETY RULES WARNING! Read all instructions Failure to follow all instructions listed below may result in electric shock, fire and/or serious injury. The term “power tool” in all of the warnings listed below refers to your mains operated (corded) power tool or battery operated
  • Страница 6 из 46
    English PRECAUTIONS ON USING DISC GRINDER 1. Never operate these power tools without Wheel Guards. 2. Check that speed marked on the wheel is equal to or greater than the rated speed of the grinder. Use only depressed center wheels rated at 80m/s or more. 3. Ensure that the wheel dimensions are
  • Страница 7 из 46
    English 6. Conducting a trial run Ensure that the abrasive products is correctly mounted and tightened before use and run the tool at no-load for 30 seconds in a safe position, stop immediately if there is considerable vibration or if other defects are detected. If this condition occurs, check the
  • Страница 8 из 46
    English 3. Inspecting the carbon brushes (Fig. 5) The Motor employs carbon brushes which are consumable parts. When they become worn to or near the “wear limit”, it could result in motor trouble. When an auto-stop carbon brush is equipped, the motor will stop automatically. At that time, replace
  • Страница 9 из 46
    Deutsch ALLGEMEINE SICHERHEITSMASSNAHMEN WARNUNG! Lesen Sie sämtliche Hinweise durch Wenn nicht sämtliche nachstehenden Anweisungen befolgt werden, kann es zu Stromschlag, Brand und/oder ernsthaften Verletzungen kommen. Der Begriff „Elektrowerkzeug“ bezieht sich in den folgenden Warnhinweisen auf
  • Страница 10 из 46
    Deutsch d) Lagern Sie nicht benutzte Elektrowerkzeuge außerhalb der Reichweite von Kindern, lassen Sie nicht zu, dass Personen das Elektrowerkzeug bedienen, die nicht mit dem Werkzeug selbst und/oder diesen Anweisungen vertraut sind. Elektrowerkzeuge in ungeschulten Händen sind gefährlich. e)
  • Страница 11 из 46
    Deutsch VOR INBETRIEBNAHME 1. Netzspannung Prüfen, daß die zu verwendende Netzspannung der Angabe auf dem Typenschild entspricht. 2. Netzschalter Prüfen, daß der Netzschalter auf “AUS” steht. Wenn der Stecker an das Netz angeschlossen wird, während der Schalter auf “EIN” steht, beginnt das
  • Страница 12 из 46
    Deutsch 5. Vorsichtsmaßnahmen unmittelbar nach Beendigung der Arbeit Die Schleifscheibe dreht sich auch nach dem Ausschalten des Werkzeugs noch weiter. Nach dem Ausschalten darf die Maschine erst abgelegt werden, wenn die Schleifscheibe völlig zum Stillstand gekommen ist. Abgesehen vom Vermeiden
  • Страница 13 из 46
    Deutsch MODIFIKATIONEN Hitachi-Elektrowerkzeuge werden fortwährend verbessert und modifiziert, um die neuesten technischen Fortschritte einzubauen. Dementsprechend ist es möglich, daß einige Teile (z.B. Codenummern bzw. Entwurf) ohne vorherige Benachrichtigung geändert werden. ANMERKUNG Aufgrund
  • Страница 14 из 46
    ∂ÏÏËÓÈο °∂¡π∫Õ ª∂∆ƒ∞ ∞™º∞§∂π∞™ ¶ƒ√™√Ã∏! ¢È·‚¿ÛÙ fiϘ ÙȘ Ô‰ËÁ›Â˜ Αν δεν τηρηθ ύν λες ι δηγίες π υ αναέρ νται παρακάτω, ενδέεται να πρ κληθεί ηλεκτρ πληία, πυρκαγιά ή/και σ αρ ς τραυµατισµ ς. # ρ ς “ηλεκτρικ εργαλεί ” σε λες τις πρ ειδ π ιήσεις π υ αναέρ νται παρακάτω αναέρεται στ ηλεκτρικ
  • Страница 15 из 46
    ∂ÏÏËÓÈο d) e) f) g) Αυτά τα πρ ληπτικά µέτρα ασαλείας µειών υν τ ν κίνδυν να εκινήσει τ ηλεκτρικ εργαλεί κατά λάθ ς. ∞ÔıË·ÂÙ ٷ ÂÚÁ·Ï›· Ô˘ ‰ÂÓ ¯ÚËÛÈÌÔÔț٠̷ÎÚÈ¿ ·fi ·È‰È¿ Î·È ÌËÓ ·Ê‹ÓÂÙ ٷ ¿ÙÔÌ· Ô˘ ‰ÂÓ Â›Ó·È ÂÍÔÈÎÂȈ̤ӷ Ì ÙÔ ËÏÂÎÙÚÈÎfi ÂÚÁ·ÏÂ›Ô ‹ Ì ·˘Ù¤˜ ÙȘ Ô‰ËÁ›Â˜ Ó·
  • Страница 16 из 46
    ∂ÏÏËÓÈο 䡬 Λείανση συνθετικών ρητινών, σιστ λιθ , τ ύ λ , µάρµαρ κλπ. 䡬 Κ ψιµ συνθετικ ύ τσιµέντ υ, πέτρας, τ ύ λ υ, µάρµαρ υ και παρ µ ιων υλικών. ¶ƒπ¡ ∆∏ §∂π∆√Àƒ°π∞ 1. ¶ËÁ‹ Ú‡̷ÙÔ˜ Βε αιωθείτε τι η πηγή ρεύµατ ς π υ πρ κειται να ρησιµ π ιηθεί είναι εναρµ νισµένη µε τις απαιτήσεις σε ρεύµα π υ
  • Страница 17 из 46
    ∂ÏÏËÓÈο 4. §ÂÈÙÔ˘ÚÁ›· ‰È·ÎfiÙË [Hταν διακ πτης έει µηανισµ κλειδώµατ ς] Lεκίνηµα λειτ υργίας: Για να εκινήσετε, σπρώετε τ µ λ κλειδώµατ ς πρ ς την διεύθυνση A και πατήστε τ ν πλακ υτσ µ λ πρ ς την διεύθυνση B πως αίνεται στην ∂ÈÎ. 4a. Επιπρ σθετα, σπρώετε τ µ λ κλειδώµατ ς πρ ς την
  • Страница 18 из 46
    ∂ÏÏËÓÈο (3) Aαιρέστε τ άκρ της ψύκτρας στ καρ υνάκι απ τ τερµατικ τµήµα της θήκης τ υ καρ υνακι ύ και µετά ααιρέστε τ καρ υνάκι απ την θήκη τ υ καρ υνακι ύ. 〈Συναρµ λ γηση〉 (1) Bάλτε τ άκρ της ψύκτρας τ υ καρ υνακι ύ στ τερµατικ τµήµα της θήκης τ υ καρ υνακι ύ. (2) Bάλτε τ καρ υνάκι στην θήκη τ
  • Страница 19 из 46
    Polski OGÓLNE WSKAZÓWKI BEZPIECZEŃSTWA OSTRZEŻENIE! Należy przeczytać wszystkie instrukcje Nieprzestrzeganie któregokolwiek z zamieszczonych poniżej zaleceń może być przyczyną porażenia prądem elektrycznym, pożaru i/lub poważnych obrażeń ciała. Występujące w poniższych ostrzeżeniach wyrażenie
  • Страница 20 из 46
    Polski Obsługa urządzeń elektrycznych przez osoby nie znające zasad ich funkcjonowania jest niebezpieczna. e) Wykonywać odpowiednie prace konserwacyjne. Kontrolować prawidłowość ustawienia części ruchomych, ich uszkodzenia i wszelkie inne kwestie, mogące spowodować nieprawidłową pracę urządzenia.
  • Страница 21 из 46
    Polski 4. Montaż i regulacja osłony tarczy Osłona tarczy to urządzenie zabezpieczające przed zranieniem się w przypadku, gdyby obniżone tarcze środkowe pękły w trakcie pracy. Upewnij się, że osłona jest odpowiednio zamocowana i zaciśnięta przed rozpoczęciem szlifowania. [Jak zamocować i wyregulować
  • Страница 22 из 46
    Polski SKŁADANIE I ROZKŁADANIE OBNIŻONYCH TARCZ ŚSRODKOWYCH (Rys. 1) UWAGA Upewnij się, że wyłączyłeś wyłącznik (przełącz na OFF) oraz wtyczkę z kontaktu aby uniknąć poważnego wypadku. 1. Składanie (Rys. 1) (1) Przekręć szlifierkę tarczową do góry nogami tak aby wrzeciono było skierowane w górę.
  • Страница 23 из 46
    Magyar ÁLTALÁNOS BIZTONSÁGTECHNIKAI ELŐÍRÁSOK FIGYELEM! Olvassa végig az utasításokat Az alábbi utasítások be nem tartása áramütést, tüzet és súlyos sérülést okozhat. Az alábbi figyelmeztetésekben szereplő “elektromos szerszámgép” kifejezés az ön - hálózatról üzemeltetett (vezetékes) vagy
  • Страница 24 из 46
    Magyar tulajdonságot, mely hatással lehet a munkavégzésre. Meghibásodás esetén használat előtt javítassa meg a készüléket. A nem megfelelő karbantartás sok balesetet okoz. f) A vágószerszámokat mindig tartsa élesen és tisztán. A megfelelően karbantartott - éles vágóélűvágószerszámok kisebb eséllyel
  • Страница 25 из 46
    Magyar [A 䡬 䡬 䡬 䡬 䡬 5. 6. 7. 8. közben a süllyesztett közepű tárcsa esetleg szétrobban. A csiszolási művelet elkezdése előtt ellenőrizze, hogy a tárcsavédő megfelelően fel legyen szerelve és rögzítve legyen. tárcsavédő felszerelése és beállítása](2. Ábra) Állítsa a tárcsaszerkezetet a
  • Страница 26 из 46
    Magyar A SÜLLYESZTETT KÖZEPŰ TÁRCSA ÖSSZESZERELÉSE ÉS SZÉTSZERELÉSE (1. Ábra) FIGYELEM A súlyos sérülések elkerülése érdekében ügyeljen rá, hogy a gép KI legyen kapcsolva, és a csatlakozódugó ki legyen húzva a hálózati dugaszolóaljzatból. 1. Összeszerelés (1. Ábra) (1) Fordítsa a kézi köszörűgépet
  • Страница 27 из 46
    Čeština VŠEOBECNÉ BEZPEČNOSTNÍ PŘEDPISY UPOZORNĚNÍ! Prostudujte si všechny pokyny Nedodržování všech níže uvedených pokynů může způsobit úraz elektrickým proudem, vznik požáru a/nebo vážné zranění. Pojem “elektrické nářadí” ve všech níže uvedených upozorněních se vztahuje na elektricky poháněné
  • Страница 28 из 46
    Čeština f) Udržujte řezné nástroje ostré a čisté. Správným způsobem udržované řezné nástroje s ostrými břity mají menší sklon k uváznutí a snadněji se při práci ovládají. g) Používejte elektrické nářadí, příslušenství, nástavce nástroje atd. ve shodě s těmito předpisy a způsobem stanoveným pro
  • Страница 29 из 46
    Čeština 䡬 Namažte posuvnou část nastavitelného kusu (B), pokud se páčka volně nepohybuje. 5. Ujistěte se, že nainstalované kotouče a hroty jsou nastaveny v souladu s instrukcemi výrobce. Ujistěte se, že středově vtlačený kotouč je správného typu a je bez trhlin nebo povrchových vad. Také se
  • Страница 30 из 46
    Čeština 3. Kontrola uhlíkových kartáčků (Obr. 5) Motor obsahuje uhlíkové kartáčky, které jsou opotřebitelné. Pokud se opotřebí nebo jsou na pokraji „limitu opotřebení“, může dojít k problému s motorem. Pokud je použit automatický uhlíkový kartáček se samozastavením, dojde k automatickému zastavení
  • Страница 31 из 46
    Türkçe GENEL GÜVENLIK KURALLARI DÓKKAT! Bütün talimatları okuyun Aßaåıda belirtilen talimatların tümünün uygulamaması, elektrik çarpması, yangın ve/veya ciddi yaralanmalarla sonuçlanabilir. Aßaåıdaki uyarılarda belirtilen “Elektrikli alet” terimi, ißletilen (kablolu) veya (kablosuz) ana elektrik
  • Страница 32 из 46
    Türkçe 5) Servis a) Elektrikli aleti vasıflı bir kißi tarafından sadece özdeß yedek parçalar kullanarak tamir edilmesini saålayın. Böylece elektrikli aletin güvenli kullanımı saålanacaktır. ÖNLEM Çocukları ve diåer yeterli güce sahip olmayan kißileri uzak tutun. Kullanılmadıåı zamanlarda aleti
  • Страница 33 из 46
    Türkçe 5. Kullanılan taßlama diskinin ve uçlarının imalatçının talimatlarına uygun olarak takılmıß olduåundan emin olun. Kullanılan taßlama diski doåru tip ve hasarsız olmalıdır. Ayrıca taßlama diskinin doåru ßekilde monte edilmiß olduåundan ve disk somununun emniyetli bir ßekilde sıkıldıåından
  • Страница 34 из 46
    Türkçe derhal sıkın. Gevßemiß vidalar ciddi tehlikelere yol açabilir. 3. Kömürlerin incelenmesi (Íekil 5) Motorda tükenen parçalar olan kömürler bulunur. Kömürler aßındıåında veya “yıpranma limitine” geldiåinde, motorda sorun olma ihtimali doåar. Otomatik durduran kömür kullanılıyorsa, motor
  • Страница 35 из 46
    PyccÍËÈ OÅôàE èPABàãA èO TEXHàKE ÅEÂOèACHOCTà èPEÑìèPEÜÑEHàE! èpoäÚËÚe pyÍoÇoÀcÚÇo Ôo íÍcÔÎyaÚaáËË HeÇêÔoÎÌeÌËe Çcex ÔpËÇeÀeÌÌêx ÌËÊe ÔoÎoÊeÌËÈ ÀaÌÌoÖo pyÍoÇoÀcÚÇa ÏoÊeÚ ÔpËÇecÚË Í ÔopaÊeÌËï íÎeÍÚpËäecÍËÏ ÚoÍoÏ, ÔoÊapy Ë/ËÎË Í cepëeÁÌoÈ ÚpaÇÏe. TepÏËÌ "íÎeÍÚpoËÌcÚpyÏeÌÚ" Ç ÍoÌÚeÍcÚe Çcex
  • Страница 36 из 46
    PyccÍËÈ 4) ùÍcÔÎyaÚaáËÓ Ë oÄcÎyÊËÇaÌËe íÎeÍÚpoËÌcÚpyÏeÌÚoÇ a) He ÔepeÖpyÊaÈÚe íÎeÍÚpoËÌcÚpyÏeÌÚ. àcÔoÎëÁyÈÚe ÌaÀÎeÊaçËÈ ÀÎÓ BaåeÖo ÔpËÏeÌeÌËÓ íÎeÍÚpoËÌcÚpyÏeÌÚ. HaÀÎeÊaçËÈ íÎeÍÚpoËÌcÚpyÏeÌÚ ÄyÀeÚ ÇêÔoÎÌÓÚë paÄoÚy Îyäåe Ë ÌaÀeÊÌee Ç ÚoÏ peÊËÏe paÄoÚê, Ìa ÍoÚopêÈ oÌ paccäËÚaÌ. b) He ËcÔoÎëÁyÈÚe
  • Страница 37 из 46
    PyccÍËÈ TEXHàóECKàE XAPAKTEPàCTàKà MoÀeÎë G12SE2 HaÔpÓÊeÌËe (Ôo peÖËoÌaÏ)* èoÚpeÄÎÓeÏaÓ ÏoçÌocÚë* 1200 BÚ 11000 ÏËÌ-1 óËcÎo oÄopoÚoÇ xoÎocÚoÖo xoÀa* òÎËÙoÇa- HapyÊÌêÈ ÀËaÏeÚp × ÀËaÏeÚp oÚÇepcÚËÓ ÎëÌêÈ ÍpyÖ OÍpyÊÌaÓ cÍopocÚë Bec (ToÎëÍo ocÌoÇÌoÈ ÍopÔyc) G13SE2 (110 B, 120 B, 230 B, 240 B) 115 × 22
  • Страница 38 из 46
    PyccÍËÈ 7. èpoÇepëÚe ÙyÌÍáËoÌËpoÇaÌËe ÌaÊËÏÌoÈ ÍÌoÔÍË. èepeÀ ÇÍÎïäeÌËeÏ íÎeÍÚpËäecÍoÖo ËÌcÚpyÏeÌÚa ÔpoÇepëÚe ÌaÊËÏÌyï ÍÌoÔÍy Ë yÄeÀËÚecë Ç ÚoÏ, äÚo ÌaÊËÏÌaÓ ÍÌoÔÍa ocÇoÄoÊÀeÌa, ÔyÚeÏ ÀÇyx- ËÎË ÚpexpaÁoÇoÖo ÌaÊaÚËÓ (CÏ. PËc. 1). 8. èpËÍpeÔÎeÌËe ÄoÍoÇoÈ pyÍoÓÚÍË. BÇËÌÚËÚe ÄoÍoÇyï pyÍoÓÚÍy Ç ÍpêåÍy
  • Страница 39 из 46
    PyccÍËÈ ÔoÇopaäËÇaÓ åÎËÙoÇaÎëÌêÈ ÍpyÖ c yÚoÔÎeÌÌêÏ áeÌÚpoÏ ÀpyÖoÈ pyÍoÈ. ÂaÚÓÌËÚe ÖaÈÍy ÍpeÔÎeÌËÓ åÎËÙoÇaÎëÌoÖo ÍpyÖa ÔpË ÔoÏoçË ÔpËÎaÖaeÏoÖo ÖaeäÌoÖo ÍÎïäa, ÍaÍ ÔoÍaÁaÌo Ìa PËc. 1. 2. CÌÓÚËe BêÔoÎÌËÚe ÀeÈcÚÇËÓ ÇêåeoÔËcaÌÌoÈ ÔpoáeÀypê Ç oÄpaÚÌoÏ ÔopÓÀÍe. OCTOPOÜHO 䡬 ìÄeÀËÚecë Ç ÚoÏ, äÚo
  • Страница 40 из 46
    39 38 37 36 35 34 33 32 31 30 29 28 27 26 25 24 23 22 21 20 19 1 2 3 4 40 5 39 6 54 51 41 7 52 8 53 42 9 55 65 64 63 66 44 11 62 43 10 46 67 56 45 58 57 47 12 48 13 501 56 59 14 60 49 502 15 50 17 61 16 18 B 303-255 320-523 301-944 321-737 949-558 308-541 308-543 980-866 629-T12 957-754 321-734
  • Страница 41 из 46
    40 38 37 36 35 34 33 32 31 30 29 28 27 26 25 24 23 22 21 20 19 1 2 3 4 40 5 39 6 54 51 41 7 52 8 53 42 9 55 65 64 63 66 44 11 62 43 10 46 67 56 45 58 57 47 12 48 13 501 56 59 14 60 49 502 15 50 17 61 16 18 B 303-255 320-523 301-944 321-737 949-558 308-541 308-543 980-866 629-T12 957-754 321-734
  • Страница 42 из 46
    English Magyar GARANCIA BIZONYLAT GUARANTEE CERTIFICATE 1 2 3 4 5 Model No. Serial No. Date of Purchase Customer Name and Address Dealer Name and Address (Please stamp dealer name and address) Deutsch 1 2 3 4 5 Típusszám Sorozatszám A vásárlás dátuma A Vásárló neve és címe A Kereskedő neve és címe
  • Страница 43 из 46
    1 2 3 4 ✄ 5 42
  • Страница 44 из 46
    43
  • Страница 45 из 46
    Magyar English EC DECLARATION OF CONFORMITY EU MEGFELELŐSÉGI NYILATKOZAT We declare under our sole responsibility that this product is in conformity with standards or standardized documents EN60745, EN50144, EN55014 and EN610003 in accordance with Council Directives 73/23/EEC, 89/ 336/EEC and
  • Страница 46 из 46