10
GB
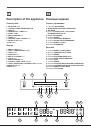
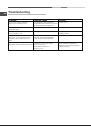
Restoring the factory settings
The oven factory settings can be restored to reset all
selections made by the user (clock and customised
durations). To carry out a reset, switch off the oven, then
press and hold the button corresponding to the first manual
cooking mode (top left) and the
button simultaneously
for 6 seconds. Once the restore procedure is complete, a
buzzer will sound. The first time the
button is pressed, the
oven will behave as if it is being switched on for the first time.
Standby
This product complies with the requirements of the latest
European Directive on the limitation of power consumption in
standby mode. If no buttons are pressed for 30 minutes and the
control panel/door lock has not been activated, the appliance
automatically reverts to standby mode. Standby mode is indicated
by the high luminosity “Clock button” light. As soon as interaction
with the machine resumes, system operation is restored.
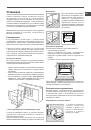
Modes
!
To guarantee perfectly soft or crispy food, the oven releases
water contained within the food in the form of steam. This means
it is possible to achieve optimal cooking results for all dishes.
!
Every time the oven is switched on, it suggests the first
CREATION cooking mode.
!
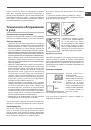
Never put objects directly on the bottom of the oven; this
will prevent the enamel coating from being damaged.
!
Always place cookware on the rack(s) provided.
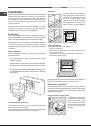
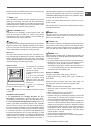
ExtraLarge Space
!
Do not use position “D” for racks.
Starting the oven
1. Switch the control panel on by pressing the
button.
The appliance buzzer sounds three times (ascending) and
all buttons light up in sequence.
2. Press the button corresponding to the desired cooking
mode. The TEMPERATURE display shows:
- the temperature associated with the mode, if programming
manually;
- “Auto”, if programming is automatic.
The TIME display shows:
- the current time, if programming manually;
- the duration, if programming is automatic.
3. Press the
button to begin cooking.
4. The oven will begin its preheating stage: the preheating
light flashes.
5. When the preheating process has finished, a buzzer sounds
and the preheating indicator light shows that this stage has
been completed: the food can then be placed in the oven.
6. During cooking it is always possible to:
- change the temperature by pressing the button,
followed by the and
buttons (manual modes only);
- set the duration of a cooking mode (see Cooking Modes);
- press the
button to stop cooking. In this case the
appliance stores the temperature modified previously in its
memory (manual modes only);
- switch off the oven by pressing the
button for 3 seconds.
7. In case of a blackout, if the oven was already operating,
an automatic system within the appliance will reactivate
the cooking mode from where it was interrupted as long
as the temperature did not drop below a certain level.
Programmed cooking modes which have not yet started
will not be restored and must be reprogrammed.
!
There is no preheating stage for the BARBECUE mode.
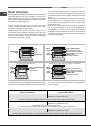
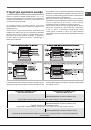
CREATION cooking modes
!
All cooking modes have a default cooking temperature
which may be adjusted manually to a value between 30°C
and 250°C as desired (300°C for GRILL mode). CREATION
cooking modes include all manual programmes.
The oven controls all essential aspects of each of these
cooking modes and makes it easier for you to create the
perfect dish, from the simplest recipe to the most sophisticated
culinary delights: the temperature, heat source, humidity and
fan assisted operation are all controlled automatically.
This chapter was written with the help of our very own
culinary expert. We invite you to follow his advice so you can
benefit from his experience and perfect your cooking skills.
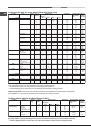
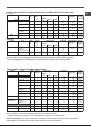
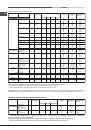
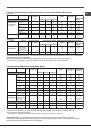
The recommended cooking modes, temperatures and
oven shelf heights reflect our expert’s own experience in
the kitchen and will help you achieve the very best results.
The table below specifies whether it is best to pre-heat your
oven or not for each CREATION cooking mode. Observing
these suggestions will guarantee perfect results.
If you wish to place food in a preheated oven, wait for the
preheating stage to be completed (this will be signalled by
a series of beeps).
The temperature is set automatically, according to the
cooking mode selected; however, you may adjust it to suit
your recipe.
You can also set a cooking duration with an immediate or
delayed start.
MULTILEVEL
mode
All heating elements and the fan are activated. Since the
heat remains constant throughout the oven, the air cooks
and browns food in a uniform manner. A maximum of two
racks may be used at the same time.
LOW TEMPERATURE
modes
This type of cooking can be used for proving, defrosting,
preparing yoghurt, heating dishes at the required speed and
slow cooking at low temperatures. The temperature options
are: 40, 65 and 90°C.
FAN GRILLING
mode
The top heating element and the rotisserie spit (where
present) are activated and the fan begins to operate.
During part of the cycle the circular heating element is
also activated. This combination of features increases the
effectiveness of the unidirectional thermal radiation provided
by the heating elements through the forced circulation of
the air throughout the oven.
This helps prevent food from burning on the surface and