12
GB
•
Make incisions on the loaves.
•
Place the food inside the oven while it is still cold.
•
Start the
BREAD cooking mode.
•
Once baked, leave the loaves on one of the grill racks
until they have cooled completely.
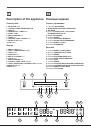
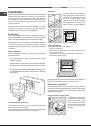
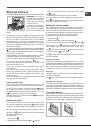
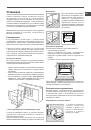
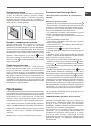
THE DIVIDER
Fit the DIVIDER to the DIVIDER shelf “D” using the pin,
with the arrows turned towards the rear part of the oven. A
buzzer will sound to confirm that the DIVIDER has been fitted
correctly; it will then be possible to use the two MAIN and
SMALL Space compartments separately or at the same time.
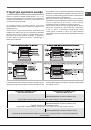
The
button will be enabled. The selected cavity
alternates every time the button is pressed. The MAIN cavity
is selected by default.
Small Space
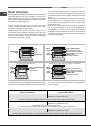
Starting the oven
1. With the DIVIDER inserted, use the
button to select
the SMALL Space cavity. The
icon will light up.
2. Follow the above instructions for the EXTRALARGE
cavity when carrying out the various adjustment and setting
procedures.
Cooking modes
GRILL
mode
The top heating element and the rotisserie spit (where
present) are activated. The high and direct temperature
of the grill is recommended for food which requires a high
surface temperature. Always cook in this mode with the oven
door closed (see “Practical cooking advice”).
FAST COOKING
mode
Preheating is not necessary for this cooking mode. This
mode is particularly suitable for cooking pre-packed
food quickly (frozen or pre-cooked). The best results are
achieved using one cooking rack only.
Main Space
Starting the oven
1. With the DIVIDER inserted, use the
button to select
the SMALL Space cavity. The
icon will light up.
2. Follow the above instructions for the EXTRALARGE
cavity when carrying out the various adjustment and setting
procedures.
CREATION cooking modes
!
All cooking modes have a default cooking temperature
which may be adjusted manually to a value between 30°C
and 250°C as desired (300°C for GRILL mode). CREATION
cooking modes include all manual programmes.
The oven controls all essential aspects of each of these
cooking modes and makes it easier for you to create
the perfect dish, from the simplest recipe to the most
sophisticated culinary delights: the temperature, heat
source, humidity and fan assisted operation are all
controlled automatically.
This chapter was written with the help of our very own
culinary expert. We invite you to follow his advice so you
can benefit from his experience and perfect your cooking
skills. The recommended cooking modes, temperatures and
oven shelf heights reflect our expert’s own experience in
the kitchen and will help you achieve the very best results.
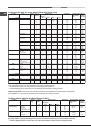
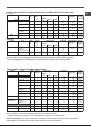
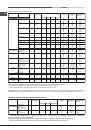
The table below specifies whether it is best to pre-heat your
oven or not for each CREATION cooking mode.
Observing these suggestions will guarantee perfect results.
If you wish to place food in a preheated oven, wait for the
preheating stage to be completed (this will be signalled by
a series of beeps). The temperature is set automatically,
according to the cooking mode selected; however, you may
adjust it to suit your recipe.
You can also set a cooking duration with an immediate or
delayed start.
MULTILEVEL
mode
All heating elements and the fan are activated. Since the
heat remains constant throughout the oven, the air cooks
and browns food in a uniform manner. A maximum of two
racks may be used at the same time.
LOW TEMPERATURE
modes
This type of cooking can be used for proving, defrosting,
preparing yoghurt, heating dishes at the required speed and
slow cooking at low temperatures. The temperature options
are: 40, 65 and 90°C.
PIZZA
mode
The top and circular heating elements switch on and the fan
begins to operate. This combination heats the oven rapidly.
If you use more than one rack at a time, switch the position
of the dishes halfway through the cooking process.
ECO
mode
The rear heating element and the fan are switched on,
thus guaranteeing the distribution of heat in a delicate and
uniform manner throughout the entire oven. This energy
saving mode is suitable for cooking small dishes, reheating
meat and finishing off cooking processes.
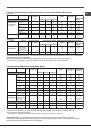
SUCCESS cooking modes
!
The
temperature
and
cooking duration
are
pre-set values
,
guaranteeing a perfect result every time - automatically. These
values cannot be adjusted and use the
C.O.P.® (Programmed
Optimal Cooking)
system. The cooking cycle stops
automatically and the oven indicates when the dish is cooked.
You may start cooking whether the oven has been preheated
or not. The cooking duration can be customised according to
personal tastes, modifying it - before the start time - by ±5/20
minutes depending on the selected programme. Once cooking
has begun, it is still possible to modify its duration. If the value
is modified before cooking begins, it is stored in the appliance
memory and suggested again when that cooking mode is next
used. If the temperature inside the oven is higher than the
suggested value for the selected mode, the text “Hot” appears
on the TEMPERATURE display and it will not be possible to
begin cooking; wait for the oven to cool.