14
GB
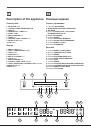
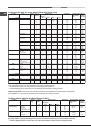
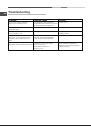
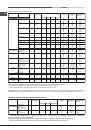
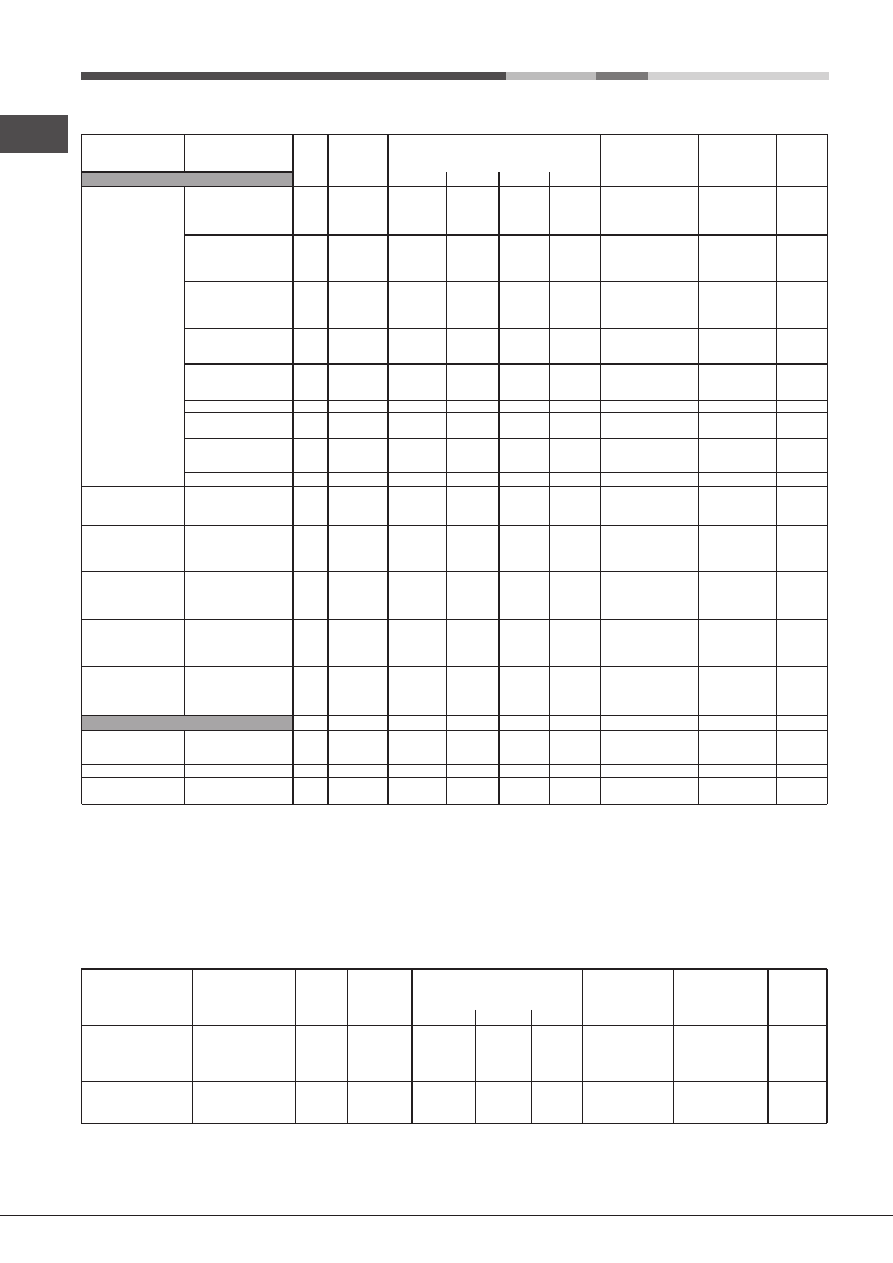
Cooking advice table for ovens with an ExtraLarge Space cavity
Function
Food
Weight
(Kg)
Cook on
shelf no.
Shelf position
Preheating
Recommended
temperature
(°C)
Cooking
duration
(minutes)
Dripping
pan
Rack 1
Rack 2
Rack 3
Fast cooking*
Kebabs
Fish fillets
Frozen potatoes
1
1
1
1
1
5
5
5
No
No
No
210
200
230
20-25
15-20
25-30
Bread
Bread (see recipe)
2
2
2
1
2
3
7**
7**
7**
2
1
1
4
3
5
No
No
No
Beef
Roast
1,2-1,5
5
No
Cakes
Cakes
1
2
No
No
* The cooking times listed above are intended as guidelines only and may be modified according to personal tastes.
Oven preheating times are set as standard and may not be modified manually.
** As stated in the recipe, pour 100 g water into the dripping pan in position 7.
*** Use the dripping pan to collect any oil or fat produced as a result of the cooking process.
!
ECO cooking mode:
This energy saving mode is suitable for cooking dishes such as fish fillets, small pastries
and vegetables. It is also ideal for reheating meat and finishing off cooking processes.
1
2
3
4
2 or 3
1 or 2
1
1
3 or 5
3
3
5
5
6
Yes
Yes
Yes
Yes
220
220
220
220
15-25
20-30
25-35
30-40
Fan grilling*
Roast meats
Gratin
Large roasting joint
Large game roasting joint
1
1
1
1
3
2
2
No
No
No
No
200
190
200
200
35-75
40-60
90-120
90-120
Grill*
Beef ribs
Sausages
Pork ribs
Bacon
1
1
1
1
4 or 5
5 or 7
5 or 7
5 or 7
Yes
Yes
Yes
Yes
270-300
270-300
270-300
270-300
20-30
10-20
15-25
3-6
Low
temperature*
Proving/Defrosting
White meringues
Meat/Fish
1
4
3
2
1
1
3
3
5
5
6
No
No
No
40
65
90
8-12 hours
90-180
Pizza*
Pizza/Focaccia
Creation
Success
Multilevel*
Tarts
1
2
3
4
Yes
Yes
Yes
Yes
190
180
180
180
25-30
35-45
40-50
45-55
Cream puffs
1
2
3
4
2 or 3
1 to 2
1
1
3 to 5
3
3
5
5
6
Yes
Yes
Yes
Yes
1
2
3
4
2 or 3
1 to 2
1
1
3 to 5
3
3
5
5
6
Yes
Yes
Yes
Yes
190
190
190
190
25-35
25-35
30-40
30-40
Biscuits
180
180
180
180
15-25
15-25
20-30
20-30
Small pastries
1
2
3
2 or 3
2
1
5
4
6
Yes
Yes
Yes
200
200
200
30-40
35-45
40-50
Crème Caramel
(bain-marie)
1
2
3
2 or 3
2
1
5
4
6
Yes
Yes
Yes
170
170
170
35-45
35-45
40-50
Panettone
1
1 or 2
Yes
160
45-60
Cake
1
2
Yes
Yes
160
160
60-75
60-75
Sponge cake
1
2
3
2 or 3
2
1
5
4
6
Yes
Yes
Yes
190
190
190
30-35
35-40
40-45
Roast
1,5-2
2
Yes
160
90-240
1
2 or 3
1 or 2
1
3
3 or 5
3
5
5
6
2 or 3
1
4 or 5
1***
2***
3 or 4
1***
1***
3***
3***
3***
3***
1
1***
5
2
2
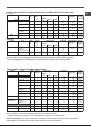
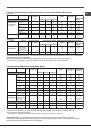
Cooking advice table for the Small Space feature
Function
Food
Weight
(Kg)
Cook on
shelf
Shelf position
Preheating
Recommended
temperature
(°C)
Cooking
duration
(minutes)
no.
Dripping
pan
Rack 1
Divider
Fast cooking*
Fish fillets
Meat fillets
Frozen pizza
Frozen prepared foods
1
1
1
1
6
6
6
6
D
D
D
D
D
D
D
Yes
Yes
Yes
Yes
160-180
180-200
20-30
30-40
* The cooking times listed above are intended as guidelines only and may be modified according to
personal tastes. Oven preheating times are set as standard and may not be modified manually.
** Use the dripping pan to collect any oil or fat produced as a result of the cooking process.
Grill*
Toast
Bacon
Pork steaks
1
1
1
6**
6**
6
7
7
Yes
Yes
Yes
270-300
270-300
270-300
3-5
3-6
15-25