Инструкция для INDESIT 7OFIM 53K.A IX

(скачивание инструкции бесплатно)
Формат файла: PDF
Доступность: Бесплатно как и все руководства на сайте. Без регистрации и SMS.
Дополнительно: Чтение инструкции онлайн
background image

2

GB

!

 Before placing your new appliance into operation

please read these operating instructions carefully.
They contain important information for safe use, for
installation and for care of the appliance.

!

 Please keep these operating instructions for future

reference. Pass them on to possible new owners of
the appliance.

Positioning

!

 Keep packaging material out of the reach of

children.


It can become a choking or suffocation

hazard. (

see Precautions and tips

).

!

 The appliance must be installed by a qualified

person in compliance with the instructions provided.
Incorrect installation may cause harm to persons,
animals or may damage property.

Fitting the appliance

Use the appropriate cabinet to ensure that the
appliance functions properly.

• The panels adjacent to the oven must be made of

heat-resistant material.

• Cabinets with a veneer exterior must be assembled

with glues which can withstand temperatures of up
to 100°C.

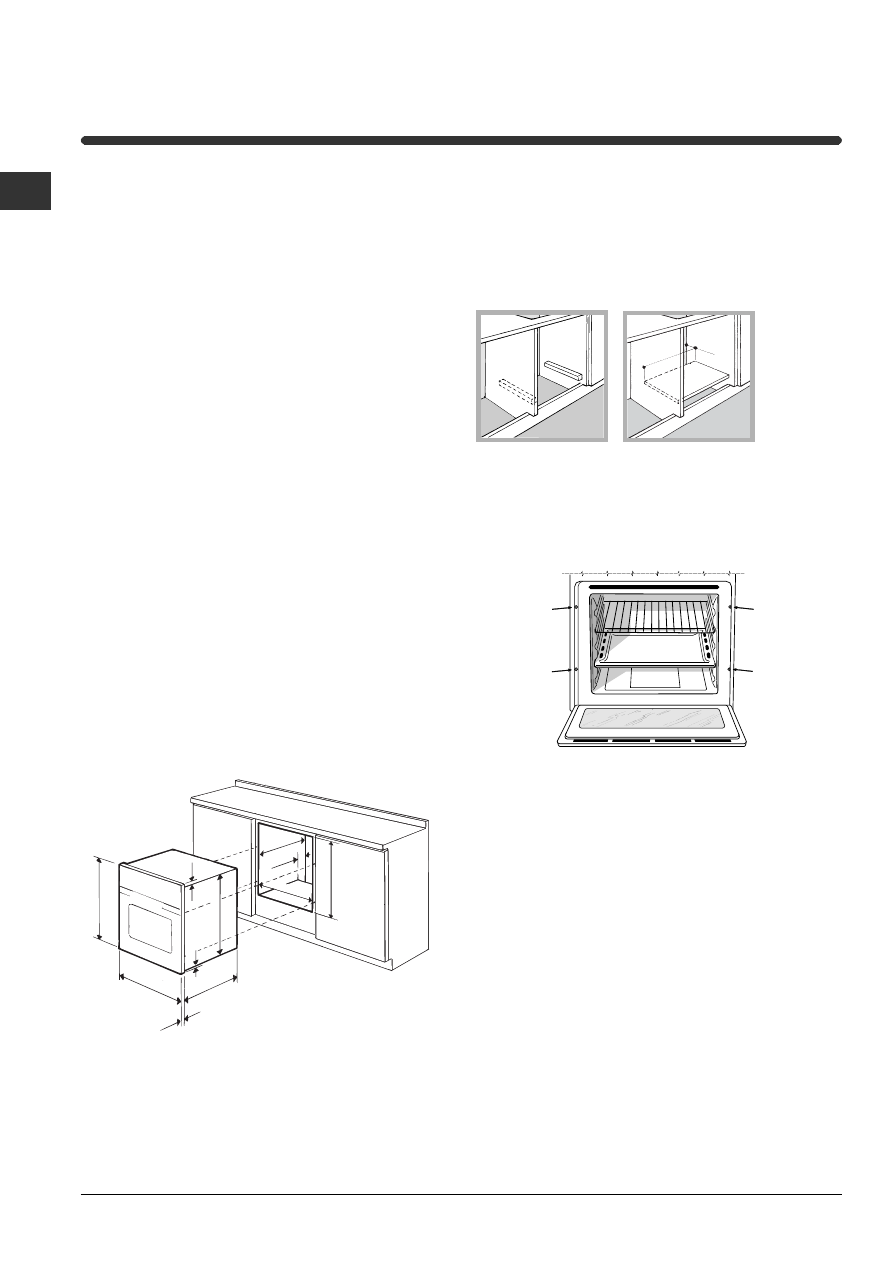
•  to install the oven under the counter (

see diagram

)

and in a kitchen unit, the cabinet must have the
following dimensions:

!

 The appliance must not come into contact with

electrical parts once it has been installed.
The consumption indications on the data plate have
been calculated for this type of installation.

Ventilation

To ensure good ventilation, the back panel of the
cabinet must be removed. It is advisable to install the
oven so that it rests on two strips of wood, or on a
completely flat surface with an opening of at least 45 x
560 mm (

see diagrams

).

Centring and fastening

Secure the appliance to the cabinet by opening the
oven door and putting 4 screws into the 4 holes of the
outer frame.

!

 All parts which ensure the safe operation of the

appliance must not be removable without the aid of a
tool.

Installation

595 mm.

595 mm.

24 mm.

545 mm.

5 mm.

567 mm.

23 mm.

575-585 mm.

45 mm.

560 mm.

547 mm. min.

560 mm.

45 mm.

1
2
3
4
5
6
7
8
9
10
11
12
13
14
15
16
17
18
19
20
Оглавление инструкции
  • Страница 1 из 21
    Operating Instructions OVEN Contents GB English,1 RS Русский, 11 Installation, 2-3 Positioning Electrical connections Data plate Description of the appliance, 4 Overall view Control panel Start-up and use, 5 Starting the oven Assistance Cooking modes, 6-7 Cooking modes Practical cooking advice
  • Страница 2 из 21
    Installation ! Before placing your new appliance into operation please read these operating instructions carefully. They contain important information for safe use, for installation and for care of the appliance. ! Please keep these operating instructions for future reference. Pass them on to
  • Страница 3 из 21
    Electrical connections ! Ovens equipped with a three-pole power supply cable are designed to operate with alternating current at the voltage and frequency indicated on the data plate located on the appliance (see below). Fitting the power supply cable 1. Open the terminal board by inserting a
  • Страница 4 из 21
    Description of the appliance GB Overall view GUIDES for the sliding racks Control panel position 5 position 4 position 3 position 2 position 1 GRILL DRIPPING PAN Control panel SELECTOR knob THERMOSTAT knob ELECTRONIC programmer* * Only on a few models 4 THERMOSTAT indicator light
  • Страница 5 из 21
    Start-up and use ! The first time you use your appliance, heat the empty oven with its door closed at its maximum temperature for at least half an hour. Ensure that the room is well ventilated before switching the oven off and opening the oven door. The appliance may produce a slightly unpleasant
  • Страница 6 из 21
    Cooking modes GB Cooking modes Practical cooking advice ! A temperature value can be set for all cooking modes between 60°C and Max, except for ! Do not place racks in position 1 and 5 during fanassisted cooking. Excessive direct heat can burn temperature sensitive foods. • GRILL (recommended: set
  • Страница 7 из 21
    Cooking advice table Cooking modes Convection Oven Multi-cooking Top oven Grill Gratin GB Foods Weight (in kg) Rack position Pre-heating time (min) Recommended temperature Duck Roast veal or beef Pork roast Biscuits (short pastry) Tarts Pizza (on 2 racks) Lasagne Lamb Roast chicken + potatoes
  • Страница 8 из 21
    The electronic cooking programmer Programming cooking GB ! A cooking mode must be selected before programming can take place. DISPLAY END OF COOKING icon DURATION icon •• •• DECREASE TIME button CLOCK icon Programming the cooking duration TIMER icon 1. Press the button several times until the icon
  • Страница 9 из 21
    Precautions and tips ! The appliance was designed and manufactured in compliance with international safety standards. The following warnings are provided for safety reasons and must be read carefully. General safety • The appliance was designed for domestic use inside the home and is not intended
  • Страница 10 из 21
    Maintenance and care GB Switching the appliance off Disconnect your appliance from the electricity supply before carrying out any work on it. Cleaning the appliance • The stainless-steel or enamel-coated external parts as well as the rubber seals may be cleaned using a sponge that has been soaked
  • Страница 11 из 21
    Руководство по эксплуатации ДУХОВОИ ШКАФ Содержание Монтаж, 12-13 GB English, 1 RS Русский, 11 Расположение Электрическое подключение Паспортная табличка Описание изделия, 14 Общии вид Панель управления Включение и эксплуатация, 15 Включение духового шкафа Программы, 16- 17 Программы приготовления
  • Страница 12 из 21
    Установка ! Важно сохранить данное руководство для его последующих консультации. В случае продажи, передачи изделия или при переезде на новое место жительства необходимо проверить, чтобы руководство оставалось вместе с изделием, для того чтобы его новыи владелец мог ознакомиться с правилами
  • Страница 13 из 21
    Подсоединение сетевого кабеля 1. Откроите зажимную коробку, нажав при помощи отвертки на выступы с боков крышки: потяните и откроите крышку (см. схему). 2. Отвинтите винт кабельного сальника и выньте его, поддев отверткои (см. схему). 3. Отвинтите винты контактов L-Nи затем прикрепите провода под
  • Страница 14 из 21
    Описание изделия RS Общии вид Панель управления * Имеется только в некоторых моделях 14
  • Страница 15 из 21
    Включение и эксплуатация ! При первом включении духового шкафа рекомендуем прокалить его примерно в течение часа при максимальнои температуре с закрытои дверцеи. Затем выключите духовои шкаф, откроите дверцу и проветрите помещение. Запах, которыи вы можете почувствовать, вызван испарением веществ,
  • Страница 16 из 21
    Программы RS Программы приготовления ! Для всех программ можно задать температуру от 60°C до МАКС кроме: • ГРИЛЬ (рекомендуется устанавливать только МАКС. температуру); • ПОДРУМЯНИВАНИЕ (рекомендуется не превышать температуру 200°C). Программа ТРАДИЦИОНАЛЬНАЯ ДУХОВКА Включаются два нагревательных
  • Страница 17 из 21
    Таблица приготовления Programlar Yemekler RS Ağırlık (Kg) Rafların pozisyonu Ön ısıtma (dakika) Tavsiye edilen sıcaklık derecesi Pişirme süresi (dakika) 1 1 1 1 3 3 3 3 3 15 15 15 15 15 200 200 200 180 180 65-75 70-75 70-80 15-20 30-35 1 1 1 1+1 1 1 0.5 0.5 0.5 1 1.5 2 ve 4 3 2 2 ve 4 2 2 2 ve 4 2
  • Страница 18 из 21
    Электронный таймер программирования выпечки и три пока на ДИСПЛЕЕ не замигает символ цифровые значения; 2. при помощи “+” и “-” регулируется время; при их удерживании цифры меняются быстрее, что облегчает установку. 3. подождите 10 сек. или нажмите снова на кнопку RS •• •• для фиксирования
  • Страница 19 из 21
    Предосторожности и рекомендации ! Изделие спроектировано и изготовлено в соответствии с международными нормативами по безопасности. Необходимо внимательно прочитать настоящие предупреждения, составленные в целях вашеи безопасности. Общие требования к безопасности • Данное изделие предназначается
  • Страница 20 из 21
    Техническое обслуживание и уход RS 02/2011 - 195089520.00 XEROX FABRIANO Обесточивание изделия Проверка уплотнении Перед началом какои-либо операции по обслуживанию или чистке отсоедините изделие от сети электропитания. Регулярно проверяите состояние уплотнения вокруг дверцы духового шкафа. В
  • Страница 21 из 21