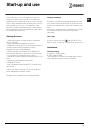
8
GB
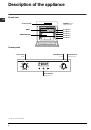
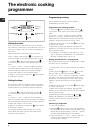
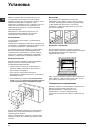
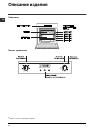
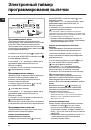
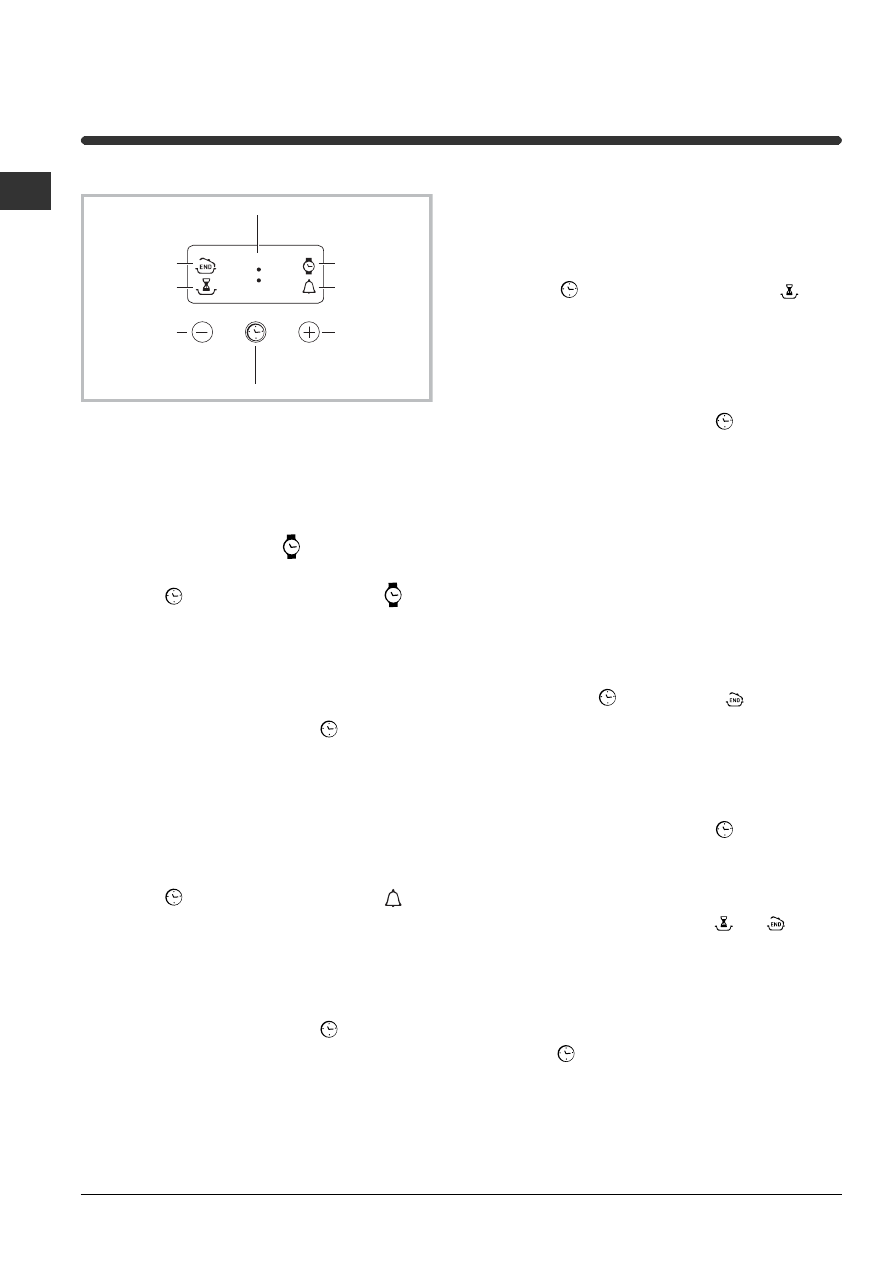
The electronic cooking
programmer
DISPLAY
SET TIME
button
END OF
COOKING
i
con
CLOCK
icon
DURATION
icon
TIMER
icon
DECREASE TIME
button
INCREASE TIME
button
•• ••
Setting the clock
!
The clock may be set when the oven is switched
off or when it is switched on, provided that a the end
time of a cooking cycle has not been programmed
previously.
After the appliance has been connected to the
mains, or after a blackout, the
icon and the four
numerical digits on the DISPLAY will begin to flash.
1. Press the
button several times until the
icon and the four digits on the display begin to
flash.
2. Use the “+” and “-” buttons to adjust the time; if
you press and hold either button, the display will
scroll through the values more quickly, making it
quicker and easier to set the desired value.
3. Wait for 10 seconds or press the
button again
to finalise the setting.
Setting the timer
!
This function does not interrupt cooking and does
not affect the oven; it is simply used to activate the
buzzer when the set amount of time has elapsed.
1. Press the
button several times until the
icon and the three digits on the display begin to
flash.
2. Use the “+” and “-” buttons to set the desired
time; if you press and hold either button, the display
will scroll through the values more quickly, making it
quicker and easier to set the value.
3. Wait for 10 seconds or press the
button again
to finalise the setting.
The display will then show the time as it counts
down. When this period of time has elapsed the
buzzer will be activated.
Programming cooking
!
A cooking mode must be selected before
programming can take place.
Programming the cooking duration
1. Press the
button several times until the
icon and the three digits on the DISPLAY begin to
flash.
2. Use the “+” and “-” buttons to set the desired
duration; if you press and hold either button, the
display will scroll through the values more quickly,
making it quicker and easier to set the value.
3. Wait for 10 seconds or press the
button again
to finalise the setting.
4. When the set time has elapsed, the text END
appears on the DISPLAY, the oven will stop cooking
and a buzzer sounds.
• For example: it is 9:00 a.m. and a time of 1 hour
and 15 minutes is programmed. The programme
will stop automatically at 10:15 a.m.
Setting the end time for a cooking mode
!
A cooking duration must be set before the cooking
end time can be scheduled.
1. Follow steps 1 to 3 to set the duration as detailed
above.
2. Next, press the
button until the
icon and
the four digits on the DISPLAY begin to flash.
3. use the “+” and “-” buttons to adjust the cooking
end time; if you press and hold either button, the
display will scroll through the values more quickly,
making it quicker and easier to set the desired
value.
4. Wait for 10 seconds or press the
button again
to finalise the setting.
5. When the set time has elapsed, the text END
appears on the DISPLAY, the oven will stop cooking
and a buzzer sounds.
Programming has been set when the
and
buttons are illuminated. The DISPLAY shows the
cooking end time and the cooking duration
alternately.
Cancelling a programme
To cancel a programme:
• press the
button until the icon corresponding to
the setting you wish to cancel and the digits on the
display are no longer flashing. Press the “-” button
until the digits 00:00 appear on the display.
• Press and hold the “+” and “-” buttons; this will
cancel all the settings selected previously,
including timer settings.