6
GB
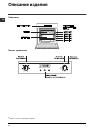
Cooking modes
!
A temperature value can be set for all cooking
modes between 60°C and Max, except for
• GRILL (recommended: set only to MAX power
level);
• GRATIN (recommended: do not exceed 200°C).
TRADITIONAL OVEN
mode
Both the top and bottom heating elements will come
on. With this traditional cooking mode, it is best to use
one cooking rack only; if more than one rack is used,
the heat will be distributed unevenly.
MULTI-COOKING
mode
All the heating elements (top and bottom), as well as
the fan, will come on. Since the heat remains constant
throughout the oven, the air cooks and browns food
uniformly. A maximum of two racks may be used at
the same time.
TOP OVEN
mode
The top heating element comes on. This mode can be
used to brown food at the end of cooking.
GRILL
mode
The top heating element comes on. The extremely
high and direct temperature of the grill makes it
possible to brown the surface of meats and roasts
while locking in the juices to keep them tender. The
grill is also highly recommended for dishes that
require a high temperature on the surface: such as
beef steaks, veal, rib steak, filets, hamburgers etc...
Some grilling examples are included in the “Practical
Cooking Advice” paragraph. Always cook in this mode
with the oven door closed.
GRATIN
mode
The top heating element, as well as the fan, will come
on. This combination of features increases the
effectiveness of the unidirectional thermal radiation of
the heating elements through forced circulation of the
air throughout the oven. This helps prevent food from
burning on the surface, allowing the heat to penetrate
right into the food. Always cook in this mode with the
oven door closed.
Cooking modes
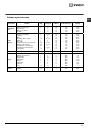
Practical cooking advice
!
Do not place racks in position 1 and 5 during fan-
assisted cooking. Excessive direct heat can burn
temperature sensitive foods.
!
In the GRILL and GRATIN cooking modes, place the
dripping pan in position 1 to collect cooking residues
(fat and/or grease).
MULTI-COOKING
• Use position 2 and 4, placing the food that requires
more heat on 2.
• Place the dripping pan on the bottom and the rack
on top.
GRILL
• Insert the rack in position 3 or 4. Place the food in
the centre of the rack.
• We recommend that you set the maximum power
level. The top heating element is regulated by a
thermostat and may not always be on.
PIZZA
• For best results when cooking pizza, use the
MULTI-COOKING mode.
• Use a light aluminium pizza pan. Place it on the
rack provided.
For a crispy crust, do not use the dripping pan
(prevents crust from forming by extending cooking
time).
• If the pizza has a lot of toppings, we recommend
adding the mozzarella cheese on top of the pizza
halfway through the cooking process.