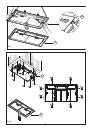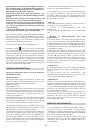
correctly, fi rst fi t the 4 screws
A
and then the 4 screws
B
, in
accordance with the diagram in fi gure 4. After fi xing the cooker
hood to the lower part of the cabinet, place grille
D
(fi g. 4) back
in the correct position. During this procedure, make sure that
grille
D
is fastened properly.
•
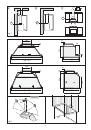
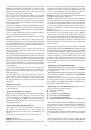
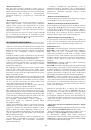
Extraction through an outside wall
The appliance expels the fumes through an outside wall or
a duct.
It is necessary to buy a telescopic pipe in accordance with
the standards in use (infl ammable) and connect it to fl ange
H
(Fig 1A).
•
Recirculation
To transform an extractor hood version into a fi lter hood
version, contact your appliance dealer and ask for active
charcoal fi lters. The fi lters should be fi tted to the extraction
assembly inside the hood, by centring them and rotating them
90 degrees, until they click into place (fi g. 6).
To perform this operation, fi rst remove grille
D
(fi g. 3). The
air is released back into the room through air exhaust piping
which passes through the cabinet and is connected to fl ange
H
(fi g. 1B).
USE AND MAINTENANCE
•
We recommend that the cooker hood is switched on before
any food is cooked. We also recommend that the appliance is
left running for 15 minutes after the food is cooked, in order
to thoroughly eliminate all contaminated air.
The eff ective performance of the cooker hood depends on
constant maintenance; the anti-grease fi lter and the active
carbon fi lter both require special attention.
• The anti-grease fi lter is used to trap any grease particles
suspended in the air, therefore is subject to saturation (the
time it takes for the fi lter to become saturated depends on
the way in which the appliance is used).
The acrylic fi lter, which is found resting on the grille, should
be replaced when the text, visible through the grille, changes
colour and the ink spreads; the new fi lter should be fi tted in
such a way that the text can be seen through the grille from
outside the cooker hood.
If the fi lters do not have any text on them, or if metal fi lters
or aluminium panel fi lters are used, they should be washed
every 2 months in order to prevent the risk of fi re. To wash
the fi lters, proceed as follows:
- Remove the fi lter from the grille and wash it using a
solution of water and neutral liquid detergent, leaving the
dirt to soften.
- Rinse thoroughly with warm water and leave to dry.
The metal fi lters and/or aluminium panel are also dishwasher
safe. If the fi lters are made using aluminium, or if an
aluminium panel is used, after a few washes the colour may
change. This does not mean they have to be replaced.
If the replacement and washing instructions are not followed,
the anti-grease fi lters may present a fi re hazard.
• The active carbon fi lters are used to purify the air which
is released back into the room. The fi lters are not washable
or re-usable and must be replaced at least once every four
months. The active carbon fi lter saturation level depends on
the frequency with which the appliance is used, the type of
cooking performed and the regularity with which the anti-
grease fi lters are cleaned.
•
Remove build-up from the fan and other surfaces of
the cooker hood regularly using a cloth moistened with
denatured alcohol or non-abrasive neutral liquid detergent.
• The light on the cooker hood is designed for use during
cooking and not for general room illumination. Extended
use of the light reduces the average duration of the bulb.
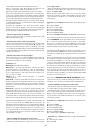
• Replacing the aluminium panels
To replace the aluminium panels, simply pull handle
A
as
shown in fi g. 4B.
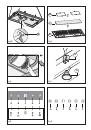
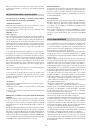
• Replacing the acrylic or metal panels
To replace the acrylic or metal panels, fi rst remove grille
D
by pressing the two side buttons
A
, as shown in fi gure 3.
Remove the two fi lter clips
B
(fi g. 5) and the acrylic or metal
panel
C
. To reassemble the part, simply perform the procedure
in reverse.
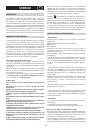
• Replacing halogen light bulbs (Fig. 7).
To replace the halogen lamps
B
, from the inside of the cooker
hood press downwards with two fi ngers as shown in Fig.7.
Replace the bulbs with new ones of the same type.
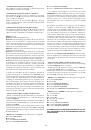
Commands:
(Fig.8)
Push-button A
= on/off lights switch
Push-button B
= on/off cooker hood switch. The appliance
switches on at speed level 1, If the cooker hood is on depress
the push-button for 2 sec. to switch off the cooker hood. If
the cooker hood is at speed level 1 it will not be necessary
to depress the push-button to switch the cooker hood off .
Decreases the motor speed.
Display C
= indicates the motor speed level selected and
activates the timer.
Push-button D
= switches on the cooker hood. Increases the
motor speed. Touching the key at 3rd speed, the intensive
function runs for 10’, then the appliance go back to work at
the original speed. During this function the display blinks.
Key E
= The Timer times the functions on activation for
15 minutes, after which they are switched off . The Timer is
deactivated by re-pressing
Key E
. When the Timer is activated
the decimal point must fl ash on the display. The Timer cannot
be activated if the intensive speed is functioning.
The
“clean air”
function is activated by pressing key
E
for
2 seconds when the appliance is switched off . This switches
the motor on for 10 minutes every hour at the fi rst speed.
During functioning a rotary movement of the peripheral
segments must be visualised on the display. When this time
has passed the motor switches off and the fi xed letter
“C”
must be visualised on the display until the motor re-starts
after 50 minutes for another 10 minutes and so on. Press any
key apart from the light keys to return to normal functioning.
Press key
E
to deactivate the function.
• Active carbon/grease fi lter saturation:
- When display item
C
fl ashes, at a speed where it alternates
with the letter
F
(e.g. 1 and
F
), the
grease
fi lters must be
washed.
- When display item
C
fl ashes, at a speed where it alternates
with the letter
A
(e.g. 1 and
A
), the
carbon
fi lters must be
replaced.
After the clean filter has been positioned correctly, the
electronic memory must be reset by pressing button
A
for
approximately
5 seconds
, until the indication
F
or
A
shown
on the display
C
stops fl ashing.
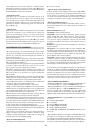
• Commands:
(Fig.9)
Luminous
the key symbols are explained
below:
A
= LIGHT
B
= OFF
- 24 -