Tools And Materials Required
4
Tools and Materials Required
Software Upgrade
IMPORTANT: before you can install the hardware components of your expansion kit, you must
upgrade your instrument’s operating system software, and its soundware objects (program and
setup information). See
below for upgrade instructions.
Hardware Installation
•
#2 (small) cross-recess (Phillips head) screwdriver
•
Two thick foam pads (to protect your instrument)
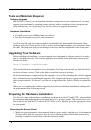
You’ll need a flat work area large enough to accommodate the disassembled instrument. Most
tabletops will work. Please be sure to use a surface wide enough to support your instrument from
the ends. The foam pads will prevent damage to the keys and the components on the front panel.
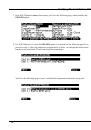
Upgrading Your Software
Before installing any hardware, you must upgrade your instrument’s software and test it to make
sure it’s working correctly. The software upgrades are available at the following location on the
Kurzweil website:
http://kurzweil.com/downloads
Click on the link that corresponds to your instrument. Scroll up or down until you find the link for
the latest software version. Click on the link to download your new software.
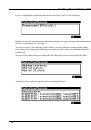
Each link downloads a compressed file that expands to a set of files including the software upgrade
files, and instructions for installing the upgrades. The compressed file may expand automatically
when you download it. If it doesn’t, you can use an application like ZipIt or WinZip to expand the
file.
When you’ve completed the software upgrade, proceed to the hardware installation, starting with
the preparations in the following section.
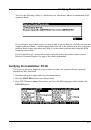
Preparing for Hardware Installation
The first few steps of the hardware installation are identical for the PC3 and PC3K—disassembling
the instrument and preparing the circuit board that you’re going to install. This section shows you
how to do this for both the PC3 and the PC3K. When you’ve finished, go to the appropriate section
for your model.
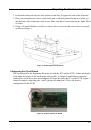
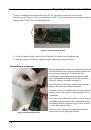
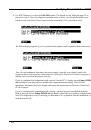
Removing the Access Panel
1.
Make sure your instrument is disconnected from its power supply, and that you’ve disconnected
all other cables from the rear panel. Also be sure to discharge any residual static electricity by
touching a conductive metal object (like the keyboard casing).