• t-^m)i^xmA-^'\s)
0 wmiPft#)
(-M8)
(iMWPt#)
( m m
mi‘¥)
1
j|$il3iEiiAlt^a®lESSi*ii«-taD[DC
m]mio
2
ilii«lflH^-3li®$SSiSiSgSfiD[DC
OUT]}f?Lo
3
./IXF-V^/i^O
-240V, 50/60Hz),
f±f«J
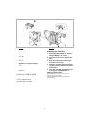
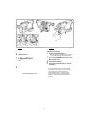
The 3 Types of Power
Supplies
To try out the Movie Camera at home, we recommend
that you use the AC Adaptor Q.
O
a
C Adaptor (supplied)
•To use the Movie Camera indoors.
•To charge the Battery.
{~¥
18)
0
Battery (supplied)
•To use the Movie Camera outdoors, and also indoors
when there is no AC mains socket nearby. (-►
18)
0Car Battery Cord (optional) or Car Battery
Charger (optional)
•To use the Movie Camera in a car.
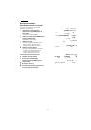
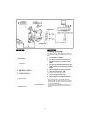
Using the AC Adaptor as Power
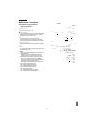
Supply Unit
Connect the DC Input Cable to the
[DC IN] Socket on the Movie Camera.
Connect the other end of the cable to
the [DC OUT] Socket on the AC Adaptor.
Connect the AC Mains Cable to the AC
Adaptor and to an AC mains socket.
1
2
3
The AC Adaptor features automatic universal voltage
adjustment (AC 100-240 V, 50/60 Hz), therefore, there
is no need for any manual voltage adjustment for use in
other countries.
16
 1
1
 2
2
 3
3
 4
4
 5
5
 6
6
 7
7
 8
8
 9
9
 10
10
 11
11
 12
12
 13
13
 14
14
 15
15
 16
16
 17
17
 18
18
 19
19
 20
20
 21
21
 22
22
 23
23
 24
24
 25
25
 26
26
 27
27
 28
28
 29
29
 30
30
 31
31
 32
32
 33
33
 34
34
 35
35
 36
36
 37
37
 38
38
 39
39
 40
40
 41
41
 42
42
 43
43
 44
44
 45
45
 46
46
 47
47
 48
48
 49
49
 50
50
 51
51
 52
52
 53
53
 54
54
 55
55
 56
56
 57
57
 58
58
 59
59
 60
60
 61
61
 62
62
 63
63
 64
64
 65
65
 66
66
 67
67
 68
68
 69
69
 70
70
 71
71
 72
72
 73
73
 74
74
 75
75
 76
76
 77
77
 78
78
 79
79
 80
80
 81
81
 82
82
 83
83
 84
84
 85
85
 86
86
 87
87
 88
88
 89
89
 90
90
 91
91
 92
92
 93
93
 94
94
 95
95
 96
96
 97
97
 98
98
 99
99
 100
100
 101
101
 102
102
 103
103
 104
104
 105
105
 106
106
 107
107
 108
108
 109
109
 110
110