
29
GB
Usin
g O
p
tion
al Eq
uipm
ent
~
• If the photograph is selected from a USB device, it
must remain connected to the TV.
• If “Sleep Timer” is activated, the TV
automatically will switch into standby mode.
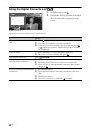
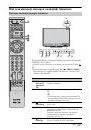
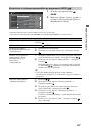
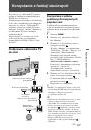
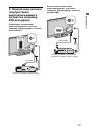
To display a photograph with the
location on the map
When using an image capture device with GPS
function (digital still camera, etc.), it is
possible to display a photograph with a map of
the location where the photograph was taken
using a function of GPS for recording
longitude and latitude. Because map
information is downloaded from the Internet
online map service, the network connection
must be required and the TV has to be
connected to the network (page 34).
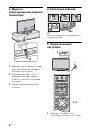
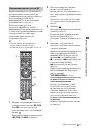
1
Select a photograph (page 27).
2
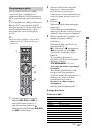
Press the green/red buttons to zoom in/out
on the map.
To change the display position of the map
on the TV screen, press the blue button
repeatedly.
~
• Because the Internet online map service is
provided by a third party, service may be changed
or terminated without prior notification to the
user.
• The position indicated on the map may differ
depending on the image capture device.
• Only a large-scale map that cannot be zoomed in
or out is displayed if the TV is not connected to
the Internet or the Internet online map service is
terminated.
• You can also display a slideshow with the location
on the map. Set “Photo Set-up” to “Simple with
map” (page 27).
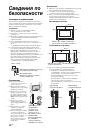
z
• A map can be displayed in the case of
photograph’s EXIF data includes a date
information, and the associated longitude and
latitude information (“Log files”) has been
recorded using a Sony GPS unit. Follow the
procedure described below.
1
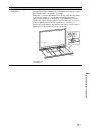
Connect the GPS unit to the USB port.
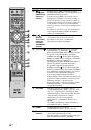
2
Press
HOME
.
3
Press
G
/
g
to select “Photo.”
4
Press
F
/
f
to select the GPS unit, then
press .
5
Select the following items using
F
/
f
and
press
, then set them using
F
/
f
.
–Time Zone
–DST
6
Select “Yes”, then press .
The GPS log files are loaded.
7
Disconnect the GPS unit and connect the
device on which the photograph is stored.
8
Select a photograph (page 27).
9
Press the green/red buttons to zoom in/out
on the map.
 1
1
 2
2
 3
3
 4
4
 5
5
 6
6
 7
7
 8
8
 9
9
 10
10
 11
11
 12
12
 13
13
 14
14
 15
15
 16
16
 17
17
 18
18
 19
19
 20
20
 21
21
 22
22
 23
23
 24
24
 25
25
 26
26
 27
27
 28
28
 29
29
 30
30
 31
31
 32
32
 33
33
 34
34
 35
35
 36
36
 37
37
 38
38
 39
39
 40
40
 41
41
 42
42
 43
43
 44
44
 45
45
 46
46
 47
47
 48
48
 49
49
 50
50
 51
51
 52
52
 53
53
 54
54
 55
55
 56
56
 57
57
 58
58
 59
59
 60
60
 61
61
 62
62
 63
63
 64
64
 65
65
 66
66
 67
67
 68
68
 69
69
 70
70
 71
71
 72
72
 73
73
 74
74
 75
75
 76
76
 77
77
 78
78
 79
79
 80
80
 81
81
 82
82
 83
83
 84
84
 85
85
 86
86
 87
87
 88
88
 89
89
 90
90
 91
91
 92
92
 93
93
 94
94
 95
95
 96
96
 97
97
 98
98
 99
99
 100
100
 101
101
 102
102
 103
103
 104
104
 105
105
 106
106
 107
107
 108
108
 109
109
 110
110
 111
111
 112
112
 113
113
 114
114
 115
115
 116
116
 117
117
 118
118
 119
119
 120
120
 121
121
 122
122
 123
123
 124
124
 125
125
 126
126
 127
127
 128
128
 129
129
 130
130
 131
131
 132
132
 133
133
 134
134
 135
135
 136
136
 137
137
 138
138
 139
139
 140
140
 141
141
 142
142
 143
143
 144
144
 145
145
 146
146
 147
147
 148
148
 149
149
 150
150
 151
151
 152
152
 153
153
 154
154
 155
155
 156
156
 157
157
 158
158
 159
159
 160
160
 161
161
 162
162
 163
163
 164
164
 165
165
 166
166
 167
167
 168
168
 169
169
 170
170
 171
171
 172
172
 173
173
 174
174
 175
175
 176
176
 177
177
 178
178
 179
179
 180
180
 181
181
 182
182
 183
183
 184
184
 185
185
 186
186
 187
187
 188
188
 189
189
 190
190
 191
191
 192
192
 193
193
 194
194
 195
195