Инструкция для TRIPP LITE PDUMH20HV, PDUMH32HV

(скачивание инструкции бесплатно)
Формат файла: PDF
Доступность: Бесплатно как и все руководства на сайте. Без регистрации и SMS.
Дополнительно: Чтение инструкции онлайн
background image

Owner’s Manual

1111 W. 35th Street, Chicago, IL 60609 USA

www.tripplite.com/support

 Important Safety Instructions

SAVE THESE INSTRUCTIONS

This manual contains instructions and warnings that should be  
followed during the installation, operation and storage of this 
product. Failure to heed these instructions may affect your warranty.
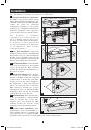
Important Warnings

•  Operate the PDU at indoor temperatures between 32°F and 104°F (between 0°C and 40°C) only.
•  Provide adequate protection against excess currents, short circuits, and ground faults in  

  accordance with local and national electrical code, such as NEC in the U.S.
•  The mains socket that supplies the PDU should be near the PDU and easily accessible.
•  The PDU provides convenient multiple outlets but it DOES NOT provide surge or line noise  

  protection for connected equipment.
•  The PDU is designed for indoor use only in a controlled environment away from excess moisture,  

  temperature extremes, conductive contaminants, dust or direct sunlight.
•  Do not connect the PDU to an ungrounded outlet or extension cords or adapters that eliminate the  

  connection to ground.
•  The power requirement for each piece of equipment connected to the PDU must not exceed the  

  individual outlet's load rating.
•  The total power requirement for equipment connected to the PDU must not exceed the maximum  

  load rating for the PDU.
•  Do not drill into or attempt to open any part of the PDU housing. There are no user-serviceable parts inside.
•  Do not attempt to modify the PDU, including the input plugs and power cables.
•  Do not attempt to use the PDU if any part of it becomes damaged.
•  Do not attempt to mount the PDU to an insecure or unstable surface.
•  Never attempt to install electrical equipment during a thunderstorm.
•  Use of this equipment in life support applications where failure of this equipment can reasonably be  

  expected to cause the failure of the life support equipment or to significantly affect its safety or  

  effectiveness is not recommended. Do not use this equipment in the presence of a flammable  

  anesthetic mixture with air, oxygen or nitrous oxide.
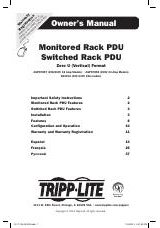
Metered Rack PDUs

Español – p. 8   •   Français – p. 15

Copyright © 2011 Tripp Lite. All rights reserved. 

W

arranty


Registration

Register online toda

y f

or a 


chance to win a FREE 

Tripp Lite 


product! www

.tr

ipplite

.com/w

arr

anty

Low-Voltage Models: PDUMH15, PDUMH15S, PDUMH20

High-Voltage Models: PDUMH20HV, PDUMH30HV, PDUMH32HV

201103062 93-3059.indd   1

4/29/2011   2:33:39 PM

1
2
3
4
5
6
7
8
9
10
11
12
13
14
15
16
17
18
19
20
Оглавление инструкции
  • Страница 1 из 21
    y a e nt ion for p Lit anty a r at day rip arr r a r o T w W ist line t REE com/ g n F e. Rester owin a ipplit .tr gi to Re ce ww w n ! a t ch duc o pr Owner’s Manual Metered Rack PDUs Low-Voltage Models: PDUMH15, PDUMH15S, PDUMH20 High-Voltage Models: PDUMH20HV, PDUMH30HV, PDUMH32HV Important
  • Страница 2 из 21
    Installation Note: The illustrations may differ somewhat from your PDU model. 1 Determine Installation Configuration. The PDUs covered by this owner’s manual support these installation configurations: 2U, 1U and 0U rackmount; wall-mount and undercounter. See below for installation configurations
  • Страница 3 из 21
    Installation (continued) 2 Attach the input plug of the PDU to a grounded outlet. Insert the plug directly into a grounded outlet that does not share a circuit with a heavy electrical load (such as an air conditioner or refrigerator). Note: Select models include an input plug adapter that converts
  • Страница 4 из 21
    Installation (continued) 3 Attach equipment to the PDU. Do not exceed the load rating of the PDU. The total electrical current used by the PDU will be displayed on the digital meter in amperes. 3-1 3-2 3-3 4 201103062 93-3059.indd 4 4/29/2011 2:33:42 PM
  • Страница 5 из 21
    Features 1 2 Input Plug (Varies by Model) 3 Circuit Breaker: If the current drawn by the equipment connected to the PDU exceeds the Maximum Load Rating, the circuit breaker will trip to prevent possible damage. When a circuit breaker trips, its plunger will pop up. Disconnect excess equipment and
  • Страница 6 из 21
    Features 8 (continued) 9 10 11 8 Longer 1U Mounting Brackets: Use these brackets to mount the 1U PDU horizontally in a standard rack or rack enclosure. The mounting depth can be adjusted by attaching the brackets to different positions on the PDU. 9 Shorter 0U Mounting Brackets: Use these brackets
  • Страница 7 из 21
    Warranty & Warranty Registration LIMITED LIFETIME WARRANTY Seller warrants this product, if used in accordance with all applicable instructions, to be free from original defects in material and workmanship for its lifetime. If the product should prove defective in material or workmanship within
  • Страница 8 из 21
    Manual del propietario PDU para montaje en rack (bastidor) con amperímetro Instrucciones de seguridad importantes GUARDE ESTAS INSTRUCCIONES Este manual contiene instrucciones y advertencias que deben seguirse durante la instalación, operación y almacenamiento de este producto. La falta de observar
  • Страница 9 из 21
    Instalación Nota: Las ilustraciones pueden ser un poco diferentes a las de su modelo de PDU. 1 Determine la configuración de la instalación. La PDU soporta cuatro configuraciones básicas de instalación: Bastidor de 1U, bastidor de 0U, de pared y debajo de mostrador. Elija una configuración y siga
  • Страница 10 из 21
    Instalación (continuación) 2 Conecte el enchufe de entrada de la PDU a un contacto conectado a tierra. Inserte el enchufe directamente en una toma de corriente alterna conectada a tierra que no comparta el circuito con alguna carga eléctrica pesada (como un aire acondicionado o una refrigeradora).
  • Страница 11 из 21
    Instalación (continuación) 3 Conecte equipos a la PDU. Tenga cuidado de no exceder la capacidad de carga de la PDU. La corriente eléctrica total usada por la unidad de distribución de potencia (PDU) será mostrada en el medidor digital, en amperios. 3-1 3-2 3-3 11 201103062 93-3059.indd 11 4/29/2011
  • Страница 12 из 21
    Características 1 Enchufe de entrada (Varía por Modelo) 2 Salidas (Varía por Modelo): Durante la operación normal, las salidas distribuyen energía CA al equipo conectado. 3 Interruptor automático: Si la corriente consumida por el equipo conectado al PDU excede la máxima capacidad de carga, el
  • Страница 13 из 21
    Características 8 9 (continuación) 10 11 8 Soportes de Instalación de 1U más largos: Use estos soportes para instalar la unidad PDU de 1U horizontalmente en un rack estándar o estante de rack. La profundidad de montaje se puede ajustar fijando los soportes a diferentes posiciones en la unidad PDU.
  • Страница 14 из 21
    Garantía GARANTÍA LIMITADA DE POR VIDA El vendedor garantiza que este producto, si se emplea de acuerdo con las todas las instrucciones aplicables, está libre de defectos en materiales y mano de obra de por vida (en Mexico: 25 años). Si se verifica que el producto tiene defectos en los materiales o
  • Страница 15 из 21
    Manual du propriétaire Unité de distribution d'alimentation (PDU) en bâti avec compteur Importantes consignes de sécurité CONSERVER CES DIRECTIVES Ce manuel contient des instructions et des mises en garde que vous devez respecter durant l’installation, l’utilisation et l’entreposage de ce produit.
  • Страница 16 из 21
    Installation Note : Les illustrations peuvent être différentes de celles de votre modèle de PDU. 1 Définir la configuration de l'installation L'unité peut être installé selon quatre configurations. Baie 1U, Baie 0U, contre un mur ou sous un comptoir. Choisir une configuration et suivre les
  • Страница 17 из 21
    Installation (suite) 2 Fixer le fiche d’entrée de l’unité PDU à une prise mise à la terre. Insérer la fiche directement dans une prise CA correctement mise à la terre, qui ne partage pas de circuit supportant une lourde charge électrique (comme un climatiseur ou un réfrigérateur). Note : Certains
  • Страница 18 из 21
    Installation (suite) 3 Fixer l’équipement à l’unité PDU. Faire attention de ne pas dépasser la charge nominale de l’unité PDU. La totalité du courant électrique utilisée par la PDU sera affichée en ampères au compteur numérique. 3-1 3-2 3-3 18 201103062 93-3059.indd 18 4/29/2011 2:33:46 PM
  • Страница 19 из 21
    Caractéristiques 1 Fiche d’entrée (Varie selon le modèle) 2 Prises (Varient selon les modèles) : Lors d'un fonctionnement normal, les prises distribuent du courant CA à l'équipement connecté. 3 Disjoncteur : Si le courant tiré par l’équipement connecté à l’unité PDU excède la charge nominale
  • Страница 20 из 21
    Caractéristiques 8 (suite) 9 10 11 8 Supports de montage Longs 1U: Utilisez ces supports pour monter la PDU 1U horizontalement dans un bâti standard ou une enceinte de support. La profondeur de l’installation peut être ajustée en attachant les supports à différentes endroits sur la PDU. 9 Supports
  • Страница 21 из 21