4
ENGLISH
power plug or the unit into water or other
liquids. If it happens, DO NOT TOUCH
the unit, unplug it immediately and apply
to the authorized service center for test-
ing or repair.
• Periodically check the integrity of the
power cord.
• Do not use the unit if the power cord or
the power plug is damaged, in case of
malfunction, and if the unit fell down.
Do not try to repair the unit yourself. For
repair apply to the authorized service
center.
• This unit is not intended for usage by chil-
dren or disabled persons.
• This unit is not intended for usage by
children or disabled persons unless they
are given all the necessary instructions on
safety measures and information about
danger, which can be caused by improper
usage of the unit.
• The deep fryer is intended for household
usage only.
BEFORE USING THE UNIT FOR THE FIRST
TIME
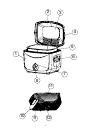
Unpack the unit.
Wipe the outer and the inner surfaces of the
body (1) with a soft damp cloth, then wipe
dry.
Warning: provide that water does not get
on the heating element of the unit.
Thoroughly wash the removable parts: the
lid (2), the bowl for oil (5), the basket (9) and
the basket handle (10) with warm water and a
neutral detergent.
Place the lid (2) and the bowl for oil (5).
Assemble the basket for frying:
• Press the ends of the handle (10) together
and insert them into the loops of the
clamp (11), move the handle (10) to the
clamp (11) and fix it until a click.
COOKING PRODUCTS
Viewing window
To avoid weeping of the viewing window (3)
lubricate the inner surface with plant oil.
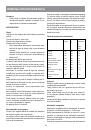
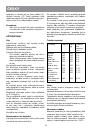
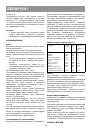
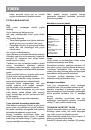
Temperature control
The temperature control (8) provides main-
tenance of oil temperature in the bowl (5),
temperature range from 130°С to 190°С gives
wide possibilities for cooking of different
products.
Operating indicator
Green color of the indicator (7) indicates that
the power plug is inserted into the socket.
Red color of the indicator indicates that
the preset oil temperature in the bowl (5) is
reached.
Place the deep fryer on the dry stable heat-
resistant surface.
Insert the bowl for oil (5) into the body of the
deep fryer (1).
Attention: usage of the unit without the
bowl for oil is strictly forbidden.
Fill the bowl (5) with 1-1,5 liters of oil of good
quality in a way that the oil level is between
the minimal and maximal marks on the inner
surface of the bowl (5) and close the lid (2).
It is recommended to use high-quality puri-
fied oils (sunflower, corn) and not to use
margarine or butter, as they do not endure
high temperature.
Insert the plug into the socket and select
the necessary temperature mode, by turn-
ing the temperature control handle (8) to
the required temperature indication (see the
“Cooking recommendations” section). When
the oil heats up to the required temperature,
the red indicator (7) will light up.
Put the necessary quantity of products into
the basket (9) (products should be dry, if
products are frozen, then try to shake off as
much as possible ice from them).
Open the lid (2), holding the handles (4).
Carefully immerse the basket (9) into the
bowl with oil (5) and close the lid (2).
After cooking of products, switch off the unit,
by turning the temperature control handle (8)
anticlockwise until bumping. Slowly open the
lid (2), holding the handles (4). In order to
avoid getting of burns by hot steam, do not
bend over the deep fryer and do not hold the
hands above the bowl with oil (5).
Holding the handle (10), remove the basket
with ready products and put it on the edge
of the bowl (5), using the support (12). Let
the surplus oil flow into the bowl (5) after that
take the ready product from the basket (9)
4