Инструкция для VITEK VT-1770 W

(скачивание инструкции бесплатно)
Формат файла: PDF
Доступность: Бесплатно как и все руководства на сайте. Без регистрации и SMS.
Дополнительно: Чтение инструкции онлайн
background image

5

ENGLISH          

• 

Always  unplug  the  unit  and  pour  out  water 
from  the  water  tank  and  disc  filter  block 
before  cleaning  or  if  you  do  not  use  the 
humidifier.

• 

Before  moving  the  humidifier  to  another 
place, unplug it and pour out water from the 
water tank and disc filter block. When moving 
the unit, hold it by the base with both hands.

• 

Do not touch the power plug with wet hands.

• 

Before  using  the  unit,  closely  examine  the 
power cord and make sure that it is not dam-
aged. Do not use the unit if the power cord is 
damaged.

• 

Do not switch on and do not use the unit if the 
cord or the plug is damaged or if the fan heat-
er works irregularly, fell or is damaged. In this 
case contact an authorized service center for 
testing and repair

• 

Do  not  dismantle  the  unit  by  yourself,  if  any 
malfunction is detected, apply to the nearest 
authorized service center.

• 

Clean the unit regularly.

• 

Keep the unit out of reach of children.

THE  UNIT  IS  INTENDED  FOR  HOUSEHOLD 
USAGE ONLY

BEFORE THE FIRST USE

After  unit  transportation  or  storage  at  low 
temperature it is necessary to keep it for at 
least two hours at room temperature before 
switching on.

– 

Unpack the unit and remove any stickers and 
package materials that can prevent unit oper-
ation. Examine the unit for damages. In case 
of damages do not switch the unit on.

Notes:

– 

Use the humidifier at the room tempera-
ture  from  +5°  С  to  +40°  С  and  relative 
humidity less than 80%.

– 

Water  temperature  should  not  exceed 
+40°С.

– 

Before connecting the humidifier to the mains 
make sure that your home mains voltage cor-
responds to unit operating voltage.

OPERATION

This unit type humidifies and cleans air by blow-
ing  hot  air  on  the  wet  disc  filter,  thereby  dust 
particles accumulate in water and on filter discs. 
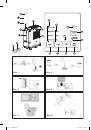
– 

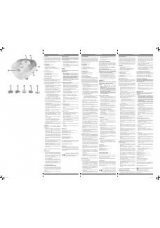
Remove the lid (4) moving it aside.

– 

Take the water tank (6) by the handle (7) and 
remove it from the unit body (pic. 1).

– 

Turn over the tank (6), open the lid (5) rotat-
ing  it  counterclockwise.  Fill  the  tank  (6)  with 
necessary amount of water, close the lid (5) 
rotating it clockwise (pic. 2).

– 

Put the filled water tank (6) back to its place 
and close the lid (4). Wait for some time, that 
is necessary to fill the disc filter block (1) with 
water. 

– 

Insert the plug into the socket, you will hear 
a sound signal.

– 

Switch the unit on by pressing the «ON/OFF» 
button  (17).  You‘ll  hear  a  sound  signal,  the 
standard  operation  mode  indicator  (12)  and 
the  relative  room  air  humidity  indicator  (9) 
will light up.

– 

After the unit operation switch the unit off by 
pressing the «ON/OFF» button (17). 

– 

Wait till the unit switches off completely (the 
fan  motor  stops  in  approximately  30  sec-
onds) and then unplug the unit.

Notes: 

– 

Every  pressing  of  the  buttons  is  con-
firmed with a short sound signal.

– 

The humidity level shown by the indicator 
(9) may be different from the readings of 
another hygrometer. 

– 

The humidity level indications depend on 
the room temperature.

– 

Draughts or other air flows may affect the 
air humidity indications in the room.

CONTROL PANEL (8)
«ON/OFF» button (17)

To switch the unit on, press the «ON/OFF» but-
ton  (17)  once.  Switch  the  unit  off  by  pressing 
the «ON/OFF» button (17) again, the indicators 
on  the  control  panel  (8)  will  go  out,  and  the 
unit  will  be  switched  off  in  approximately  30 
seconds.

«MODE» button (11)

Select the operating mode pressing consequent-
ly the «MODE» button (11), one of the indicators 
(12) will light up:

– 

Standard

* - operation mode maintaining the 

relative room humidity 50%;

– 

Humidification

* - operation mode maintain-

ing the relative room humidity 60%;

– 

Sleep

*  -  operation  mode  maintaining  the 

relative room humidity 50%; in this mode the 

VT-1770_IM.indd   5

20.05.2013   14:16:22

1
2
3
4
5
6
7
8
9
10
11
12
13
14
15
16
17
18
19
20
21
22
23
24
25
26
27
28
29
30
31
32
33
34
35
36
37
38
39
40
41
42
43
44
45
46
47
48
49
50
51
52
Оглавление инструкции
  • Страница 1 из 53
    VT-1770 W Humidifier-air washer Увлажнитель-мойка воздуха 4 9 15 21 26 32 37 42 47 1 VT-1770_IM.indd 1 20.05.2013 14:16:21
  • Страница 2 из 53
    20 19 16 18 15 Рис. 1 Рис. 2 Рис. 3 Рис. 4 Рис. 5 Рис. 6 VT-1770_IM.indd 2 17 20.05.2013 14:16:22
  • Страница 3 из 53
    Рис. 7 Рис. 8 Рис. 9 Рис. 10 Рис. 11 Рис. 12 VT-1770_IM.indd 3 20.05.2013 14:16:22
  • Страница 4 из 53
    ENGLISH • HUMIDIFIER - AIR WASHER Insufficient room humidity negatively affects human health, pets, plants and furniture. The recommended comfortable room humidity level should be from 50 to 60%. Humidifier - air washer VT-1770 is a combined unit for air cleaning and humidifying. Using this unit
  • Страница 5 из 53
    ENGLISH • • • • • • • • Always unplug the unit and pour out water from the water tank and disc filter block before cleaning or if you do not use the humidifier. Before moving the humidifier to another place, unplug it and pour out water from the water tank and disc filter block. When moving the
  • Страница 6 из 53
    ENGLISH water. Install the filled water tank back to its place, close the lid (4) and switch the unit on. Notes: – During the operation you can check the water level in the tank (6) using the scale (2). – No water indicator (18) can also indicate that the disc filter block (1) is installed
  • Страница 7 из 53
    ENGLISH Cleaning of the inlet filter Clean the filter weekly. – Remove the inlet filter grid (10) (pic. 10). – Remove the inlet filter from the inner side of the grid (pic. 11). – Clean the filter. – Fix the filter on the inner side of the grid (10). – Insert the grid (10) ledges into the grooves
  • Страница 8 из 53
    ENGLISH DELIVERY SET Humidifier – air washer – 1 pc. Instruction manual – 1 pc. TECHNICAL SPECIFICATIONS Power supply: 220-230 V ~ 50 Hz Power consumption: 320 W Water tank capacity: 3 L Water discharge: ≥ 350ml/h Productivity: up to 150 m3/h Humidified area: up to 30 m2 The manufacturer preserves
  • Страница 9 из 53
    DEUTSCH LUFTBEFEUCHTER-LUFTWÄSCHER oder materiellen Schaden beim Nutzer hervorrufen. • Vor dem Einschalten des Geräts vergewissern Sie sich, dass die Netzspannung und die Betriebsspannung des Geräts übereinstimmen. • Verwenden Sie keine Adapterstecker beim Anschließen des Geräts ans Stromnetz, um
  • Страница 10 из 53
    DEUTSCH • • • • • • • • • • • • • • Decken Sie das Gerät nicht ab. Sperren Sie die Öffnungen des Geräts nicht und achten Sie darauf, dass keine fremden Gegenstände darin eindringen. Achten Sie darauf, dass die Luftaustrittsöffnungenmit fremden Gegenständen nicht blockiert werden. Es ist nicht
  • Страница 11 из 53
    DEUTSCH in diesem Betrieb reduziert sich die Drehgeschwindigkeit des Elektromotors, was niedrigeres Geräuschniveau sichert; * Beim Erreichen des eingestellten Niveaus der relativen Feuchtigkeit schaltet sich das Gerät aus, bei der Absenkung der relativen Raumluftfeuchtigkeit schaltet sich das Gerät
  • Страница 12 из 53
    DEUTSCH Um die Kinderschutz-Funktion auszuschalten, drücken und halten Sie die „KINDERSCHUTZ“Taste (19) innerhalb von drei Sekunden, dabei ertönt ein Tonsignal und erlischt die Anzeige (20). – Nehmen Sie Sie den Wasserbehälter (6) her- aus (Abb. 1). – Nehmen Sie den Deckel des Wasserbehälters ab
  • Страница 13 из 53
    DEUTSCH – Setzen Sie die Filtereinheit (1) ins Gehäuse des – Für die Reinigung des Gitters des Eingangsfilters (10) können Sie den Staubsauger mit einem entsprechenden Aufsatz benutzen. Geräts ein, stellen Sie den Wasserbehälter (6) zurück auf, stellen Sie den Deckel (4) zurück auf. Reinigung des
  • Страница 14 из 53
    DEUTSCH LIEFERUMFANG Luftbefeuchter-Luftwäscher – 1 St. Bedienungsanleitung – 1 St. TECHNISCHE EIGENSCHAFTEN Stromversorgung: 220-230 V ~ 50 Hz Aufnahmeleistung: 320 W Fassungsvermögen des Wasserbehälters: 3 l Wasserverbrauch: ≥ 350 ml/Stunde Leistung: bis 150 m3/Stunde Befeuchtungsfläche: bis 30
  • Страница 15 из 53
    русский Используйте устройство только по его прямому назначению, как изложено в данной инструкции. Неправильное обращение с прибором может привести к его поломке, причинению вреда пользователю или его имуществу. • Перед включением убедитесь в том, что напряжение в электрической сети соответствует
  • Страница 16 из 53
    русский • • • • • • • • • • • • • • • • Не используйте газированную или загрязненную воду, а также парфюмерные добавки. Температура используемой воды не должна превышать 40°С. Не включайте устройство без установленных фильтров и резервуара для воды. Отключайте прибор от сети перед снятием
  • Страница 17 из 53
    русский ся скорость вращения электромотора, что обеспечивает более низкий уровень шума; *При достижении установленного уровня относительной влажности устройство выключится, при уменьшении относительной влажности воздуха в помещении устройство включится, таким образом, в помещении будет
  • Страница 18 из 53
    русский ОТ ДЕТЕЙ» в течение трех секунд, при этом прозвучит звуковой сигнал, а индикатор (20) погаснет. – Снимите крышку резервуара и промойте резервуар тёплой водой с нейтральным моющим средством (рис. 2). – Потяните блок дискового фильтра (1) и извлеките его из корпуса устройства (рис. 3).
  • Страница 19 из 53
    русский – Снимите решетку входного фильтра (10) – – – – – ХРАНЕНИЕ – Перед тем, как убрать прибор на хранение, (рис. 10). Снимите входной фильтр с внутренней стороны решетки (рис. 11). Очистите фильтр. Закрепите фильтр на внутренней стороне решетки (10). Выступы решетки (10) вставьте в пазы на
  • Страница 20 из 53
    русский КОМПЛЕКТ ПОСТАВКИ Увлажнитель-мойка – 1 шт. Инструкция – 1 шт. ТЕХНИЧЕСКИЕ ХАРАКТЕРИСТИКИ Электропитание: 220-230 В ~ 50 Гц Потребляемая мощность: 320 Вт Емкость резервуара для воды: 3 л Расход воды: ≥ 350 мл/ч Производительность: до 150 м3/ч Площадь увлажнения: до 30 м2 Производитель
  • Страница 21 из 53
    Қазақша ЫЛҒАЛДАНДЫРҒЫШ-АУА ТАЗАРТҚЫШ және пайдаланушыға немесе оның мүлкіне зиян келтіруге әкеп соғуы мүмкін. • Қосар алдында, электр желісіндегі кернеу құрылғының жұмыс кернеуіне сәйкес келетіндігін тексеріп алыңыз. • Өрттің пайда болу тәуекелін болдырмас үшін құрылғыны электрлік розеткаға қосқан
  • Страница 22 из 53
    Қазақша • • • • • • • • • • • • • АЛҒАШҚЫ ПАЙДАЛАНАР АЛДЫНДА Құрылғыны төменгі температурада тасымалдағаннан немесе сақтағаннан кейін, оны бөлмелік температурада кемінде екі сағат уақыт бойы ұстау керек. Құрылғының бетін бүркемеңіз. Прибордың саңылауын жаппаңыз және оның ішіне басқа заттардың түсіп
  • Страница 23 из 53
    Қазақша ша белгіленген ылғалдық деңгейі ұсталып тұрады. – Қарқынды – тұрақты жұмыс режимі, бөлмедегі қатысты ылғалдық деңгейі ескерілмейді. индикаторы (12) және бөлмедегі қатысты ылғалдық деңгейін көрсететін индикатор (9) жанады. – Жұмыс аяқталған соң «ҚОСУ/СӨНД.» (17) түймесін басып, приборды
  • Страница 24 из 53
    Қазақша Резервуарға су толтырыңыз. Су толған резервуарды орнына орнтаып, қақпақты (4) жабыңыз және құрылғыны қосыңыз. Ескертпелер: – Резервуардағы (6) су деңгейін жұмыс істеп тұрған кезде шкала (2) арқылы анықтауға болады. – Судың жоқтығын білдіретін индикатор (18) диск сүзгі блогының (1) дұрыс
  • Страница 25 из 53
    Қазақша – Кіріс сүзгінің (10) торкөздерін тазалау үшін шаңсорғышты тиісті саптамасымен пайдалануға болады. (1) суды төгіп тастаңыз, сүзгі блогын (1) құрғатып сүртіңіз. – Приборды суымен бірге немесе диск сүзгі блогындағы су қалдығымен бірге сақтауға тыйым салынған. – Ылғалдандырғышты құрғақ,
  • Страница 26 из 53
    romÂnĂ/ Moldovenească UMIDIFICATOR – SPĂLARE DE AER păstraţi-o pentru utilizarea ulterioară în calitate de material de referinţă. Utilizaţi dospozitivul doar conform destinaţiei sale, cum este descris în prezenta instrucţiune. Manipularea necorespunzătoare poate duce la defectarea dispozitivului
  • Страница 27 из 53
    romÂnĂ/ Moldovenească • • • • • • • • • • • • • • • Nu conectați dispozitivul fără filtrele instalate și rezervorul de apă instalat. Deconectați dispozitivul de la rețeaua electrică înainte de a scoate rezervorul de apă sau grila filtrului de intrare. Nu acoperiţi dispozitivul. Nu blocați
  • Страница 28 из 53
    romÂnĂ/ Moldovenească – Somn* – regim de funcționare cu menținerea – Întroduceţi fişa cablului de alimentare în priza electrică, va răsuna un semnal sonor. – Conectaţi umidificatorul, apăsând pe butonul (17) «CONECTAT/DECONECTAT». Va răsuna un semnal sonor, se va ilumina indicatorul regimului
  • Страница 29 из 53
    romÂnĂ/ Moldovenească Spălați rezervorul de apă (6) și blocul filtrului de tip disc (1) cu o soluție de un detergent neutru o dată pe săptămână. – Extrageți rezervorul de apă (6) (fig. 1). – Scoateți capacul rezervorului și spălați rezervorul cu apă caldă și un detergent de spălare neutru (fig. 2).
  • Страница 30 из 53
    romÂnĂ/ Moldovenească Curățarea filtrului de intrare Efectuați curățarea filtrului în fiecare săptămână. – Scoateți grila filtrului de intrare (10) (fig. 10). – Scoateți filtrul de intrare de pe partea interioară a grilei (fig. 11). – Curățați filtrul. – Fixați filtrul pe partea interioară a grilei
  • Страница 31 из 53
    romÂnĂ/ Moldovenească SET DE LIVRARE Umidificator-spălare de aer – 1 buc. Instrucţiune – 1 buc. CARACTERISTICI TEHNICE Alimentare electrică: 220-230V ~ 50 Hz Putere de consum: 320 W Capacitatea rezervorului de apă: 3 l Consum de apă: ≥ 350 ml/oră Productivitate: până la 150 m.c/oră Suprafaţa de
  • Страница 32 из 53
    Český ZVLHČOVAČ A PRAČKA VZDUCHU chu, škodu na zdraví uživatele nebo na jeho majetku. • Před zapojením přístroje se přesvědčte, že napětí v elektrické síti odpovídá provoznímu napětí přístroje. • Aby nedošlo k požáru nepoužívejte adaptéry při připojení přístroje k elektrické síti. • Umísťujte
  • Страница 33 из 53
    Český • • • • • • • • • • • Neponořujte těleso přístroje, přívodní kabel ani vidlici přívodního kabelu do vody nebo jakékoli jiné tekutiny. Ne užívejte přístroj v koupelnách nebo v místech se zvýšenou vlhkosti. Nepřenášejte a nenaklánějte přístroj za provozu. Vždy odpojujte přístroj od elektrické
  • Страница 34 из 53
    Český POJISTKA. Pro zapnutí přístroje nebo změnu nastavení je třeba předem vypnou dětskou pojistku. Pro zapnutí funkce dětské pojistky stiskněte a podržte tlačítko (19) DĚTSKÁ POJISTKA během třech vteřin, při tom se ozve zvukový tón a rozsvítí se indikátor (20). Pro vypnutí funkce dětské pojistky
  • Страница 35 из 53
    Český 2 lžíce kyseliny citrónové v 3 litrech vody. Rozmontujte diskový filtr (2) a ponořte součástky do roztoku kyseliny citrónové přibližně na 1 hodinu. Pak důkladně umyjte a osušte součástky diskového filtru (2). Smontujte diskový filtr (2) (obr. 9). – Vložte diskový filtr (2) do jednotky filtru
  • Страница 36 из 53
    Český Nezvyklý hluk za provozu Zjevné zmenšení proudu vzduchu Údaje indikátoru stupně relativní vlhkosti jsou stále stejné Nesprávné namontování jednotky filtru (1) a diskového filtru (2) Diskový filtr (2) je znečištěn Znečištění vstupního filtru Zkontrolujte smontování přístroje Nadměrná plocha
  • Страница 37 из 53
    УКРАЇНЬСКа ладом може привести до його поломки, спричинення шкоди користувачеві або його майну. • Перед включенням переконайтеся в тому, що напруга в електричній мережі відповідає робочій напрузі пристрою. • Щоб уникнути ризику виникнення пожежі не використовуйте перехідники при підключенні
  • Страница 38 из 53
    УКРАЇНЬСКа • • • • • • • • • • • • • • • • ПЕРЕД ПЕРШИМ ВИКОРИСТАННЯМ Після транспортування або зберігання пристрою при зниженій температурі необхідно витримати його при кімнатній температурі не менше двох годин. – Звільните прилад від упаковки і видалите пакувальні матеріали і будь-які наклейки,
  • Страница 39 из 53
    УКРАЇНЬСКа зволожувача через 2, 4 або 8 годин, при цьому спалахне один з індикаторів (14). Для виключення таймера послідовно натискуйте кнопку (13) «ТАЙМЕР», або вимкніть пристрій, натиснув на кнопку (17) «ВКЛ./ВИКЛ.». – Діждіться повного виключення пристрою (електромотор вентилятора вимкнеться
  • Страница 40 из 53
    УКРАЇНЬСКа – Індикатор відсутності води (18) може – Дисковий фільтр (2) помістите в розчин також сигналізувати про неправильну установку блоку дискового фільтру (1). нейтрального миючого засобу приблизно на 1 годину (мал. 7). Розберіть дисковий фільтр (2), знявши опорну втулку з одного боку і
  • Страница 41 из 53
    УКРАЇНЬСКа УСУНЕННЯ НЕСПРАВНОСТЕЙ Несправність Пристрій не працює Сторонній запах під час роботи Сторонні звуки при роботі Помітне зниження повітряного потоку Свідчення індикатора рівня відносної вологості залишаються незмінними Можливі причини Неправильне підключення пристрою Усунення
  • Страница 42 из 53
    Беларуская • УВІЛЬГАТНЯЛЬНІК-МЫЙКА ПАВЕТРА Недастатковая вільготнасць у памяшканні негатыўна адбіваецца на здароўі чалавека, хатніх жывёл, раслінах і прадметах мэблі. Рэкамендуемы камфортны ўзровень адноснай вільготнасці паветра ў памяшканнях павінен быць ад 50 да 60%. Увільгатняльнік-мыйка паветра
  • Страница 43 из 53
    Беларуская • • • • • • • • • • • • увільгатняльнік на мяккія паверхні, напрыклад на ложак, у пазбяганне блакавання паветраных адтулін прылады і ўзнікненні пажару. Не апускайце корпус прыбора, сеткавы шнур ці вілку сеткавага шнура ў ваду ці ў іншыя вадкасці. Не выкарыстоўвайце прыбор у ванных пакоях
  • Страница 44 из 53
    Беларуская – Скразнякі ці іншыя паветраныя струмені могуць уплываць на паказанні вільготнасці паветра ў памяшканні. Кнопка «БЛАКІРОЎКА АД ДЗЯЦЕЙ» Пры ўключанай функцыі блакіроўкі ад дзяцей нельга змяніць раней устаноўленыя рэжымы працы прылады. Калі вы адключылі прыладу, націснуўшы кнопку (17)
  • Страница 45 из 53
    Беларуская – штодня змяняйце ваду ў рэзервуары для вады (6). Нататка: – Не апускайце корпус прыбора ў ваду ці любыя іншыя вадкасці. Раз у тыдзень старанна прамывайце рэзервуар для вады (6) і блок дыскавага фільтра (1) растворам нейтральнага мыйнага сродку. – Выміце рэзервуар для вады (6) (мал. 1).
  • Страница 46 из 53
    Беларуская УСТАРАНЕННЕ НЯСПРАЎНАСЦЯЎ Няспраўнасць Магчымыя прычыны Устараненне няспраўнасцяў Прылада не працуе Няправільнае падключэнне прылады Праверце, ці ўстаўлена вілка сеткавага шнура ў электрычную разетку Няправільная ўстаноўка дыскавага фільтра Устанавіце блок фільтра (1) правільна У
  • Страница 47 из 53
    O’zbekcha HАVОNI NАMLОVCHI-TОZАLОVCHI bo’lgаndа o’qib bilish uchun qo’llаnmаsini sаqlаb оlib qo’ying. Jihоzni fаqаt mаqsаdigа muvоfiq, qo’llаnmаsidа аytilgаndеk ishlаting. Jihоz nоto’g’ri ishlаtilsа buzilishi, fоydаlаnuvchi yoki uning mulkigа zаrаr qilishi mumkin. • Ishlаtishdаn оldin elеktr
  • Страница 48 из 53
    O’zbekcha • • • • • • • • • • • • • • • • • BIRINCHI MАRTА ISHLАTISHDАN ОLDIN Jihоz sоvuq hаvоdа оlib kеlingаn yoki turgаn bo’lsа ishlаtishdаn оldin kаmidа ikki sоаt хоnа hаrоrаtidа turishi kеrаk. Suv idishi yoki kirish filtri pаnjаrаsini оlishdаn оldin jihоzni elеktrdаn аjrаtib qo’ying. Jihоzni
  • Страница 49 из 53
    O’zbekcha Eslаtmа: – Tugmаsi bоsilgаndа оvоz eshitilаdi. – Ko’rsаtgich (9) ko’rsаtаdigаn nаmlik dаrаjаsi bоshqа gigrоmеtr ko’rsаtgаnidаn fаrq qilishi mumkin. – Nаmlik dаrаjаsi хоnаdаgi hаrоrаtgа bоg’liq bo’lаdi. – Yеlvizаk bilаn shаmоl хоnаdаgi nаmlik ko’rsаtgichigа tа’sir qilishi mumkin.
  • Страница 50 из 53
    O’zbekcha – Suv qоlmаgаnini ko’rsаtаdigаn chirоq sоlib qo’ying (7-rаsm). Bir tоmоnidаgi tаyanch nаychа bilаn ikkinchi tоmоnidаgi аylаntirgich tishli g’ildirаkni оlib gаrdish filtrni (2) оling (8-rаsm). Gаrdish filtrni (2) ikki qismgа аjrаting, cho’tkа bilаn filtr (2) ichi bilаn sirtidаgi kirni
  • Страница 51 из 53
    O’zbekcha NОSОZLIKLАRNI TUZАTISH Nоsоzlik Jihоz ishlаmаyapti Bo’lishi mumkin bo’lgаn sаbаbi Jihоz elеktrgа nоto’g’ri ulаngаn Ishlаyotgаndа nохush hid chiqаyapti Gаrdishli filtr nоto’g’ri qo’yilgаn Хоnаdаgi hаvоning nisbiy nаmligi ko’p yoki hаvоning nisbiy nаmligi mа’lum dаrаjаgа yеtgаnidаn kеyin
  • Страница 52 из 53
    gb A production date of the item is indicated in the serial number on the technical data plate. A serial number is an eleven-unit number, with the first four figures indicating the production date. For example, serial number 0606ххххххх means that the item was manufactured in June (the sixth month)
  • Страница 53 из 53