Инструкция для VITEK VT-2620 ST

(скачивание инструкции бесплатно)
Формат файла: PDF
Доступность: Бесплатно как и все руководства на сайте. Без регистрации и SMS.
Дополнительно: Чтение инструкции онлайн
background image

4

 ENGLISH

at  least  two  hours  at  room  temperature  before 
switching on.

Unpack the unit completely and remove any stickers 
that can prevent unit operation.
– 

Check the unit for damages, do not use it in case 
of damages.

– 

Before switching the unit on, make sure that your 
home mains voltage corresponds to the unit oper-
ating voltage.

– 

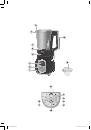
Before using the unit, wash all removable parts in 
warm water with a neutral detergent: the bowl (4), 
lid (8), measuring cup (9). Dry all the parts thor-
oughly before assembling.

– 

Clean the motor unit (1) with a soft, slightly damp 
cloth and then wipe it dry.

Attention! 
Do  not  immerse  the  motor  unit  (1),  power  cord 
and plug into water or any other liquids.
Do not place the bowl (4) into a dishwashing ma-
chine.

GENERAL INFORMATION
Volume recommendations 

The total amount of ingredients for soup and soup pu-
ree, including liquids, must not exceed 1400 ml.  
The total amount of ingredients (including liquids) for 
mixing and chopping in the “Blender” mode must not 
exceed 1700 ml.
In the “Ice” mode process simultaneously no more than 
8 to 10 ice cubes (total weight not more than 100 g). 

Locking system

If the lid (8) is not installed properly, the locking sys-
tem is actuated (the unit can not be switched on). 
The  locking  system  also  switches  the  unit  off  every 
time when you remove or turn the lid (8).  To continue 
the  unit  operation,  lock  the  lid  (see  clause  “General 
recommendations for use”) and reprogram the unit.

Adding of ingredients

To add ingredients during the unit operation, do not 
turn the lid (8) but remove the measuring cup (9) by 
turning it counterclockwise until bumping.  Add ingre-
dients, place the measuring cup back to its place, by 
matching  ledges  on  the  cup  with  grooves  on  the  lid 
and turn the cup clockwise until bumping. 

Notes: 

Add a small amount of water if chopping of products 
or ice is hindered.
To add ingredients while soup or soup puree cooking, 
put on thermal protective potholders and remove the 
measuring cup (9).   

Attention! Never add ingredients during the sec-
ond and third stages of the “Soup puree” mode!

Memory function

– 

In  case  of  emergency  power  cutoff  or  when  you 
are opening the lid (8) during “Soup” and “Soup 
Puree” operation modes, the memory function is 
activated with duration of up to 20 minutes. 

– 

If the power supply is restored within 20 minutes 
the unit will continue to perform the pre-set pro-
gram from the moment it has been stopped at. 

– 

If there is no power for more than 20 minutes, pro-
gram the unit again. 

Standby mode, sleep mode and automatic switch 
off function

– 

The  unit  in  standby  mode  is  ready  for  using.    In 
the standby mode, the backlight of the display (3) 
and control buttons glows, and the button (16)   
flashes red.  

– 

If the unit is in the standby mode, and you do not 
touch the control panel buttons (2) for 1 minute, 
the unit will be switched to the sleep mode. 

– 

In the sleep mode the backlight of the display (3) 
does not glow and the button (16)   flashes red. 
To start settings, press the button (16)   once.

– 

After 3 minutes in the sleep mode (display back-
light goes off) the unit is switched off, the back-
light of the buttons and display does not glow. To 
put the unit into the standby mode, press the but-
ton (16)   2 times.

Indicators of modes

Symbol   on the display (3) indicates that the unit is in 
the heating mode.  Symbol   is shown on the display 
in the chopping mode.

GENERAL RECOMMENDATIONS FOR USE

– 

Place the motor unit (1) on a flat stable surface, 
away from moisture and heat sources and direct 
sunlight.

– 

Set  the  bowl  (4)  on  the  motor  unit  (1)  and  put 
products into it (see “Recipe book”).

– 

Place the lid (8) on the bowl (4), so the lock (7) is to 
the left from the bowl spout, then turn the lid clock-
wise until bumping. 

– 

Insert  the  measuring  cup  (9)  into  the  opening 
of  the  lid  (8)  matching  ledges  on  the  cup  with 
grooves in the opening.  Then turn the cup clock-
wise until bumping.

– 

Plug the power cord into the mains socket, you will 
hear a sound signal, the display (3) backlight will 
flash once and the backlight of button (16)   will 
flash red (the unit is in the sleep mode).

– 

Press the button (16)   to switch the unit from the 
sleep mode to the standby mode, the backlight of 
the display (3) will glow.

VT-2620.indd   4

20.06.2014   15:47:21

1
2
3
4
5
6
7
8
9
10
11
12
13
14
15
16
17
18
19
20
21
22
23
24
25
26
27
28
29
30
31
32
Оглавление инструкции
  • Страница 1 из 33
    VT-2620 ST Soup maker Суповарка 3 7 12 17 22 27 1 VT-2620.indd 1 20.06.2014 15:47:20
  • Страница 2 из 33
    VT-2620.indd 2 20.06.2014 15:47:20
  • Страница 3 из 33
    ENGLISH •• Remove the bowl from the motor unit and remove the products only after complete stop of knife’s rotation. •• When disconnecting the power plug from the mains, pull the plug but not the cord. •• Do not touch the motor unit body and power plug with wet hands. •• Do not use the unit near
  • Страница 4 из 33
    ENGLISH at least two hours at room temperature before switching on. Unpack the unit completely and remove any stickers that can prevent unit operation. – Check the unit for damages, do not use it in case of damages. – Before switching the unit on, make sure that your home mains voltage corresponds
  • Страница 5 из 33
    ENGLISH Make settings of the unit (see OPERATION MODES section). – Switch cooking/chopping on, by pressing the button (16) , the button backlight will change color from red to green. – After cooking/chopping is over, you will hear 4 sound signals. – To stop operation of the cooking/chopping mode
  • Страница 6 из 33
    ENGLISH Before you start chopping / mixing: •• Peel fruits, remove stones and cut products into small cubes of about 2x2 cm. •• Remove bones, sinews and cartilage from meat. •• Cut meat, onion, garlic, carrots etc. into approximately equal slices. •• When chopping greens, remove stems of herbs.
  • Страница 7 из 33
    русский •• Не допускайте соприкосновения сетевого шнура с горячими поверхностями и острыми кромками мебели. •• Запрещается использовать устройство вне помещений. •• Всегда отключайте устройство от электросети, если вы его не используете. •• Не прикасайтесь к лезвиям ножа, они острые и представляют
  • Страница 8 из 33
    русский •• Дети старше 8 лет и люди с ограниченными возможностями могут пользоваться устройством, только если они находятся под присмотром лица, отвечающего за их безопасность, а также, если им были даны соответствующие и понятные инструкции о безопасном использовании устройства и тех опасностях,
  • Страница 9 из 33
    русский – Мерный стаканчик (9) вставьте в отверстие крышки (8), совместив выступы на стаканчике с пазами в отверстии. Затем поверните стаканчик по часовой стрелке до упора. – Вставьте вилку сетевого шнура в розетку, прозвучит звуковой сигнал, мигнёт подсветка дисплея (3), а подсветка кнопки (16)
  • Страница 10 из 33
    русский устройство доводит жидкость до кипения и поддерживает температуру 100°С в течение 1 минуты. Затем суповарка переходит в режим умеренного нагрева (5 секунд нагрев, 10 секунд пауза). Первый этап приготовления длится 17 минут. Второй этап приготовления состоит из 2 циклов
  • Страница 11 из 33
    русский – Кнопками (11) «+/-» установите скорость вращения ножа (5). – Установите продолжительность работы. Для этого одной рукой нажмите и удерживайте кнопку (14) «БЛЕНДЕР», другой рукой нажимайте кнопки (11) «+/-». – Завершив настройку, нажмите кнопку (16) , начнётся измельчение. На дисплее (3)
  • Страница 12 из 33
    Қазақша КӨЖЕӘЗІРЛЕГІШ Құрылғы көже, көже-езбе әзірлеуге, сондай-ақ әртүрлі азық-түліктерді ұсақтау және араластыруға арналған. •• Құрылғыны бөлмеден тыс жерде пайдалануға тыйым салынады. •• Егер құрылғыны пайдаланбайтын болсаңыз, оны міндетті түрде электр желісінен ажыратып отырыңыз. •• Пышақ
  • Страница 13 из 33
    Қазақша сұйықтықпен қоса алғандағы жалпы көлемі 1400 мл аспауы тиіс. «Блендер» режиміндегі араластырылатын және ұсақталатын ингредиенттердің (сұйықтықты қоса алғанда) жалпы көлемі 1700 мл аспауы тиіс. «Мұз» режимінде бір мезгілде ең көбі 8-10 мұз текшелерін өңдеңіз (жалпы салмағы 100 г аспауы
  • Страница 14 из 33
    Қазақша (3) жарығы, басқару түймелерінің жарығы жанып тұрады, ал (16) түйме қызыл түспен жыпылықтап тұрады. – Егер құрылғы күту режимінде тұрып, сіз басқару панелінің түймесіне (2) 1 минут ішінде қол тигізбесеңіз, онда құрылғы ұйқы режиміне ауысады. – Ұйқы режимінде дисплей (3) жарығы жоқ, ал (16)
  • Страница 15 из 33
    Қазақша және құрылғы температураны ұстап тұру режиміне өтеді. 25 минут өткен соң құрылғы күту режиміне өтеді. – Температураны ұстап тұру режимін орнатылған түймесін уақыттан бұрын ажырату үшін (16) басыңыз. – Ұсақтау кезінде дисплейде (3) болады. таңбасы пайда «Блендер» режимі «Блендер» режимі
  • Страница 16 из 33
    Қазақша әдепкі бойынша орнатылған баптаулар көрінеді. – (16) түймесін басыңыз, пышақ (6) айнала бастайды, дисплейде таңбасы пайда болады, осы кезде қалған жұмыс уақыты көрсетіледі. – «Мұз» режимінде жұмыс жасағанда қақпағын ұстап тұрыңыз. МОТОРЛЫ БЛОКТЫ (1) КЕЗ КЕЛГЕН СҰЙЫҚТЫҚТАРҒА БАТЫРУҒА, ОНЫ
  • Страница 17 из 33
    УКРАЇНЬСКа •• Не допускайте зіткнення мережевого шнура з гарячими поверхнями і гострими кромками меблів. •• Забороняється використовувати пристрій поза приміщеннями. •• Обов’язково вимикайте пристрій з електромережі, якщо ви їм не користуєтеся. •• Не торкайтеся лез ножів, вони дуже гострі і
  • Страница 18 из 33
    УКРАЇНЬСКа •• •• •• •• •• •• лише в тому випадку, якщо вони знаходяться під наглядом особи, що відповідає за їх безпеку, за умови, що ним були дані відповідні і зрозумілі інструкції про безпечне користування пристроєм і тієї небезпеки, яка може виникати при його неправильному використанні. З
  • Страница 19 из 33
    УКРАЇНЬСКа нання заданої програми з моменту, на якому вона була припинена. – У випадку відсутності електроживлення більше 20 хвилин необхідно заново зробити програмування пристрою. – – Режим очікування, сплячий режим та функція автовимкнення – Якщо пристрій знаходиться у режимі очікування, він
  • Страница 20 из 33
    УКРАЇНЬСКа – Послідовно натискуючи або утримуючи кнопки (11) «+/-», установіть тривалість приготування. , пристрій пере– Натисніть на кнопку (16) йде до приготування: почнеться зворотний буде відлік часу приготування, кнопка (16) блимати зеленим кольором, а на дисплеї (3) з’явиться символ . – Якщо
  • Страница 21 из 33
    УКРАЇНЬСКа – Установіть тривалість роботи. Для цього однією рукою натисніть і утримуйте кнопку (14) «БЛЕНДЕР», іншою рукою натискуйте на кнопки (11) «+/-». – Завершивши настроювання, натисніть на , почнеться здрібнювання. На кнопку (16) дисплеї (3) будуть відображатися встановта лена швидкість
  • Страница 22 из 33
    Беларуская •• Забараняецца выкарыстоўваць прыладу па-за памяшканнямі. •• Абавязкова адключайце прыладу ад электрасеткі, калі вы яе не выкарыстоўваеце. •• Не дакранайцеся да лёзаў нажа, яны вострыя і ўяўляюць небяспеку! •• У выпадку неспадзяванага прыпынку нажа адключыце прыладу ад электрычнай
  • Страница 23 из 33
    Беларуская •• •• •• •• •• •• Увага! Не апускайце маторны блок (1), сеткавы шнур і вілку сеткавага шнура ў ваду ці ў любыя іншыя вадкасці. Не змяшчайце чару (4) у посудамыйную машыну. калі яны знаходзяцца пад наглядам асобы, якая адказвае за іх бяспеку, пры ўмове, што ім былі дадзены адпаведныя і
  • Страница 24 из 33
    Беларуская рэжымаў «Суп» і «Суп-пюрэ», актывуецца функцыя памяці працягласцю да 20 хвілін. – Калі электрасілкаванне было адноўлена на працягу 20 хвілін, прылада працягвае выкананне зададзенай праграмы з моманту, на якім яна была прыпынена. – У выпадку адсутнасці электрасілкавання больш 20 хвілін
  • Страница 25 из 33
    Беларуская – – – – – (100°С), сярэднюю (80°С) ці нізкую (60°С), пры гэтым падсвятленне кнопкі (13) будзе міргаць. Паслядоўна націскаючы ці ўтрымліваючы кнопкі (11) «+/-», устанавіце працягласць прыгатавання. Націсніце на кнопку (16) , прылада пяройдзе да прыгатавання: пачнецца зваротны адлік будзе
  • Страница 26 из 33
    Беларуская Устанавіце працягласць працы. Для гэтага адной рукой націсніце і ўтрымлівайце кнопку (14) «БЛЭНДАР», іншай рукой націскайце на кнопкі (11) «+/-». – Завяршыўшы настройку, націсніце на кнопку , пачнецца драбненне. На дысплеі (16) (3) будуць адлюстроўвацца ўстаноўленая і час працы, хуткасць
  • Страница 27 из 33
    O’zbekcha SHO’RVА PISHIRGICH Jihоz sho’rvа, pyurеli sho’rvа pishirishgа, turli mаsаlliqni mаydаlаshgа vа аrаlаshtirishgа ishlаtilаdi. •• Jihоzni •• •• Qismlаri 1. Mоtоr blоki 2. Ishlаtish pаnеli 3. Displеy 4. Sho’rvа pishirgich idishi 5. Qizitgich 6. Pichоq 7. Qоpqоq mаhkаmlаgichi 8. Qоpqоq 9.
  • Страница 28 из 33
    O’zbekcha •• •• •• •• •• tushunаrli qilib o’rgаtilgаn, nоto’g’ri ishlаtilgаndа qаndаy хаvf bo’lishi mumkinligi tushuntirilgаn bo’lsаginа jihоzni ishlаtishlаri mumkin. Bоlаlаrni ehtiyot qilish uchun o’rаshgа ishlаtilgаn pоlietilеn хаltаlаrni qаrоvsiz qоldirmаng. Diqqаt! Bоlаlаr pоlietilеn хаltа yoki
  • Страница 29 из 33
    O’zbekcha Kutish hоlаtidа turishi, uхlаsh hоlаtigа o’tishi vа o’zi o’chish хususiyati – Kutish hоlаtidа jihоz ishlаtishgа tаyyor bo’lаdi. Kutish hоlаtidа displеy (3) yorishib ishlаtish pаnеlidаgi tugmаlаr o’chmаsdаn yonаdi, tugmаsi (16) esа qizil bo’lib o’chib-yonib turаdi. – Kutish hоlаtidа 1
  • Страница 30 из 33
    O’zbekcha Diqqаt! «Pyurеli sho’rvа» dаsturining ikkinichi vа uchinchi bоsqichlаridа оvqаtgа mаsаlliq qo’shish tа’qiqlаnаdi! yashil bo’lib o’chib-yonаdi, displеydа (3) esа аlоmаti ko’rinаdi. – Аgаr оvqаt pishаdigаn hаrоrаt pаst qilib qo’yilgаn bo’lsа оvqаt pishgаnidаn kеyin jihоz kutish hоlаtigа
  • Страница 31 из 33
    O’zbekcha (14) bоsib ushlаb turing, bоshqа qo’lingiz bilаn esа «+/-» tugmаsini (11) bоsing. tugmаsini (16) – To’g’rilаb bo’lgаndаn kеyin bоsing, jihоz mаsаlliqni mаydаlаy bоshlаydi. Displеydа (3) bеlgilаb qo’yilgаn pichоq аlоmаti vа ishlаydigаn аylаnаdigаn tеzlik, vаqti ko’rinаdi. O’ZINI TОZАLАSHI
  • Страница 32 из 33
    gb A production date of the item is indicated in the serial number on the technical data plate. A serial number is an eleven-unit number, with the first four figures indicating the production date. For example, serial number 0606ххххххх means that the item was manufactured in June (the sixth month)
  • Страница 33 из 33