3
ENGLISH
CLOCK RADIO
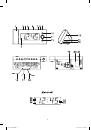
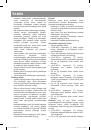
DESCRIPTION
1.
Projector
2.
Display
3.
«NAP/M+/MEM.SET» button for display auto
switch/ radio stations recording and switch-
ing/ countdown timer setting.
4.
First alarm on/off/setup button «ALARM 1»
5.
Second alarm on/off/setup button «ALARM
2»
6.
«SNOOZE/SLEEP/DIMMER» button for
alarm signal repeat /sleep timer/display
brightness setting
7.
«CLK.ADJ./TEMP» button for date and time
setting/for displaying temperature and fre-
quency when tuning radio.
8.
Button for frequency decreasing when radio
tuning /current date «Y-M-D» displaying
9.
«DST/C-F» button for frequency increasing
when radio tuning / setting a clock to sum-
mer/winter time/temperature measurement
unit selection.
10.
«DISPLAY» button for on/off switching of
sequential displaying mode / volume level
increase.
11.
Radio on/off button
12.
Volume level decrease button
13.
«FOCUS» projector focus control
14.
«180°FLIP» button of projected image rota-
tion
15.
«PROJECTION ON/OFF» projector on/off
button
16.
Temperature indication
17.
FM-antenna cord
18.
Power cord
19.
Battery compartment lid
20.
«RESET» button
21.
Label
Display
22.
Radio on indicator
23.
«AL 2» second alarm on indicator
24.
«AL 1» first alarm on indicator
25.
Display auto switch off indicator
26.
«PM» time indicator
SAFETY MEASURES
Before connection, usage and tuning of clock
radio read the instruction carefully. Follow all
warnings and operating recommendations for
unit operation contained in this instruction.
Keep this manual and use it for future reference.
•
Make sure that unit operating voltage corre-
sponds to voltage of your mains.
•
In order to avoid risk of fire or electric shock,
do not expose the unit to rain or moisture.
•
Do not immerse the unit, its power cord or
power plug into water or other liquids.
•
To prevent fire or electric shock hazard do
not use this unit in places with high humid-
ity, near kitchen sinks or bath tubs filled with
water, near swimming pool, in wet base-
ments, etc. Prevent the unit from dripping
and splashing.
•
Do not overload sockets or extension cords
as this can result in fire or electric shock.
•
Place the clock radio in such a way that you
can easily pull out the plug from the socket in
case of any malfunction.
•
For additional unit protection during lighting
storm and in cases when you are not going to
use it for a long time, unplug it. It will prevent
the unit from being damaged by lightning
and power surges.
•
To unplug the unit, take its plug, do not pull
the cord.
•
To prevent shock hazard do not remove the
cover by yourself. Do not repair the unit or
make any changes in it by yourself. If there
are any damages in the unit disconnect it
from the mains and apply to the authorized
service center.
•
Install the unit on flat surface in places with
proper ventilation. Do not block the unit’s
ventilation openings.
•
Place the unit on the flat stable waterproof
surface, away from equipment with strong
magnetic field, for example, from video and
audio recording devices or big speakers,
as magnetic electric field lines from these
devices cause interferences while unit oper-
ation.
•
Do not connect FM-antenna with external
antenna.
•
Do not set the unit near heat sources such
as radiators, heaters, stoves, or in places
exposed to direct sunlight, excessive dust,
vibration or mechanical shocks. It is prohib-
ited to place sources of open fire, such as
candles on the unit.
•
Do not let foreign objects get into unit open-
ings.
•
This unit is not intended for usage by chil-
dren or disabled persons unless they are
VT-3516 IM.indd 3
26.01.2012 12:48:27