Инструкция для VITEK VT-4212 BK

(скачивание инструкции бесплатно)
Формат файла: PDF
Доступность: Бесплатно как и все руководства на сайте. Без регистрации и SMS.
Дополнительно: Чтение инструкции онлайн
background image

7

ENGLISH          

down of the time needed for the cooking to be fin-
ished will start on the display (3)).   

Example: 

If you set the cooking end time for 1 hour, and duration 
of the selected program is 55 minutes, the unit will be 
switched  to  the  cooking  mode  in  5  minutes  after  the 
settings are finished (the «KEEP WARM» indicator (14) 
will go out, the «COOKING» indicator (13) will light up).

USING OF THE MULTICOOKER

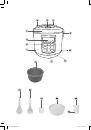
1.  Put  the  products  into  the  bowl  (12)  following  the 

recommendations  given  in  the  recipe  (see  «Rec-
ipe book»). 

Note

:


Make sure that the products and liquids level 

does not exceed the level of maximal mark «10» and 
is not lower than the level of minimal mark «4».


Max-

imal level mark for porridges (except rice) is «8».

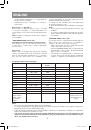
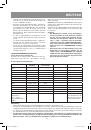
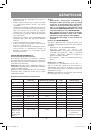
General example of loading porridges and required 
amount of water (as example rice is considered). 

– 

Measure  rice  with  the  measuring  cup  (23)  (one 
measuring  cup  is  equal  to  approximately  160  g  of 
rice), wash it and place in the casserole. 

– 

Add water using the scale with marks in cups (CUP).

Example:  Put  four  measuring  cups  of  rice,  pour 
water up to the graduating mark «4 CUP». 

– 

For cooking liquid milk porridges the recommended 
proportion of rice and water is 1:3.

2.  Make sure that the outer surface of the bowl (12) is 

clean and dry, insert the bowl (12) into the process 
chamber  of  the  unit.  The  bowl  should  be  placed 
evenly  and  in  secure  contact  with  the  heating  ele-
ment (9) surface.

Note: 

• 

Do  not  use  the  bowl  (12)  for  washing  cereals 
and do not chop products in it, this can damage 
the non-stick coating;

• 

Make  sure  that  there  are  no  foreign  objects, 
dirt or moisture in the process chamber and on 
the bottom of the bowl (12).

• 

Wipe  the  outer  surface  and  the  bottom  of  the 
bowl (12) dry before use.

• 

In  the  middle  of  the  heating  element  (9)  there 
is  a  temperature  sensor  (10).  Make  sure  that 
free movement of the sensor (10) is not limited.

3.  If you steam products, pour water into the bowl (12) 

so that boiling water does not reach the bottom of 
the  basket  (24).  Put  the  basket  (24)  with  food  into 
the bowl (12).

4.  Close the lid (4) until click.
5.  Insert the power cord jack into the connector (9) and 

the power cord plug into the socket. 

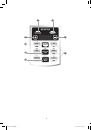
6.  Select  the  cooking  program  by  pressing  once  or 

twice  the  corresponding  button.  See  the  «Cooking 
program buttons (16)» section. Set the «Multicook» 
program as it is described in the «Multicook» button 
(17)» section.

7.  Cooking time in each program is set by default but it 

may be changed (except the «RICE» program»). To 

set the cooking time, press or hold the buttons (15) 
«-» and (20) «+».

Note

:  Setting  of  cooking  time  is  not  available  in  the 

«Rice» program, switch to the next step.

8.  Set  the  delayed  start  function  as  described  in  the 

«Delayed start» button (18)» section. If you want to 
start cooking immediately, skip this step.

9.  The  multicooker  will  be  automatically  switched  to 

the cooking mode in 10 seconds upon termination 
of  settings,  and  the  «COOKING»  indicator  (13)  will 
light up. 

Attention! 

• 

The  multicooker  is  automatically  switched  to 
the  operating  mode  in  about  10  seconds  after 
you  push  one  of  the  buttons  (16),  or  change 
program  operating  time  with  buttons  (15)  «-»/
(20)


«+»  or  set  the  delayed  start  time  with 

the  «DELAYED  START»  button  (18),  while  the 
«COOKING» indicator (13) will light up. 

• 

To  reset  program  settings  or  cancel  the  cook-
ing program, BE SURE to press the «STOP» but-
ton (19) (the «8888» symbols will light up on the 
display). 

• 

Never leave the unit connected to the mains un-
attended!

10. Watch  the  cooking  process,  stir  the  products  with 

the plastic spatula (21) or plastic soup ladle (22). Do 
not use metal objects that can scratch the non-stick 
coating of the bowl (12).

11. If you want to stop cooking, press the «STOP» but-

ton (19).

Attention!

• 

Never leave the operating unit unattended.

• 

To avoid burns, be careful when opening the lid 
(4). Do not bend over the steam valve (6) during 
operation  of  the  multicooker  and  do  not  place 
open parts of your body above the bowl (12)! 

• 

During  the  first  operation  of  the  multicooker 
some  foreign  smell  from  the  heating  element 
can appear. It is normal.

12. Upon termination of the cooking program the multi-

cooker will be switched to the keep warm mode, and 
the «KEEP WARM» indicator (14) will light up. 

Notes: 

• 

Despite the unit keeps the ready dish warm for 
24  hours,  it  is  not  recommended  to  leave  the 
cooked products in the bowl for a long time, be-
cause this may spoil the products.

• 

Do not use the keep warm mode to heat up cold 
products.

• 

After  steam  cooking,  do  not  remove  products 
with bare hands, use kitchen tools.  

RECOMMENDATIONS 

You can use the «Yogurt» and «Multicook» programs for 
dough proofing.
Dough proofing is a stage of dough making that takes 
place right before baking. During the proofing stage the 
dough  ferments  intensively,  restores  its  structure  and 

VT-4212_IM.indd   7

06.08.2013   12:38:36

1
2
3
4
5
6
7
8
9
10
11
12
13
14
15
16
17
18
19
20
21
22
23
24
25
26
27
28
29
30
31
32
33
34
35
36
37
38
39
40
41
42
43
44
45
46
47
48
49
50
51
52
53
54
55
56
Оглавление инструкции
  • Страница 1 из 57
    VT-4212 BK Multicooker Мультиварка 4 9 15 21 27 32 37 43 49 1 VT-4212_IM.indd 1 06.08.2013 12:38:35
  • Страница 2 из 57
    VT-4212_IM.indd 2 06.08.2013 12:38:36
  • Страница 3 из 57
    3 VT-4212_IM.indd 3 06.08.2013 12:38:36
  • Страница 4 из 57
    ENGLISH • MULTICOOKER The main purpose of the multicooker is swift and quality food cooking. • DESCRIPTION 1. Body 2. Control panel 3. Display 4. Lid 5. Lid opening button 6. Steam valve 7. Carrying handle 8. Condensation collector 9. Power cord connector 10. Heating element 11. Temperature sensor
  • Страница 5 из 57
    ENGLISH • • • • • • • • • – Never allow children to use the unit as a toy. For children safety reasons do not leave polyethylene bags, used as a packaging, unattended. Attention! Do not allow children to play with polyethylene bags or packaging film. Danger of suffocation! This unit is not intended
  • Страница 6 из 57
    ENGLISH – «Yogurt» and «Multicook» programs (if the user has set the temperature lower than 75ºС). To switch from the standby mode to the keep warm mode, press the button (19). To switch the keep warm off press the button (19) again. Notes: – Do not use the keep warm function to heat up cold
  • Страница 7 из 57
    ENGLISH down of the time needed for the cooking to be finished will start on the display (3)). Example: If you set the cooking end time for 1 hour, and duration of the selected program is 55 minutes, the unit will be switched to the cooking mode in 5 minutes after the settings are finished (the
  • Страница 8 из 57
    ENGLISH grows in size significantly. One of the main conditions of successful process is no draughts and maintenance of constant temperature (about 40°С), which is maintained in the «Yogurt» and «Multicook» programs. TECHNICAL SPECIFICATIONS Power supply: 220-240 V ~ 50/60 Hz Maximal power
  • Страница 9 из 57
    DEUTSCH • MULTIKOCHER Die Hauptbestimmung des Multikochers ist schnelle Nahrungszubereitung von hoher Qualität. • BESCHREIBUNG 1. Gehäuse 2. Bedienungsplatte 3. Bildschirm 4. Deckel 5. Taste der Deckelöffnung 6. Dampfventil 7. Tragegriff 8. Kondenswassersammler 9. Anschlußstelle des Netzkabels 10.
  • Страница 10 из 57
    DEUTSCH • • • • • • • • • • • • • • • • • VERWENDUNG DES BEHÄLTERS FÜR NAHRUNGSMITTELZUBEREITUNG (12) • Benutzen Sie den Multikocher und seine abnehmbaren Teile nur bestimmungsmäßig. • Es ist nicht gestattet, den Behälter (12) auf Heizgeräte oder Heizoberflächen zu stellen. • Es ist nicht
  • Страница 11 из 57
    DEUTSCH – – – – – – Bildschirm (3) wird die standardeingestellte Programmdauer angezeigt. Beispiel: Drücken Sie die “REIS/SUPPE”-Taste einmal, um das “Reis”-Programm zu wählen, die Tastenanzeige wird grün leuchten. Drücken Sie die “REIS/SUPPE”-Taste zweimal, um das “Suppe”-Programm zu wählen, die
  • Страница 12 из 57
    DEUTSCH • “MULTIKOCH”-Taste (17) Das „Multikoch“-Programm lässt Temperatur und Dauer der Nahrungsmittelzubereitung selbstständig einstellen. – Drücken Sie die “MULTIKOCH”-Taste (17). – Drücken Sie die “MULTIKOCH”-Taste (17) nochmals, auf dem Bildschirm (3) werden die Symbole «100°C» angezeigt,
  • Страница 13 из 57
    DEUTSCH • • Wischen Sie die Außenoberfläche und den Boden des Behälters (12) vor der Nutzung ab. • Im Zentrum des Heizelements (9) befindet sich der Temperatursensor (10). Achten Sie darauf, dass die Bewegung des Temperatursensors (10) nicht verhindert ist. 3. Während des Dampfkochens gießen Sie
  • Страница 14 из 57
    DEUTSCH • Nach ungefähr 10 Sekunden nach der Beendigung der Einstellung schaltet sich das Gerät in den Zubereitungsbetrieb um. Anmerkung: Um das beste Ergebnis zu erreichen, öffnen Sie den Deckel des Multikochers (4) bis zur Beendigung des Programms nicht. Joghurtgläser mit Deckeln – 6 St.
  • Страница 15 из 57
    русский • МУЛЬТИВАРКА Основное предназначение мультиварки – быстрое и качественное приготовление пищи. • ОПИСАНИЕ 1. Корпус 2. Панель управления 3. Дисплей 4. Крышка 5. Кнопка открытия крышки 6. Паровой клапан 7. Ручка для переноски 8. Сборник конденсата 9. Гнездо для подключения сетевого шнура 10.
  • Страница 16 из 57
    русский • • • • • • • • • • • • • • • • • • • Содержите в чистоте паровой клапан, в случае загрязнения очищайте его. Категорически запрещается эксплуатация прибора без установленной чаши и парового клапана. Также запрещается включать мультиварку без продуктов или достаточного объёма жидкости в
  • Страница 17 из 57
    русский Внимание! Не размещайте прибор вблизи ванн, раковин или других ёмкостей, наполненных водой. – Откройте крышку (4), нажав на кнопку (5) и извлеките чашу (12). – Снимите паровой клапан (6), а затем раскройте его, повернув нижнюю часть в положение «LOOSEN». – Промойте тёплой водой с
  • Страница 18 из 57
    русский – Не оставляйте включенное в сеть устройство без присмотра! старта устанавливается в часах. Данная функция не является доступной для программ «Выпечка», «Жарка» и «Йогурт». • Выберите программу и установите продолжительность приготовления (см. раздел «Использование мультиварки»). • Нажмите
  • Страница 19 из 57
    русский • Убедитесь в том, что в рабочей камере и на дне чаши (12) нет посторонних предметов, загрязнений или влаги. • Перед использованием вытрите внешнюю поверхность и дно чаши (12) насухо. • В середине нагревательного элемента (9) находится датчик температуры (10). Следите за тем, чтобы движению
  • Страница 20 из 57
    русский • Для программы «Мультиповар» установите температуру 35°С-45°С (см. раздел «Кнопка (17) «Мультиповар»). • Приблизительно через 10 секунд после завершения настройки устройство перейдёт в режим приготовления. Примечание: Для получения наилучшего результата не открывайте крышку мультиварки (4)
  • Страница 21 из 57
    Қазақша МУЛЬТИПІСІРГІШ Мультипісіргіштің негізгі міндеті – тамақты жылдам және сапалы пісіру. • • СИПАТТАМАСЫ 1. Корпусы 2. Басқару тақтасы 3. Дисплей 4. Қақпағы 5. Қақпақты ашу пернесі 6. Бу құлақшасы 7. Тасымалдау тұтқасы 8. Ылғал жинауыш 9. Желілік бауды қосуға арналған ұя 10. Қыздырғыш элемент
  • Страница 22 из 57
    Қазақша • • • • • • • • • • • • • • • • Құрғақ тағамдардың және сұйықтықтардың көлемі бойынша ұсыныстарды қатаң сақтаңыз. Құрылғы жұмыс істеп тұрғанда тостағанды шығармаңыз. Құрылғы жұмыс уақытында бүркеп жаппаңыз. Назар аударыңыз! Тағамдарды буға дайындаған кезде тостағандағы сұйықтық деңгейін
  • Страница 23 из 57
    Қазақша – – – – Мысал: «КҮРІШ/КӨЖЕ» батырмасын бір рет басыңыз, «Күріш» бағдарламасын таңдау үшін, Батырма көрсеткіші жасыл түспен жанады. «КҮРІШ/КӨЖЕ» батырмасын екі екі реет басыңыз, «Көже» бағдарламасын таңдау үшін, батырма көрсеткіші қызыл түспен жанады. Назар аударыңыз! – Мультипісіргіш сіз
  • Страница 24 из 57
    Қазақша – батырмасын (19) басыңыз (дисплейде отобразятся символы «8888»)! Желіге қосылған құрылғыны қараусыз қалдырмаңыз! старт уақыты сағатпен белгіленеді. Берілген қызмет «Қуыру» «Нан пісіру» және «Йогурт» бағдарламалары үшін қолжетімсіз. • Бағдарламаны таңдаңыз және дайындау ұзақтығын таңдаңыз
  • Страница 25 из 57
    Қазақша • Жұмыс камерасында және тостаған (12) түбінде бөтен заттардың, ластанудың және ылғалдыңи болмауына көз жеткізіңіз. • Пайдалану алдында, тостағанның (12) сыртқы бетін және түбін сүртіңіз. • Қыздырғыш элементтің (9) ортасында температура бергіші (10) бар. Бергіштің (10) еркін қозғалуына
  • Страница 26 из 57
    Қазақша ЖЕТКІЗІЛІМ ЖИНАҒЫ Мультипісіргіш – 1 дн. Желілік бау – 1 дн. Тостаған – 1 дн. Буға пісіруге арналған табақ – 1 дн. Ожау – 1 дн. Қалақ – 1 дн. Өлшеуіш стақан – 1 дн. Қақпақтары бар йогуртқа арналған стаканшалар – 6 дн. Нұсқаулық – 1 дн. • Батырмаларамен (15) «-» және (20) «+» жұмыс ұзақтығын
  • Страница 27 из 57
    romÂnĂ/ Moldovenească MULTICOOKER Destinaţia de bază a multicooker-ului constă în prepararea rapidă şi calitativă a mâncării. • • DESCRIERE 1. Carcasă 2. Panou de comandă 3. Display 4. Capac 5. Buton deschidere capac 6. Supapă de aburi 7. Mâner pentru transportare 8. Colector de condens 9. Locaş
  • Страница 28 из 57
    romÂnĂ/ Moldovenească • • • • • • • • • • • • • Atenţie! La gătirea alimentelor la aburi urmăriţi nivelul lichidului în bol, turnaţi apă în bol pe măsura necesităţii. Nu lăsaţi aparatul să funcţioneze nesupravegheat! Nu mutaţi aparatul în timpul funcţionării. Utilizaţi mânerul pentru transportare,
  • Страница 29 из 57
    romÂnĂ/ Moldovenească Exemplu: Apăsaţi pe butonul «OREZ/SUPĂ» o dată pentru a selecta programul «Orez», indicatorul butonului va arde cu lumină verde. Apăsaţi pe butonul «OREZ/SUPĂ» de două ori pentru a selecta programul «Supă», indicatorul butonului va arde cu lumină roşie. Atenţie! –
  • Страница 30 из 57
    romÂnĂ/ Moldovenească aprinde indicatorul (14). Aparatul menţine temperatura mâncării preparate până la 24 de ore. Această funcţie nu este accesibilă pentru programele «Iaurt» şi «Multibucătar» (dacă utilizatorul a setat o temperatură sub 75ºС). Pentru a trece din regimul de aşteptare în regimul de
  • Страница 31 из 57
    romÂnĂ/ Moldovenească CURĂŢARE ŞI ÎNTREŢINERE • Scoateţi fişa cablului de alimentare din priză şi permiteţi aparatului să se răcească. • Ştergeţi carcasa (1) şi capacul (4) cu un material uşor umezit, apoi ştergeţi până la uscare. • Pe măsura umplerii colectorului pentru condens (8) goliţi-l de
  • Страница 32 из 57
    Český • MULTIFUNKČNÍ PARNÍ HRNEC Hlavním účelem multifunkčního parního hrnce je rychlá a kvalitní příprava pokrmů. • POPIS 1. Těleso 2. Ovládací panel 3. Displej 4. Poklice 5. Klávesa otevírání poklice 6. Parní ventil 7. Úchyt pro přenášení 8. Zásobník na kondenzát 9. Přípojka přívodního kabelu 10.
  • Страница 33 из 57
    Český • • • • • • • • • • • • • Nikdy nepřenášejte přístroj za provozu. Použijte úchyt pro přenášení, předem odpojte přístroj od sítě, vyndejte nádobu s potravinami a nechte ho vychládnout. Za provozu se víko multifunkčního hrnce, nádoba a také části tělesa přístroje silně zahřívají, nedotýkejte
  • Страница 34 из 57
    Český – – zmačkli jedno z tlačítek (16), změnili délku provozu programu tlačítky (15) «-»/ (20) «+» nebo nastavili čas odloženého startu tlačítkem (18) ODLOŽENÝ START, při tom se rozsvítí kontrolka (13) VAŘENÍ. Pro zrušení nastavení nebo přerušení programu V KAŽDÉM PŘÍPADĚ zmáčkněte tlačítko (19)
  • Страница 35 из 57
    Český • Poznámka: – Nepoužívejte funkci udržování teploty k ohřívání studených pokrmů. – Aby nedošlo k připálení jídla vypněte funkci udržování teploty po ukončení programů Pečivo a Jogurt. V prostřední části topného tělesa (9) je umístěn teplotní snímač (10). Dohlížejte na to, aby pohybu snímače
  • Страница 36 из 57
    Český • Poznámka: • Přestože přístroj je schopen udržovat teplotu hotového pokrmu do 24 hodin, nedoporučujeme však nechávat hotové pokrmy v nádobě multifunkčního hrnce na delší dobu, neboť kvůli tomu by se mohly zkazit. • Nepoužívejte režim udržování teploty k ohřívání studených potravin. • Po
  • Страница 37 из 57
    УКРАЇНЬСКа • МУЛЬТІВАРКА Основне призначення мультіварки – швидке та якісне приготування їжі. • ОПИС 1. Корпус 2. Панель управління 3. Дисплей 4. Кришка 5. Кнопка відкриття кришки 6. Паровий клапан 7. Ручка для перенесення 8. Збірник конденсату 9. Гніздо для підмикання мережного шнура 10.
  • Страница 38 из 57
    УКРАЇНЬСКа • • • • • • • • • • • • • • • • • • Категорично забороняється експлуатація приладу без встановленої чаші та парового клапана. Також забороняється вмикати мультіварку без продуктів і без достатньої кількості рідини в чаші. Забороняється використовувати мультіварку, якщо силіконова
  • Страница 39 из 57
    УКРАЇНЬСКа – – – – – Промийте теплою водою з нейтральним миючим засобом всі знімні деталі: паровий клапан (6), чашу (12), лопатку (21), ополоник (22), мірний стакан (23), лоток для готування на парі (24), стаканчики (25) та кришечки (26). Потім обполосніть їх проточною водою та просушіть. Перед
  • Страница 40 из 57
    УКРАЇНЬСКа Примітка: – Не відкривайте кришку (4) до закінчення роботи програми “Випічка”. – Щоб уникнути підгоряння та псування продуктів, вимкніть підтримання температури після завершення роботи програм «Випічка» та “Йогурт” . Для цього натисніть кнопку (19) «СТОП». – У програмі “Смаження”
  • Страница 41 из 57
    УКРАЇНЬСКа Примітки: • Незважаючи на те, що пристрій підтримує температуру готового блюда до 24 годин, не рекомендується залишати приготовані продукти в чаші надовго, оскільки це може привести до псування продуктів. • Не використовуйте режим підтримання температури для розігрівання холодних
  • Страница 42 из 57
    УКРАЇНЬСКа • • • • Забороняється поміщати чашу (12) в посудомийну машину. Протріть поверхню нагрівального елементу (лише у захололому стані), у жодному випадку не допускайте попадання води всередину корпусу. Не занурюйте корпус приладу, мережевий шнур і вилку мережевого шнура у воду або будь-які
  • Страница 43 из 57
    Беларуская • МУЛЬТЫВАРКА Асноўнае прызначэнне мультываркі - хуткае і якаснае прыгатаванне ежы. • АПІСАННЕ 1. Корпус 2. Панэль кіравання 3. Дысплей 4. Вечка 5. Кнопка адкрыцця вечка 6. Паравы клапан 7. Ручка для пераноскі 8. Зборнік кандэнсату 9. Гняздо для падключэння сеткавага шнура 10.
  • Страница 44 из 57
    Беларуская • • • • • • • • • • • • • • • • • • • ПРЫЛАДА ПРЫЗНАЧАНА ТОЛЬКІ ДЛЯ БЫТАВОГА ВЫКАРЫСТАННЯ Трымайце ў чысціні паравы клапан, у выпадку забруджвання чысціце яго. Катэгарычна забараняецца эксплуатацыя прыбора без устаноўленай чары і паравога клапана. Таксама забараняецца ўключаць
  • Страница 45 из 57
    Беларуская – – – – – – – Ўвага! – Мультыварка аўтаматычна пераходзіць ў працоўны рэжым прыблізна праз 10 секунд пасля таго, як вы націснулі адну з кнопак (16), змянілі час працы праграмы кнопкамі (15) «-»/ (20) «+» ці ўсталявалі час адкладзенага старту кнопкай (18) «АДКЛАДЗЕНЫ СТАРТ», пры гэтым
  • Страница 46 из 57
    Беларуская • Нататка: – Не адкрывайце вечка (4) да канчатку працы праграмы «Выпечка». – Каб не дапусціць падгарання i псавання прадуктаў, адключыце падтрыманне тэмпературы пасля завяршэння працы праграм «Выпечка» i «Ёгурт». Для гэтага націсніце кнопку (19) «СТОП». – Ў праграме «Смажанне» прылада
  • Страница 47 из 57
    Беларуская дна латка (24). Устанавіце латок (24) з прадуктамі ў чашу (12). 4. Зачыніце вечка (4) да пстрычкі. 5. Устаўце раздым сеткавага шнура ў гняздо (9), а вілку сеткавага шнура - у электрычную разетку. 6. Выбярыце праграму прыгатавання, націснуўшы адпаведную кнопку адзін ці два разы. Глядзіце
  • Страница 48 из 57
    Беларуская • • • • • • • Па меры запаўнення зборніка кандэнсату (8) злівайце з яго ваду. Усе здымныя дэталі вымыйце мяккай губкай з нейтральным мыйным сродкам, апаласніце праточнай вадой. Старанна прасушыце паравы клапан (6) перад тым, як устанавіць яго на месца. Забараняецца змяшчаць чару (12) у
  • Страница 49 из 57
    O’zbekcha KO’P ХIL TАОM PISHIRGICH Ko’p хil tаоm pishirgich аsоsаn оvqаtni tеz vа sifаtli pishirishgа mo’ljаllаngаn. • • QISMLАRI 1. Kоrpusi 2. Ishlаtish pаnеli 3. Displеy 4. Qоpqоq 5. Qоpqоqni оchаdigаn tugmа 6. Bug’ klаpаni 7. Ko’tаrishgа ishlаtilаdigаn dаstаk 8. Tоmchi to’plаnаdigаn idish 9.
  • Страница 50 из 57
    O’zbekcha • • • • • • • • • • • Jihоz ishlаyotgаndа qоpqоg’i, idishi, kоrpusidаgi qismlаri qizib kеtаdi, ulаrgа qo’l tеkkizmаng. Issiq idishini оlish kеrаk bo’lsа оshхоnа qo’lqоpi kiying. Jihоzni vаqtidа tоzаlаb turing. Bоlаlаr jihоzni o’yinchоq qilib o’ynаshlаrigа ruхsаt bеrmаng. Bоlаlаrni ehtiyot
  • Страница 51 из 57
    O’zbekcha – – Eslаtmа: «Guruch» dаsturidа оvqаt pishаdigаn vаqtni o’zgаrtirib bo’lmаydi. To’g’rilаshni bеkоr qilish yoki dаstur ishlаshini o’chirish uchun АLBАTTА «TO’ХTАTISH» tugmаsini (19) bоsing (displеydа «8888» аlоmаti ko’rinаdi)!. Elеktrgа ulаngаn jihоzni qаrоvsiz qоldirmаng! «ISSIQ
  • Страница 52 из 57
    O’zbekcha Eslаtmа: – Issiq sаqlаsh usulini sоvuq оvqаtni isitishgа ishlаtmаng. – Pishiriq kuyib kеtmаsligi yoki buzilmаsligi uchun «Pishiriq» vа «Yоgurt» dаstulаrridа ishlаshi tugаshi bilаn jihоzni o’chirib qo’ying. • Ishlаtishdаn оldin idish (12) sirti bilаln оstini аrtib quriting. • Qizitgich (9)
  • Страница 53 из 57
    O’zbekcha hirgich ishlаyotgаndа bug’ klаpаni (6) ustigа engаshmаng, оchiq а’zоlаringizni issiq idish (12) ustigа yaqinlаshtirmаng! • Ko’p хil tаоm pishirgich birinchi mаrtа ishlаtilgаndа qizitgichi kuyib bir оz hid chiqishi mumkin. 12. Оvqаt pishirish dаsturining ishi tugаgаndаn kеyin ko’p хil tаоm
  • Страница 54 из 57
    VT-4212_IM.indd 54 06.08.2013 12:38:41
  • Страница 55 из 57
    gb A production date of the item is indicated in the serial number on the technical data plate. A serial number is an eleven-unit number, with the first four figures indicating the production date. For example, serial number 0606ххххххх means that the item was manufactured in June (the sixth month)
  • Страница 56 из 57
    VT-4212_IM.indd 56 06.08.2013 12:38:41
  • Страница 57 из 57