28
MO-004_v03
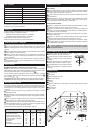
Grilling
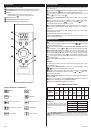
1
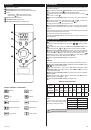
Press the
Micro./Grill/Combi.
button. The display will show
P100
and the symbols
,
. The ring around the knob will start flashing.
2
In order to select the required grill function
G
, keep pressing the
Micro./Grill/Combi.
button until the display shows
G
and the symbol
, or keep turning the knob in the
or
direction until the display shows
G
and the symbol
.
3
Press the
Start/+30Sec./Confirm
to confirm the function and turn the knob in the
or
direction to set the grilling time. The grilling time ranges from 0:05 (5 seconds)
to 95:00 (95 minutes) and it can be increased by turning the knob in the
direction
or decreased by turning it in the
direction. You can start decreasing the value from
95:00. The maximum grilling time is 95 minutes.
4
Press the
Start/+30Sec./Confirm
button to start grilling. The buzzer will sound and the
grilling programme will start. The symbol
and the remaining grilling time will be visible
on the display.
Hal�way through the set grilling time the buzzer will make a double sound
(it is normal in this mode o� operation). In order to obtain a better grilling
e��ect, turn the �ood over and close the door. �ress the Start/+30Sec./
Confirm button to resume the grilling.
Combination cooking (microwave + grill)
1
Press the
Micro./Grill/Combi.
button. The display will show
P100
and the symbols
,
. The ring around the knob will start flashing.
2
In order to select the required function, keep pressing the
Micro./Grill/Combi.
button
until the display shows
C-1
or
C-2
and the symbols
,
, or keep turning the knob in
the
or
direction until the display shows
C-1
or
C-2
and the symbols
,
.
C-1
= 55% of the time – microwave cooking 45% of the time – grilling
C-2
= 36% of the time – microwave cooking 64% of the time – grilling
3
Press the
Start/+30Sec./Confirm
button to confirm the function and turn the knob
in the
or
direction to set the cooking time. The cooking time ranges from 0:05
(5 seconds) to 95:00 (95 minutes) and it can be increased by turning the knob in the
direction or decreased by turning it in the
direction. You can start decreasing the
value from 95:00. The maximum cooking time is 95 minutes.
4
Press the
Start/+30Sec./Confirm
button to start cooking. The buzzer will sound and
the cooking programme will start.
The symbol
,
and the remaining cooking time will be visible on the display.
When the appliance is operated in the combination mode, children may
only use the oven under adult supervision, because the appliance is heated
to high temperature.
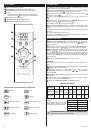
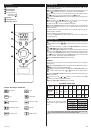
Quick start
1
When the microwave oven is in the standby mode, press the
Start/+30Sec./
Confirm
button to start the cooking for 30 seconds at full power. Each time you press the
Start/+30Sec./Confirm
button the cooking time will be extended by another 30 seconds.
The maximum cooking time is 95 minutes.
2
During the microwave cooking or defrosting, each time you press the
Start/+30Sec./
Confirm
button the cooking time will be extended by another 30 seconds.
3
When the microwave oven is in the standby mode, turn the knob in the
direction
to set the time of cooking at full power. Press the
Start/+30Sec./Confirm
button to start
cooking.
Defrosting by weight
1
Press the
W.T./Time Defrost
button once. The display will show
dEF1
and the indicator
,
will light. The ring around the knob will start flashing.
2
Turn the knob in the
or
direction to set the weight of food to be defrosted.
The display will show the symbol
and the numbers from 100–200 ... 1900–2000 (the
direction) or in the reverse order (the
direction).
3
Press the
Start/+30Sec./Confirm
button to start defrosting. The buzzer will sound and
the defrosting programme will start. The symbols
,
and the remaining defrosting
time will flash on the display. The ring around the knob will light.
Defrosting by time
1
Press the
W.T./Time Defrost
button twice. The display will show
dEF2
and the
indicators
,
will light. The ring around the knob will start flashing.
2
Turn the knob in the
or
direction to set the defrosting time. The defrosting
time ranges from 0:05 (5 seconds) to 95:00 (95 minutes) and it can be increased by
turning the knob in the
direction or decreased by turning it in the
direction. The
maximum defrosting time is 95 minutes.
3
Press the
Start/+30Sec./Confirm
button to start defrosting. The indicators
i
will light. The power during the defrosting by time is set to P30 and this value cannot be
changed. The ring around the knob will light.
Kitchen timer
1
Press the
Clock/Kitchen Timer
button twice. The display will show
00:00
and the
indicator
will light. The ring around the knob will start flashing.
2
Turn the knob in the
or
direction to set the required time for the kitchen
timer. The maximum kitchen timer setting is 95 minutes.
3
Press the
Start/+30Sec./Confirm
to confirm the setting. The display will show the
countdown, the indicator
will start flashing and the ring around the knob will go out.
4
If the door is closed, then after the set time elapses, the buzzer will sound five times
and the
indicator will go out. If the clock has been set earlier (24-hour displaying
mode), the current time will appear on the display.
The kitchen timer is a separate operating mode o� the microwave oven,
independent �rom the clock.
Automatic menu (auto menu)
1
Turn the knob in the
direction to select the automatic cooking menu. Indicators
,
will appear on the display and the ring around the knob will start flashing. The
required menu can be selected according to the table below in the following manner:
By turning the knob, select:
Automatic heating – Vegetables – Fish – Meat – Pasta –
Potatoes – Pizza – Soup
, and the display will show
A–1, ..., A–8.
2
After selecting the menu, confirm it by pressing the
Start/+30Sec./Confirm
button.
3
Turn the knob in the
or
direction to select the weight of food to be cooked.
The display will show the
symbol. The weight can be increased by turning the knob in
the
direction or decreased by turning it in the
direction.
4
Press the
Start/+30Sec./Confirm
button to start cooking. The buzzer will sound and
the cooking programme will start. The symbol
will go out and the display will show the
symbols
,
and the remaining cooking time. The ring around the knob will light.
EXAMPLE
In order to set the automatic menu for cooking 350 grams of fish, complete the following
steps:
1
Turn the knob in the
direction to select the automatic cooking menu. The display
will show
A-1
and the symbols
,
. The ring around the knob will start flashing. By
turning the knob, select
A-3
(Fish)
2
Press the
Start/+30Sec./Confirm
button to confirm the automatic menu programme.
3
Turn the knob in the
or
direction to set the weight 350 g.
4
Press the
Start/+30Sec./Confirm
button to start cooking.
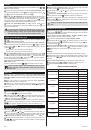
AUTOMATIC MENU TABLE
Menu
Weight
Time
A-1 Automatic heating
200 g
2:00
400 g
4:00
600 g
6:00
A-2 Vegetables
200 g
2:50
300 g
4:10
400 g
5:30
A-3 Fish
250 g
4:20
350 g
6:00
450 g
7:30
A-4 Meat
250 g
4:00
350 g
5:30
450 g
6:50
A-5 Pasta
50 g (in 450 ml of cold water)
17:00
100 g (in 800 ml of cold water)
20:00
A-6 Potatoes
200 g
4:40
400 g
7:30
600 g
9:10
A-7 Pizza
200 g
1:20
400 g
2:30
A-8 Soup
200 g
2:00
400 g
4:00