45
PI-003_v02
If you simultaneously press the
,
buttons for the
given heating zone, the power setting will be reduced to
0 and the heating zone will stop operating.
After removing the utensil from the heating zone, the
heating zone stops operating and the symbol “ ” on the
power level indicator will
fl
ash for one minute. After that
the heating zone switches off (symbol “ ”).
If you place the utensil back on the heating zone
when the symbol “ ” is
fl
ashing, the heating zone will
automatically return to heating at the previous setting.
4
After operation, switch off the hob with the
button.
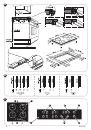
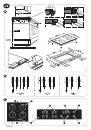
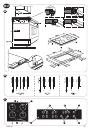
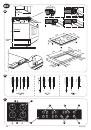
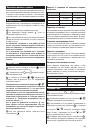
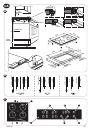
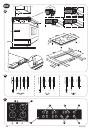
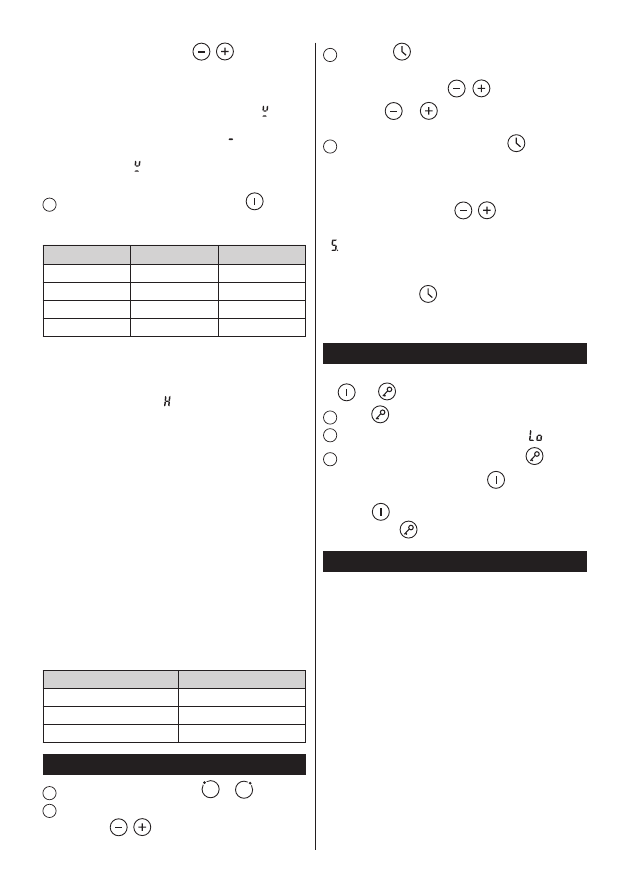
Power and size of the individual heating zones
Heating zone
Size
Maximum power
I
∅
180 mm
1500 W
II
∅
180 mm
2000 W
III
∅
180 mm
1500 W
IV
∅
180 mm
2000 W
Heat indicator
When using the hob for a longer period of time, the given
heating zone remains hot for some time after switching the
appliance off. The symbol “ ” on the power indicator of the
given heating zone warns against accidental touching of the
hot hob.
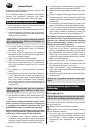
Detecting improper items
If an item of an improper size (scissors, knife, fork, keys
etc.) or a non-magnetic utensil is placed on the hob, it will
automatically switch to the standby mode
Overheat protection
The hob is equipped with a built-in sensor, which measures
the temperature inside the hob. If the permitted temperature
value is exceeded, the induction hob will automatically
switch off.
Automatic switch off
When the heating zone is switched on without any operation,
the hob will switch off automatically upon the lapse of
a default time depending on the set power level. See table
below:
Power level
Time
1-3
8 hours
4-6
4 hours
7-9
2 hours
TIMER function
1
Select the heating zone with the
or
button.
2
Select the desired power level of the selected heating
zone using the
,
buttons.
3
Press the
button within 5 seconds (when the
power indicator is
fl
ashing) and set the desired time
(max. 99 minutes) with the
,
buttons. If you press
and hold the
or
button, the time will respectively
increase or decrease by 10 minutes.
4
Con
fi
rm the settings by pressing the
button. Upon
the lapse of the set time a single beep will be heard and the
heating zone will switch off.
To cancel the TIMER function during operation,
●
simultaneously press the
,
buttons.
A glowing dot symbol next to the power indicator e.g.
“ ” indicates that the TIMER function is enabled for the
given heating zone.
If you do not select any heating zone (within 5 seconds)
before pressing the
button, the TIMER function will
not be set to any heating zone. After the lapse of the set
time, a 30-second beep will be heard.
LOCK function
The LOCK function enables to block all the buttons (except
for
and
buttons).
1
Press
to block the buttons.
2
The TIMER indicator will show the symbol “ ”.
3
To unblock the buttons press and hold the
button.
If you switch off the hob with the
button when the
LOCK function is active, to
switch it back on you have to
press the
button and unblock the hob by pressing
and holding the
button.
Cleaning and maintenance
Remember to keep the hob clean.
Unplug the appliance and before cleaning.
Do not use steam jets to clean the hob.
●
Light dirt
●
wipe the hob with a cloth socked in lukewarm
water wipe until dry with a sponge.
Heavy dirt
●
wipe the hob with a cloth socked in lukewarm
water wipe until dry with a special sponge for cleaning
glass.
Limestone and other residue
●
remove the dirt by
applying a small amount of special substance for
cleaning ceramic glass or white wine vinegar and next
wipe with a dry cloth.
Sweetmeat, melt aluminum, plastic
●
remove by using
a special scraper suitable for cleaning glass and next
wipe with a damp cloth. If necessary use a special
substance for cleaning ceramic glass.