Инструкция для BEST Gloss SS

(скачивание инструкции бесплатно)
Формат файла: PDF
Доступность: Бесплатно как и все руководства на сайте. Без регистрации и SMS.
Дополнительно: Чтение инструкции онлайн
background image

12

english

!

 The appliance must be installed by a qualified person 

in compliance with the instructions provided.

 Wear gloves when carrying out installation and 

maintenance operations.

aIr VeNT

(for ducting versions)

!

  Prepare the hole and the air vent duct (150 mm dia-

meter).

!

  Use a duct of the minimum indispensible length.

!

  Use a duct with as few elbows as possible (maximum 

elbow angle: 90°).

!

  Avoid drastic changes in the duct cross-section.

!

  Use a duct with an as smooth as possible inside.

!

  The duct must be made of certified material.

!

  Do not connect the hood to smoke exhaust ducts 

for the products of combustion (boilers, fireplaces, 

stoves, etc).

!

  For the air vents comply with the provisions laid down 

by the competent authorities.


In addition, the air must not be evacuated through a 

hole in the wall unless specifically intended for this 

purpose.

!

  Fit air intakes in the room to prevent the hood from 

creating a negative pressure in the room (which must 

not exceed 0.04 mbar); if the hood is used at the 

same time as non-electrical equipment (gas-, oil- and 

charcoal-fired stoves, etc.) the exhaust gas may be 

sucked in by the heat source.

FIlTerING or dUcTING VerSIoN ?

The hood may be in filtering or in ducting version.  Deci

-

de from the outset which type is to be installed.

For better efficiency, we recommend installing the hood 

in the ducting version (if possible).

 ducting version

The hood purifies the air and evacuates it to the outside 

through an exhaust duct (diameter 150 mm).

 Filtering version

The hood purifies the air and recycles  the clean air 

back into the room. For this version, the following are 

required: 1 air baffle, 1 reducer, 1 charcoal filter.

The upper flue air evacuation slots must be positioned 

at the top.

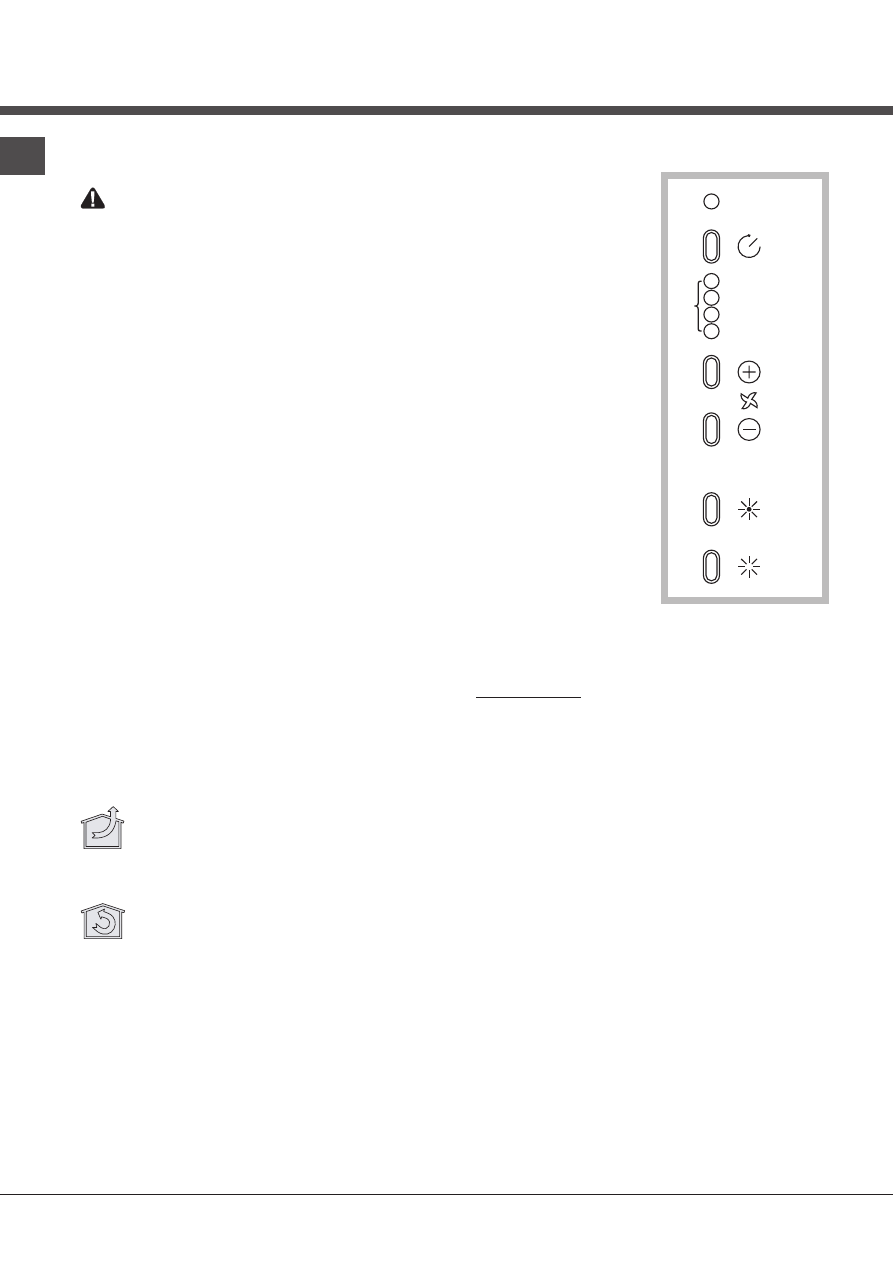
coNTrolS

a)

 Turns the LIGHTS off

B)

 Turns the LIGHTS on.

c)

 Decreases speed down 

to minimum speed. If 

pressed for 2” the motor is 

turned off.

d)

 Activates the motor 

(calling the last speed 

used) and increases the 

speed until reaching ma-

ximum.

e)

 FILTER ALARM/TIMER 

RESET: when pressing 

the key during display of 

the filter alarm (motor off) 

it resets the hour counter. 

When pressing the key 

when the motor is running, 

the TIMER is activated 

and the hood will automa-

tically be switched off after 

5  minutes.

l1)

 The 4 green LEDs in-

dicate the running speed.

l2)

 When the LED is 

red (motor off) it indica-

tes the FILTER ALARM. 

When the LED is green 

(flashing) it indicates that the TIMER has been activated 

with the key E.

FILTER ALARM: 

After 30h of operation, the LED L2 turns RED. It indica

-

tes that the grease filters need to be cleaned.

After 120h of operation, the LED L2 turns RED and 

flashes; It indicates that the grease filters need to be 

cleaned and the charcoal filters replaced.

After cleaning the grease filters (and/or replacing the 

charcoal filters), restart the hour counter (RESET) by 

pressing the key E during display of the filter alarm.

A

B

C

D

L1

E

L2

OFF

ON

OFF/-

OFF/+

R

eN

1
2
3
4
5
6
7
8
9
10
11
12
13
14
15
16
17
18
19
20
21
22
23
24
25
26
27
28
29
30
31
32
33
34
35
36
37
38
39
40
Оглавление инструкции
  • Страница 1 из 41
    Gloss Italiano, 10 English, 12 Deutsch, 14 Français, 16 Español, 17 Português, 20 Nederlands, 22   Dansk, 26 Suomi, 28 Svenska, 30 Ελληνικά, 32 Română, 34 Čeština, 36 Slovensky, 38 Istruzioni per l’uso Instructions for use Betriebsanleitung Mode d’emploi Instrucciones de uso Instruções de
  • Страница 2 из 41
    2
  • Страница 3 из 41
    3
  • Страница 4 из 41
    1x 1x ø 15cm 1x ø 12.5cm 1x 5x 1x 5x 4.8x38mm 1x 3.9x9.5mm 1x 3x 4x 3.9x16mm 1x 4x M4 x 8mm 1x 6x 3.9 x 6mm 1x 1x 4 1x 1x
  • Страница 5 из 41
    L = 65 cm min. 5
  • Страница 6 из 41
    1 3 Ø 8 mm x5 2 4 MIN 585 mm MAX 845 mm 95 mm 5 mm 5 5 mm 5 mm 335 mm 650 mm 900 mm 6 5
  • Страница 7 из 41
    6 9 3.9 x 9.5 mm 7 10 MIN 585 mm MAX 845 mm 5 mm 8 3.9 x 9.5 mm 11 4.8 x 38 mm 7
  • Страница 8 из 41
    12 15 3.9 x 16 mm 16 13 Ø 4,5 x 16 mm M 4x8 mm 14 8 17
  • Страница 9 из 41
    21 18 3,9x6 mm 19 20 9
  • Страница 10 из 41
    Italiano IT ! L’installazione va effettuata secondo queste istruzioni e da personale professionalmente qualificato. Utilizzare dei guanti nelle operazioni di installazione e di manutenzione. Scarico dell’aria (Per le versioni aspiranti) ! Predisporre il foro ed il condotto di scarico dell’aria
  • Страница 11 из 41
    MANUTENZIONE ! Prima di pulire o fare manutenzione togliere la tensione. Sostituzione LED - Sostituire con LED dello stesso tipo. IT Pulizia della cappa QUANDO PULIRE: pulire almeno ogni 2 mesi per evitare rischi di incendio. PULIZIA ESTERNA: usare un panno inumidito con acqua tiepida e detersivo
  • Страница 12 из 41
    English EN ! The appliance must be installed by a qualified person in compliance with the instructions provided. Wear gloves when carrying out installation and maintenance operations. AIR VENT (for ducting versions) ! Prepare the hole and the air vent duct (150 mm diameter). ! Use a duct of the
  • Страница 13 из 41
    MAINTENANCE ! Before cleaning or maintenance cut the power. Replacing the LEDS - Replace with leds of the same type. EN Cleaning the hood WHEN TO CLEAN IT: clean it at least every 2 months to prevent the risk of fire. EXTERNAL CLEANING: use a cloth moistened in lukewarm water and neutral detergent
  • Страница 14 из 41
    Deutsch DE ! Die Installation ist gemäß den vorliegenden Anweisungen und von Fachpersonal durchzuführen. Monteurhinweis Bevor das Gerät montiert wird ist eine Funktionsprüfung (Lüftung und Beleuchtung) vorzunehmen. Ebenso muss die Geräteoberfläche auf ästhetische Mängel bzw. Beschädigungen der
  • Страница 15 из 41
    dem Austausch der Kohlenfilter) ist zur Rückstellung des Stundenzählers die Taste E (RESET) während der Anzeige des Filteralarms zu drücken. Austausch der Leds - Durch Leds desselben Typs ersetzen. DE WARTUNG ! Vor dem Reinigen oder Warten die Spannungszufuhr ausschalten. Reinigung der Abzugshaube
  • Страница 16 из 41
    Français FR ! L’installation doit être effectuée par un professionnel du secteur conformément aux instructions du fabricant. Faire usage de gants lors des opérations d’installation et d’entretien. ÉVACUATION DE L’AIR (pour les versions aspirantes) ! Réaliser le trou et installer la conduite
  • Страница 17 из 41
    ENTRETIEN ! Avant de procéder au nettoyage ou à une opération d’entretien, couper l’alimentation électrique. Changement des LEDS - Les remplacer par des leds du même type. FR Nettoyage de la hotte QUAND NETTOYER LA HOTTE? la nettoyer au moins une fois tous les 2 mois pour prévenir le risque
  • Страница 18 из 41
    Español ES ! La instalación se debe realizar siguiendo estas instrucciones y por personal profesionalmente calificado. Utilice guantes durante las operaciones de instalación y mantenimiento. EXTRACCIÓN DE AIRE (Para las versiones aspiradoras) ! Prepare el agujero y el conducto de extracción de aire
  • Страница 19 из 41
    MANTENIMIENTO ! Desconecte la tensión antes de efectuar operaciones de limpieza o mantenimiento. Sustitución de los LEDS - Cambiar por LEDS del mismo tipo. ES Limpieza de la campana CUÁNDO LIMPIAR: limpie por lo menos cada 2 meses para evitar los riesgos de incendio. LIMPIEZA EXTERNA: utilice un
  • Страница 20 из 41
    Português PT ! A instalação deve ser realizada segundo estas instruções e por pessoal profissional qualificado. Utilizar luvas nas operações de instalação e manutenção. SAÍDA DO AR (Para as versões aspirantes) ! Preparar o furo e a conduta para exaustão do ar (diâmetro 150mm). ! Utilizar uma
  • Страница 21 из 41
    MANUTENÇÃO ! Ates de limpar ou efectuar a manutenção desligar a tensáo. Substituição das LEDS - Substituir por leds do mesmo tipo. PT Limpeza do exaustor QUANDO EFECTUAR A LIMPEZA: limpar pelo menos cada 2 meses para evitar riscos de incêndio. LIMPEZA EXTERNA: usar um pano humedecido previamente
  • Страница 22 из 41
    Nederlands NL ! De installatie moet worden uitgevoerd door een bevoegde installateur en volgens de instructies van de fabrikant. Gebruik altijd handschoenen tijdens alle installatieen onderhoudswerkzaamheden. LUCHTAFVOER (Voor afvoer afzuigkappen) ! Opening en afvoerbuis (doorsnede 150mm)
  • Страница 23 из 41
    ONDERHOUD. ! Stroomvoorziening uitschakelen alvorens de afzuigkap te reinigen of onderhouden Reiniging van de afzuigkap WANNEER: minstens 1 keer in de 2 maanden reinigen om brandgevaar te vermijden. REINIGING VAN DE BUITENKANT: maak gelakte oppervlakken schoon m.b.v. een zachte doek, bevochtigd met
  • Страница 24 из 41
     RU !                                  
  • Страница 25 из 41
               RU                               
  • Страница 26 из 41
    Dansk DK ! Installationen skal udføres i overensstemmelse med instruktionerne og af en kvalificeret tekniker. se. Anvend handsker ved montering og vedligeholdel- UDLUFTNING AF LUFTEN (til modellerne med udluftning) ! Lav et hul til udluftningsrøret (diameter 150mm). ! Anvend ikke et længere
  • Страница 27 из 41
    VEDLIGEHOLDELSE ! Sørg for at tage slukke for emhætten før den rengøres eller vedligeholdes. Udskiftning af LED - Skift LED’ et ud med et af samme type. DK DK Rengøring af emhætten HVORNÅR SKAL DEN RENGØRES: rengør mindst hver anden måned for at undgå brandfare. UDVENDIG RENGØRING: anvend en fugtig
  • Страница 28 из 41
    Suomi FI ! Asennus tulee suorittaa näiden ohjeiden mukaisesti pätevän henkilöstön avulla. na. Käytä suojakäsineitä asennus- ja huoltotöiden aika- ILMANPOISTO (Imuversiot) ! Valmistele aukko ja ilmanpoistoputki (halkaisija 150 mm). ! Käytä mahdollisimman lyhyttä putkea. ! Käytä mahdollisimman suoraa
  • Страница 29 из 41
    HUOLTO ! Ennen puhdistus- tai huoltotöitä poista jännite. Ledin vaihto - Vaihda tilalle samanlainen LED-valodiodi. FI Liesituulettimen puhdistus KOSKA PUHDISTAA: puhdista vähintään kahden kuukauden välein tulipalovaaran ehkäisemiseksi. ULKO-OSAN PUHDISTUS: käytä haalealla vedellä ja miedolla
  • Страница 30 из 41
    Svenska SV ! Installationen ska ske enligt dessa anvisningar och av behörig personal. Använd handskar vid åtgärder för installation och underhåll. LUFTUTLOPP (För de insugande versionerna) ! Förbered hålet och ledningen för ett luftutlopp (diameter 150mm). ! Använd en ledning som är så kort som
  • Страница 31 из 41
    UNDERHÅLL ! Ta bort spänningen innan du ska göra rent eller utföra underhållsåtgärder. Ersättning av LED - Ersätt med en LED av samma sort. SV Rengöring av spiskåpan NÄR SKA DEN GÖRAS REN: rengör åtminstone en gång varannan månad för att undvika brandrisk. UTVÄNDIG RENGÖRING: använd en trasa som
  • Страница 32 из 41
    Ελληνικά GR ! Η εγκατάσταση διενεργείται σύμφωνα με τις οδηγίες αυτές και από προσωπικό επαγγελματικά ειδικευμένο. Χρησιμοποιείτε γάντια στις εργασίες εγκατάστασης και συντήρησης. ΕΚΚΕΝΩΣΗ ΤΟΥ ΑΕΡΑ (Για τις εκδόσεις απορρόφησης) ! Προετοιμάστε την οπή και τον αγωγό εκκένωσης του αέρα (διάμετρος
  • Страница 33 из 41
    ΣΥΝΤΗΡΗΣΗ ! Πριν καθαρίσετε ή κάνετε συντήρηση διακόψτε το ηλεκτρικό. Καθαριότητα του απορροφητήρα ΠΟΤΕ ΚΑΘΑΡΙΖΕΤΑΙ: τον καθαρίζετε τουλάχιστον κάθε 2 μήνες για να αποσοβηθούν κίνδυνοι πυρκαγιάς. ΕΞΩΤΕΡΙΚΟΣ ΚΑΘΑΡΙΣΜΟΣ: χρησιμοποιήστε ένα πανί βρεγμένο με χλιαρό νερό και ουδέτερο απορρυπαντικό (για
  • Страница 34 из 41
    Română RO ! Instalarea se va face conform prezentelor instrucţiuni, numai de persoane calificate. Utilizaţi mănuşi pe parcursul operaţiunilor de instalare şi întreţinere. Evacuarea aerului (Pentru versiunile cu aspirare) ! Pregătiţi orificiul şi conducta de evacuare a aerului (diametrul 150mm). !
  • Страница 35 из 41
    ÎNTREŢINERE ! Înainte de a curăţa sau efectua întreţinerea decuplaţi tensiunea. Înlocuire LED - Înlocuiţi cu LED-uri de acelaşi tip. RO Curăţarea hotei CÂND TREBUIE CURĂŢATĂ: curăţaţi cel puţin o dată la 2 luni pentru a evita riscul de incendiu. CURĂŢARE EXTERNĂ: utilizaţi o lavetă umezită în apă
  • Страница 36 из 41
    Čeština CZ ! Instalace musí být provedena podle uvedených pokynů odborně kvalifikovaným personálem. Při provádění operací instalace a údržby používejte rukavice. odtah vzduchu (pro sací verze) ! Připravte otvor a trubici odtahu vzduchu (průměr 150 mm). ! Použijte trubici o nejkratší možné délce. !
  • Страница 37 из 41
    údržba ! Před čištěním nebo prováděním údržby odpojte od zdroje napětí. Výměna diody LED - Nahraďte diodu LED stejným typem diody. CZ Čištění digestoře KDY ČISTIT: Čistit alespoň každé 2 měsíce, abyste zabránili riziku vzniku požáru. VNĚJŠÍ ČIŠTĚNÍ: Používejte navlhčený hadřík s vlažnou vodou a
  • Страница 38 из 41
    Slovensky SK ! Napravo sme v skladu s temi navodili namestiti samo usposobljeno osebje. OVLÁDAČE Pri vykonávaní inštalácie a údržby používajte rukavice. A) B) C) ODVOD VZDUCHU (Pri verziách s odvodom vzduchu) ! Pripravte otvor a rúrku na odvod vzduchu (priemer 150mm). ! Použite rúrku s minimálnou
  • Страница 39 из 41
    ÚDRŽBA ! Pred čistením alebo vykonávaním údržby odpojte spotrebič od elektrického napájania. Ersättning av LED - Ersätt med en LED av samma sort. SK Čistenie odsávača pár KEDY ČISTIŤ: aby sa predišlo riziku požiaru, čistite odsávač aspoň každé 2 mesiace. ČISTENIE POVRCHU: používajte utierku
  • Страница 40 из 41
    04308247/1 - GLOSS EVO 40
  • Страница 41 из 41