9
10
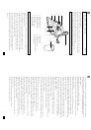
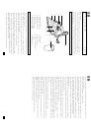
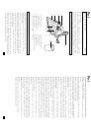
Settings:
0
= OFF
•
= Nylon, Silk
••
=
W
o
o
l
••• =
Cotton
MAX
= Linen, highest temperature
•
Before selecting the temperature, please read the care instructions on
the apparel label.
•
Note:
If there are no care instructions, you should start with the lowest
temperature level. Less steam is produced with a lower temperature level.
Caution: Synthetic fibres may melt.
•
Iron the piece of clothing.
•
T
o
turn of
f the appliance, set the temperature regulator and steam
selection button to the
0
position. Place the iron in an upright position
and unplug the appliance.
Steam ironing
•
Steam ironing can be used in the temperature ranges ••• and
MAX
. Do
not use other temperature levels due to the fact that water can escape
from the iron base.
•
Fill water into the water tank as described below in
Before First Use
.
For reliable functioning of the steam iron, the water tank should be
filled with enough water at all times.
•
Select the desired amount of steam with the steam selection switch. In
the position
the amount of steam is the highest.
Always keep the
iron in a horizontal position.
•
For an extra blast of steam press the steam/spray button in the
position.
The steaming function should be used at the highest
temperature level only
.
T
o
avoid dripping water from the iron base, wait
at least 1 minute between every blast of steam.
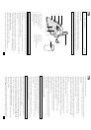
Spray function:
•
T
urn the steam/spray button into the position
and then press the
button to moisten the spot to be ironed. W
ater escapes from the spray
nozzle
(4)
.
V
ertical steam ironing:
•
Hold the iron in a vertical position about 15 to 30 cm away from the clothes.
To
remove wrinkles on hanging apparel, curtains, or any other fabrics,
simply press the steam/spray button in the position
to blast out steam.
•
W
arning!
The steaming temperature is very high. Do not use steam
on apparel or fabrics while there are being worn by humans or pets.
T
urning of
f the iron:
•
T
o turn of
f the appliance, set the temperature regulator and steaming
selection switch to position 0 and unplug the power plug.
•
Before draining the water
, let the appliance cool down completely
.
Burn hazard!
•
Open the lid of the water fill-in opening, place the iron upside down, and
carefully drain the remaining water while shaking the appliance carefully
.
•
Press the steam/spray button to let the remaining water drain easily
.
SPECIAL
SAFETY
INSTRUCTIONS
•
Burn hazard!
The iron base is very hot when in use. Hot steam
escapes while steam ironing. Hold the appliance on the handle only
.
•
Make sure to unplug the appliance before refilling the water tank.
•
T
urn of
f and unplug the appliance whenever it is not in use.
•
After using the appliance, let it cool down completely and then store it
in a safe place out of reach of children.
BEFORE FIRST USE
•
Remove all packaging material and protection foil from the iron base.
•
Clean the iron base
(8)
(see
Cleaning and Maintenance
).
•
When first used, a light odour or smoke may emit. However
, this is
harmless and of a short duration only
.
Ensure sufficient ventilation!
•
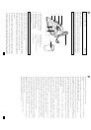
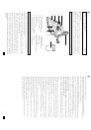
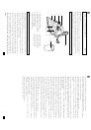
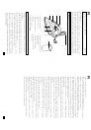
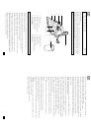
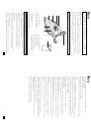
Open the lid of the water fill-in opening
(3)
and fill the water tank
(7)
with tap water up to the indication mark
MAX
(5)
. The
supplied
measuring cup
(1
1)
can be used for this. If the water is very hard, use
distilled water only
.
Do not use chemically decalcified water!
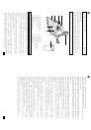
•
Close the lid of the water fill-in opening and set the steam selection
switch
(2)
into the position
0
.
•
Connect the power plug
(10)
with a suitable socket and set the
temperature regulator
(6)
to the highest temperature level
MAX
. The
power indicator
(9)
will light up. When the power indicator turns of
f, set
the steam selection switch into position
.
T
o
remove the remaining
residue, iron an old piece of cloth.
•
T
urn the steam/spray button
(1)
into position
and blast out steam
several times by pressing the steam/spray button.
•
When all the steam has escaped, the iron is ready to operate.
OPERA
TION
Dry Ironing
•
Fill the water tank as described below in
Before First Use
. For dry
ironing, the water tank does not need to be filled with water
.
•
T
o
dry iron, set the steam selection switch to position
0
.
•
Connect the power plug to a suitable socket and turn the temperature
regulator clockwise to the desired temperature.
The power indicator
will light up.
As soon as the desired temperature is reached the power
indicator will turn of
f. If the steam iron has cooled down too much, the
power indicator will light up again to indicate that the iron is heating up
again.
GB
GB
GB
GB