Инструкция для Freggia HA631VGTB, HR750VGTAN, HA640VB, HA640VW, HR750VGTCH, HA640VGX, HA640VGTB, HA640VGTW, HA640VX, HA750VGTX, HA640VGTX, HA631VGTX, HA631VGTW, HA750VGTB
12
INSTRUCTIONS FOR THE USER
This product complies with EU Directive 2002/96/EC.
The crossed-out dustbin symbol reported on the appliance indicates that the appliance must be disposed of
separately from other domestic refuse at the end of its useful life. It must therefore be delivered to a waste
recycling centre specifically for electric and electronic equipment or returned to the retailer at the moment
of purchase of a new equivalent appliance.
The user is responsible for delivering the appliance to the appropriate collection centre at the end of its useful life,
Failure to do so may result in a fine, as provided for by laws governing waste disposal. Differential collection of waste
products for eventual recycling, treatment and environmentally friendly disposal helps reduce possible negative
effects on the environment and health, and also enables the materials making up the product to be recycled. For more
detailed information on the available refuse collection systems, refer to the local Municipal Solid Waste disposal centre
or the shop where the product was purchased. Producers and importers are responsible for fulfilling their obligations
as regards recycling, treatment and environmentally friendly disposal by directly or indirectly participating in the
collection system.
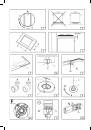
It is necessary that all the operations regarding the installation, adjustment and adaptation to the type
of gas available are carried out by qualified personnel, in conformity with the regulations in force.
The specific instructions are described in the booklet section intended for the installer.
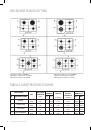
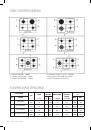
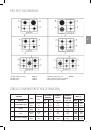
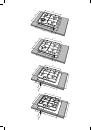
USING THE BURNERS
The symbols silk-screen printed on the side of the knob indicate the correspondence between the knob and the
burner.
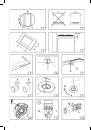
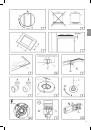
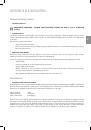
• START-UP WITHOUT VALVES
Turn the corresponding knob anticlockwise up to the maximum position (large flame, fig. 1) and press start-up button
P (fig. 1).
• AUTOMATIC START-UP WITH VALVES
Turn the corresponding knob anticlockwise up to the maximum position (large flame, fig. 1) and press the knob. Once
the burner has been started up, keep the knob pressed for about 6 seconds.
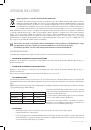
• USING THE BURNERS
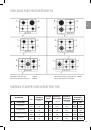
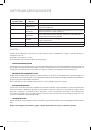
In order to obtain the maximum yield without waste of gas, it is important that the diameter of the pot is suitable for
the burner potential (see the following table), so as to avoid that the flame goes out of the pot bottom (fig. 2).
Use the maximum capacity to quickly make the liquids reach the boiling temperature, and the reduced capacity to
heat food or maintain boiling. All of the operating positions must be chosen between the maximum and the minimum
ones, never between the minimum position and the closing point.
Use the maximum capacity to quickly make the liquids reach the boiling temperature, and the reduced capacity to
heat food or maintain boiling. All of the operating positions must be chosen between the maximum and the minimum
ones, never between the minimum position and the closing point.
The gas supply can be interrupted by turning the knob clockwise up to the closing position.
If there is no power supply, it is possible to light the burners with matches, setting the knob to the start-up point (large
flame, fig. 1).
INSTRUCTIONS FOR THE USER
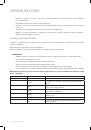
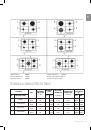
BURNERS
POWER (W)
Ø of pots
Auxiliary
1000
10 - 14 cm
Semi-rapid
1750
16 - 18 cm
Rapid
3000
20 - 22 cm
Triple crown
3800
24 - 26 cm