Инструкция для Freggia PP96GGG50X, PP96GEE50X, PP96GGG50CH, PP96GEE50AN, PP96GEE50CH, PP96GGG50AN

(скачивание инструкции бесплатно)
Формат файла: PDF
Доступность: Бесплатно как и все руководства на сайте. Без регистрации и SMS.
Дополнительно: Чтение инструкции онлайн
background image

16

SAFETY INSTRUCTIONS

• 

When the gas cooker is in use, it creates extra heat, humidity and by-
products of combustion in the room where it is installed. Make sure that 
the room is well-ventilated, particularly when the cooker is in use: do not 
close natural ventilation openings, and switch on (or install if you do not 
have one) a device for mechanical ventilation (an extractor).

• 

 The product can only be used for cooking. Do not use it for any other 
purpose, like heating the premises.

The manufacturer does not accept any responsibility for any damage and faults 
of the product, as well as accidents, caused by not following the installation and 
usage recommendations.

If you discover a fault, or a gas leak, or damaged electrical cords, immediately 
report it to the Service Centre and arrange an expert visit.

GENERAL INFORMATION

Thank you for choosing and buying one of our high-quality products. We are hoping 
very much that in your hands our cookers will function most eff ectively, and provide 
the best results, living up to your expectations. With this in mind, we suggest that you 
read the manual carefully and follow its instructions. It is important to understand 
that the manufacturer does not accept responsibility for any damage or faults of 
the product, as well as accidents, caused by not following the installation and usage 
recommendations.

To produce cookers that live up to modern technological demands and/or to 
continuously enhance the quality of our products, the company reserves the right 
to introduce any changes without prior notice, which will not however cause any 
problems or diffi

  culties for the user.

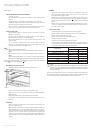
If you need to order spare parts or accessories for the product, get in touch with 
your seller or call the company helpline, stating the model number and the serial 
number, which you will fi nd on the manufacturer’s identifi cation panel. This panel 
can be found either inside the compartment for warming-up plates (if your model 
does have this compartment) or on the external back wall.

The cooker complies with the following standards:

• 

 CEE 2009/142/ (30/11/2009)

• 

2006/95/EC Low Voltage directive (12/12/2006 and further amendments)

• 

 CEE 2004/108 (on radio interference levels) – 15/12/2004)

• 

 EUROPEAN REGULATION № 1935/2004 (food contact materials)

• 

 EUROPEAN REGULATION № 1275/2008

•  

CEE 

40/2002

•  

CEE 

92/75

•  

2012/19/EEC 

(WEEE)

• 

 2005/32/EC (equipment, using electricity)

WARNING!

• 

The appliance and its external parts get hot when it is in use. Be careful not 
to touch the heaters, Children under 8 should remain at a distance or be 
supervised by adults.

• 

 Children under 8, as well as people with special needs, or those lacking 
in experience and knowledge, can use this appliance provided they 
are supervised or were given instructions as to how to use it safely and 
correctly, and that they are fully aware of the risks.

• 

 Children should not be allowed to play with the appliance, or to clean and 
adjust it without adult supervision.

• 

 Never leave a switched-on cooker cooking oils and fats unattended. It can 
be dangerous and cause a fi re.

• 

 Never use water to put out fl ames! First, disconnect the appliance from the 
mains, and only then extinguish fl ames, if possible by covering the source 
of the fi re with a fi re-resistant blanket or cover.

• 

 The internal surfaces of the kitchenware drawer (if it has been included in 
your package) can get hot.

• 

 Before taking off  the protective cover, wipe off  any liquid from its surface.

Important! 
Before changing the lighting bulb inside the oven make sure that the 
appliance is disconnected from the mains – to avoid possible injury from 
electrical current.

• 

 When in use, the appliance gets very hot. Be careful: don’t touch the heaters 
inside the oven.

• 

Before connecting to the mains, you should prepare a device, which will 
be able to disconnect the appliance from the mains. A gap between the 
contacts in this device should be able to ensure total disconnection if the 
voltage increases to category III, according to the installation manual.

• 

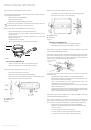
 The appliance must be disconnected from the mains during installation, 
maintenance, cleaning and repair procedures. It is dangerous to touch any 
appliance parts that are live.

• 


Don’t use compartments intended for warming up plates and storing 
gas cylinders (if such compartments are part of your product) to store 
infl ammable liquids or materials, such as wood, paper, sprays, liquids and 
gas under pressure, matches etc.

• 

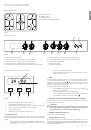
 From time to time, check the condition of the supply cord connecting the 
cooker with the gas supply: make sure it does not contact the heating 
surfaces, that it is not trapped, signifi cantly bent or damaged. When 
damaged, the cord should be immediately replaced. It is also needs to 
be replaced by the set date. Both ends of the cord should be fi xed with 
approved standard clamps, guaranteeing safety.

• 

 If in time, a gas valve becomes diffi

  cult to open, we recommend calling a 

technical services expert.

• 

 Clean the ceramic and chrome parts of the cooker in soapy water or non-
abrasive cleaning products. To clean burner bodies and caps and saucepan 
carriers you can use a metal scourer. Thoroughly dry out clean surfaces.

• 

 Don’t use abrasive cleaning products to clean the ceramic and chrome 
parts of the appliance.

• 

 During cleaning, try to avoid the burner plate of the cooker. Avoid getting 
water into injector openings.

• 

 Always keep clean ignition candles and dry them out after every use of 
the cooker, particularly if some liquid was spilled from saucepans during 
cooking.

• 

 If the cooker has got a glass cover, never close it before the burners and 
heated surfaces of the burner plate have cooled down. Otherwise, the 
cover can crack or get damaged.

• 

 Protect the ceramic parts of the cooker and ignition candles from physical 
impact.

• 

 Do not use the door handle to move the cooker around.

• 


It is not advisable to use rough abrasive products and sharp metallic 
scourers to clean glass doors – they can get scratched or the glass can get 
damaged.

• 

 Do not use steaming devices for cleaning the device.

• 

 This cooker does not need a special stand for installation.

• 

 This device is not intended to be switched on by an external timer or a 
separate remote control system.

• 

 If cracks appear on the cooker surface, disconnect it from the mains to avoid 
possible electrical shock.

SAFETY INSTRUCTIONS

1
2
3
4
5
6
7
8
9
10
11
12
13
14
15
16
17
18
19
20
21
22
23
24
25
26
27
28
29
30
31
32
33
34
35
36
37
38
39
40
41
42
43
44
45
46
47
48
49
50
51
52
53
54
55
56
57
58
59
60
61
62
63
64
Оглавление инструкции
  • Страница 1 из 65
    CUCINA COOKER ПЛИТА КУХОННАЯ ПЛИТА КУХОННА KUCHNIA Istruzioni per l`uso User manual Руководство пользователя Інструкція з експлуатації Instrukcja obsługi PP96GEE50 PP96GGG50
  • Страница 2 из 65
    IT Grazie per aver acquistato una cucina della nostra società Freggia. Si prega di leggere attentamente il presente libretto istruzioni, in quanto fornisce importanti indicazioni, rigurdanti la sicurezza di installazione, d`uso e di manutenzione del piano di cottura. Conservarlo per ogni ulteriore
  • Страница 3 из 65
    IT SOMMARIO NOTE IMPORTANTI E PRECAUZIONI D’USO........................4 INFORMAZIONE GENERALE........................................................4 SOSTITUIZIONE DELL’INIETTORE AL BRUCIATORE DEL GRILL (FIGURA
  • Страница 4 из 65
    NOTE IMPORTANTI E PRECAUZIONI D’USO ATTENZIONE: • L’apparecchio e le sue parti accessibili diventano molto calde durante l’uso. Si deve prestare attenzione a non toccare gli elementi riscaldanti. I bambini con meno di 8 anni di età devono essere tenuti lontani se non continuamente sorvegliati. •
  • Страница 5 из 65
    IT CUCINE SERIE PP96GEE50 PIANO DI COTTURA A GAS SR— bruciatore a gas semirapido; R — bruciatore a gas rapido; A — bruciatore a gas ausilisario; TC — bruciatore a gas tripla corona. Figura 1 PANELLO DI CONTROLLO I А B C D J E F G H Figura 2 A — display elettronico digitale con touch control; F —
  • Страница 6 из 65
    CUCINE SERIE PP96GEE50 • IMPOSTAZIONE DEL TEMPO CORRENTE La prima volta e dopo un’interruzione di corrente, i numeri e simbolo А lampeggiano in display - in questo modo un fornello non funzioneranno. 1. • Dopo aver acceso della cucina premete il pulsante М e tenerlo premuto per almeno 2 secondi,
  • Страница 7 из 65
    IT CUCINE SERIE PP96GGG50 PIANO DI COTTURA A GAS SR— bruciatore a gas semirapido; R — bruciatore a gas rapido; A — bruciatore a gas ausilisario; TC — bruciatore a gas tripla corona. Figura 4 PANELLO DI CONTROLLO H А B C D E F G J I Figura 5 F — manopola comando bruciatore posteriore destra; A —
  • Страница 8 из 65
    CUCINE SERIE PP96GGG50 dai bruciatori. Se l’accensione non avviene in un tempo relativamente breve, si ripete l’operazione dopo avere riportato la manopola sulla posizione di chiusura . FORNO A GAS • ACCENSIONE DEL BRUCIATORE PRINCIPALE DEL FORNO Aprire la porta del forno. • Premere e ruotare la
  • Страница 9 из 65
    SCHEMA DI COLLEGAMENTI ELETTRICI IT INSTALLAZIONE E COLLEGAMENTO MONTAGGIO DEI PIEDINI Cucine attrezzate i piedini regolabili che si avvitano dal fondo su tutti i quattro lati. Dal altezza dei piedini può essere regolato per allineare la cucina rispetto al livello dai mobili vicini e di distribuire
  • Страница 10 из 65
    INSTALLAZIONE E COLLEGAMENTO ADATTAMENTO AI DIVERSI GAS SOSTITUIZIONE DELL’INIETTORE AL BRUCIATORE DEL GRILL (FIGURA 14) Qualora la cucina non fosse già predisposta per funzionare con il tipo di gas disponibile, occorre trasformata, procedendo nel seguente ordine: • Sostituzione degli iniettori
  • Страница 11 из 65
    IT INSTALLAZIONE E COLLEGAMENTO Tempo di intervento automatico, dopo lo spegnimento della fiamma non oltre 90 secondi per i bruciatori del piano; non oltre 60 secondi per i bruciatori forno e grill. • AVVERTENZE • Qualunque intervento tecnico all’interno della cucina deve essere preceduto dal
  • Страница 12 из 65
    COME SI USA LA CUCINA SERVIZIO E MANUTENZIONE CONSIGLI GENERALI DI SICUREZZA In caso di anomalie si raccomanda da fare seguenti azioni. Prima di consultare il Servizio Assistenza di fiducia controllare che: • la spina sia correttamente inserita nella presa di corrente; • la spia generale di
  • Страница 13 из 65
    IT SERVIZIO E MANUTENZIONE DIRETTIVA EUROPEA 2012/19/EEC (WEEE) Questa nota informativa è rivolta esclusivamente ai possessori d’apparecchi che presentano il tale simbolo nell’etichetta adesiva riportante i dati tecnici, applicata sul prodotto stesso (etichetta matricolare). Questo simbolo indica
  • Страница 14 из 65
    ALLEGATO 1. CARATTERISTICHE TECNICHE DIMENSIONI Dimensioni esterne nominali Altezza al piano di lavoro, cm 85 Profondità a porta chiusa, cm 59 Profondità a porta aperta, cm 100 Larghezza, cm 90 Dimensioni utili del forno Larghezza, cm 75 Profondità, cm 48 Altezza, cm 33 Volume, l 119
  • Страница 15 из 65
    SAFETY INSTRUCTIONS................................................................16 AUTOMATIC ELECTRIC IGNITION................................................23 GENERAL INFORMATION.............................................................16 GAS CONTROL SAFETY
  • Страница 16 из 65
    SAFETY INSTRUCTIONS WARNING! When the gas cooker is in use, it creates extra heat, humidity and byproducts of combustion in the room where it is installed. Make sure that the room is well-ventilated, particularly when the cooker is in use: do not close natural ventilation openings, and switch on
  • Страница 17 из 65
    PP96GEE50 RANGE COOKERS GB GAS BURNER PLATE SR – Normal gas burner; R – Rapid gas burner; A – Auxiliary gas burner; TC – a gas burner with three rows of flames. Figure 1 CONTROL PANEL I А B C D J E F G H Figure 2 A – digital display with touch control; F — oven thermostat handle; B — left front
  • Страница 18 из 65
    PP96GEE50 RANGE COOKERS • SETTING THE CLOCK The first time you switch the appliance on, as well as after a power cut, the digits and the indicator A on the display will flicker, and the cooker will not operate in this position. • 1. After switching on the cooker, press the M button and hold for at
  • Страница 19 из 65
    PP96GGG50 RANGE COOKERS GAS BURNER PLATE GB SR – Normal gas burner; R – Rapid gas burner; A – Auxiliary gas burner; TC – a gas burner with three rows of flames. Figure 4 CONTROL PANEL H А B C D E F G J I Figure 5 A – digital display with touch control; F — right rear burner knob – used to switch on
  • Страница 20 из 65
    PP96GGG50 RANGE COOKERS GAS OVEN • • • Open the oven door. • Press the knob down and turn it anti-clockwise to the maximum flame position. • To ignite the burner automatically, press the button down all the way. • Without releasing a knob, make sure that the burner has lit up: watch the flame
  • Страница 21 из 65
    INSTALLATION AND SWITCHING ON CONNECTING TO THE MAINS INSTALLATION OF THE FEET 230 V TWO-PHASE GB Cookers have adjustable feet that are screwed bottom from four sides. With the help of the feet, you can adjust the height of the cookers to align its level due to nearby kitchen units and evenly
  • Страница 22 из 65
    INSTALLATION AND SWITCHING ON ADJUSTING FOR DIFFERENT TYPES OF GAS REPLACING THE GRILL INJECTORS (FIG. 14) If the cooker is not already pre-set to operate with the type of gas available, it must be converted by following these steps: • • Remove the injector, by loosening the two screws fastening it
  • Страница 23 из 65
    • • Slowly retighten the by-pass, watching the flame decrease through the window in the closed oven door, until the size of the flame is reduced to approximately 4 mm. It is not recommended to keep the flame too low. It must be stable even when the oven door is opened or closed quickly. Switch off
  • Страница 24 из 65
    USING THE COOKER 2. Put a piece of meat on a spit, securing it in the center with special forks. 3. Insert a spit into the tip located in the hub of the support frame. 4. Remove the protective handle from the spit. GENERAL RECOMMENDATIONS REGARDING OVEN USE • Oven shelf: place drip trays on it for
  • Страница 25 из 65
    CARE AND MAINTENANCE The oven door may be removed in order to make the process of cleaning the oven more convenient. Carry out the following instructions: • Open the door fully. • Turn the two levers marked “B”, turning them from position 1 to position 2 (fig. 20). • Slowly start to close the door
  • Страница 26 из 65
    APPENDIX 1. TECHNICAL CHARACTERISTICS DIMENSIONS Nominal external dimensions Height up to the work surface, cm 85 Depth with the oven door closed, cm 59 Depth with the oven door open, cm 100 Width, cm 90 Useful dimensions Width, cm 75 Depth, cm 48 Height, cm 33 Volume, l 119 GAS BURNER
  • Страница 27 из 65
    ОГЛАВЛЕНИЕ ЗАМЕНА ФОРСУНОК ГОРЕЛКИ ДУХОВКИ (РИС. 13)...........34 УКАЗАНИЯ ПО БЕЗОПАСНОЙ ЭКСПЛУАТАЦИИ ИЗДЕЛИЯ.........................................................................................28 ЗАМЕНА ФОРСУНОК ГОРЕЛКИ ГРИЛЯ (РИС. 14).........................34 ОБЩАЯ
  • Страница 28 из 65
    УКАЗАНИЯ ПО БЕЗОПАСНОЙ ЭКСПЛУАТАЦИИ ИЗДЕЛИЯ • Не используйте ручку дверцы для переноса плиты. • Изделие и его наружные части сильно нагреваются во время работы. Следует проявлять осторожность. Нельзя касаться нагревательных элементов. Дети в возрасте до 8 лет должны находиться на расстоянии или под
  • Страница 29 из 65
    КУХОННЫЕ ПЛИТЫ СЕРИИ PP96GEE50 ГАЗОВАЯ ВАРОЧНАЯ ПОВЕРХНОСТЬ SR— стандартная газовая конфорка; R — быстрая газовая конфорка; A — вспомогательная газовая конфорка; RU TC — газовая конфорка с тремя рядами пламени. Рисунок 1 ПАНЕЛЬ УПРАВЛЕНИЯ I А B C D J E F G H Рисунок 2 A — электронный дисплей с
  • Страница 30 из 65
    КУХОННЫЕ ПЛИТЫ СЕРИИ PP96GEE50 • УСТАНОВКА ТЕКУЩЕГО ВРЕМЕНИ При первом включении и после перебоя в подаче электроэнергии на дисплее мигают цифры и символ А — в таком режиме плита не будет функционировать. • 1. После включения плиты нажмите кнопку М и удерживайте ее не менее 2 секунд, пока символ А
  • Страница 31 из 65
    КУХОННЫЕ ПЛИТЫ СЕРИИ PP96GGG50 ГАЗОВАЯ ВАРОЧНАЯ ПОВЕРХНОСТЬ SR— стандартная газовая конфорка; R — быстрая газовая конфорка; A — вспомогательная газовая конфорка; RU TC — газовая конфорка с тремя рядами пламени. Рисунок 4 ПАНЕЛЬ УПРАВЛЕНИЯ H А B C D E F G J I Рисунок 5 A — электронный дисплей с
  • Страница 32 из 65
    КУХОННЫЕ ПЛИТЫ СЕРИИ PP96GGG50 • КНОПКА ВКЛЮЧЕНИЯ ВЕНТИЛЯТОРА ПРИНУДИТЕЛЬНОЙ КОНВЕКЦИИ Нажатие данной кнопки активирует работу внутреннего вентилятора принудительной конвекции. Он может быть включен одновременно с работой основной газовой горелки (режим ГАЗ С КОНВЕКЦИЕЙ), а также самостоятельно
  • Страница 33 из 65
    УСТАНОВКА И ПОДКЛЮЧЕНИЕ СХЕМА ПОДКЛЮЧЕНИЯ К ЭЛЕКТРОСЕТИ СХЕМА ПОДКЛЮЧЕНИЯ К ЭЛЕКТРОСЕТИ т. д.) — при установке соблюдайте безопасное расстояние от них. Плиту можно устанавливать саму по себе или между кухонной мебелью при условии, что стенки этой мебели выдерживают температуру до 100°С, а ее высота
  • Страница 34 из 65
    УСТАНОВКА И ПОДКЛЮЧЕНИЕ • Соединение рампы соответствует нормам ISO 228-1. • Избегайте сильных изгибов трубы или шланга, не пережимайте и старайтесь не прислонять ее/его) к разогретым стенкам плиты. ЗАМЕНА ФОРСУНОК ГОРЕЛКИ ГРИЛЯ (рис. 14) • Снимите горелку, открутив два винта, которыми она
  • Страница 35 из 65
    УСТАНОВКА И ПОДКЛЮЧЕНИЕ • Медленно закрутите регулировочный винт, наблюдая за уменьшением пламени через стекло закрытой дверцы духовки до тех пор, пока конус пламени не уменьшится приблизительно до 4 мм. Не рекомендуется слишком уменьшать пламя. Оно должно быть стабильным даже при быстром открытии
  • Страница 36 из 65
    УСТАНОВКА И ПОДКЛЮЧЕНИЕ ИСПОЛЬЗОВАНИЕ ВЕРТЕЛА • ОБЩИЕ РЕКОМЕНДАЦИИ ПО ИСПОЛЬЗОВАНИЮ ДУХОВЫХ ШКАФОВ • Решетка духовки: на нее ставятся противни для приготовления выпечки, жаркого и т.д. (в комплект не входят); прямо на решетке можно готовить мясо («мясо на гриле»). • Противень: обычно размещается
  • Страница 37 из 65
    ОБСЛУЖИВАНИЕ И УХОД Дверцу можно снимать для того, чтобы сделать процесс очистки духовки более удобным. Выполните следующие инструкции: • Полностью откройте дверцу. • Поверните два рычага «B», переведя их из положения 1 в положение 2 (рис. 20). • Медленно закрывайте дверцу, пока она не остановится.
  • Страница 38 из 65
    ПРИЛОЖЕНИЕ 1. ТЕХНИЧЕСКИЕ ХАРАКТЕРИСТИКИ ГАБАРИТЫ Номинальные наружные размеры Высота до рабочей поверхности, см 85 Высота с поднятой крышкой, см 59 Глубина с закрытой дверцей духовки, см 100 Глубина с открытой дверцей духовки, см 90 Ширина, см 60 Полезные размеры Ширина, см 75 Глубина, см 48
  • Страница 39 из 65
    ЗМIСТ ВКАЗІВКИ ЩОДО БЕЗПЕЧНОГО ВИКОРИСТАННЯ ВИРОБУ..............................................................................................40 АВТОМАТИЧНИЙ ЕЛЕКТРОПIДПАЛ............................................47 КУХОННІ ПЛИТИ СЕРІЇ PP96GEE50.................................41 ВИКОРИСТАННЯ
  • Страница 40 из 65
    ВКАЗІВКИ ЩОДО БЕЗПЕЧНОГО ВИКОРИСТАННЯ ВИРОБУ УВАГА! • • Виріб і його зовнішні частини сильно нагріваються під час роботи. Слід проявляти обережність. Не можна торкатися нагрівальних елементів. Діти у віці до 8 років повинні знаходитися на відстані або під наглядом дорослих. Діти у віці від 8 років,
  • Страница 41 из 65
    КУХОННІ ПЛИТИ СЕРІЇ PP96GEE50 ГАЗОВА ВАРИЛЬНА ПОВЕРХНЯ SR— стандартна газова конфорка; R —швидка газова конфорка; A — допомiжна газова конфорка; UA TC — газова конфорка з трьома рядами полум’я. Малюнок 1 ПАНЕЛЬ УПРАВЛIННЯ I А B C D J E F G H Малюнок 2 A — електронний дисплей з сенсорним
  • Страница 42 из 65
    КУХОННІ ПЛИТИ СЕРІЇ PP96GEE50 • УСТАНОВКА ПОТОЧНОГО ЧАСУ При першому включенні і після перебою в подачі електроенергії на дисплеї блимають цифри і символ А — в такому режимі плита не функціонуватиме. • 1. Після вмикання плити натиснiть кнопку М і утримуйте її не менше 2 секунд, поки символ А не
  • Страница 43 из 65
    КУХОННІ ПЛИТИ СЕРІЇ PP96GGG50 ГАЗОВА ВАРИЛЬНА ПОВЕРХНЯ SR— стандартна газова конфорка; R —швидка газова конфорка; A — допомiжна газова конфорка; UA TC — газова конфорка з трьома рядами полум’я. Малюнок 4 ПАНЕЛЬ УПРАВЛIННЯ H А B C D E F G J I Малюнок 5 A — електронний дисплей з сенсорним
  • Страница 44 из 65
    КУХОННІ ПЛИТИ СЕРІЇ PP96GGG50 • КНОПКА ВМИКАННЯ ВЕНТИЛЯТОРА ПРИМУСОВОЇ КОНВЕКЦІЇ • Натиснення цiєї кнопки активує роботу внутрішнього вентилятора примусової конвекції. Він може бути включений одночасно з роботою основного газового пальника (режим ГАЗ З КОНВЕКЦІЄЮ), а також самостійно (режим
  • Страница 45 из 65
    УСТАНОВКА I ПІДКЛЮЧЕННЯ СХЕМА ПІДКЛЮЧЕННЯ ДО ЕЛЕКТРОМЕРЕЖІ СХЕМА ПІДКЛЮЧЕННЯ ДО ЕЛЕКТРОМЕРЕЖІ 230 V ДВУХФАЗНИЙ Сечение кабеля МОНТАЖ НIЖОК Плити оснащені регульованими ніжками, які прикручуються знизу з чотирьох сторін. За допомогою ніжок можна регулювати висоту плити для вирівнювання її рівня щодо
  • Страница 46 из 65
    УСТАНОВКА I ПІДКЛЮЧЕННЯ НАСТРОЙКА ПІД РІЗНІ ТИПИ ГАЗУ ЗАМІНА ФОРСУНОК ПАЛЬНИКА ГРИЛЯ (МАЛ. 14) У випадку, якщо газ, який використовується для функціонування плити, відрізняється від вказаного, необхідно налаштувати плиту таким чином: • Замінiть форсунки (див. ДОДАТОК 1). • Виконайте регулювання
  • Страница 47 из 65
    УСТАНОВКА I ПІДКЛЮЧЕННЯ • • Повільно закрутіть регулювальний гвинт, спостерігаючи за зменшенням полум’я через скло закритих дверцят духовки до тих пір, поки конус полум’я не зменшиться приблизно до 4 мм. Не рекомендується занадто зменшувати полум’я . Воно має бути стабільним навіть при швидкому
  • Страница 48 из 65
    УСТАНОВКА I ПІДКЛЮЧЕННЯ ВИКОРИСТАННЯ РОЖНА • ЗАГАЛЬНІ РЕКОМЕНДАЦІЇ З ВИКОРИСТАННЯ ДУХОВИХ ШАФ • Решітка духовки: на неї ставляться деко для приготування випічки, жаркого і т.д. (у комплект не входять); прямо на решітці можна готувати м’ясо («м’ясо на грилі»). • Деко: зазвичай розміщується під
  • Страница 49 из 65
    ОБСЛУГОВУВАННЯ І ДОГЛЯД ДЕМОНТАЖ ДВЕРЦI ДУХОВКИ У разі, якщо захисна кришка пошкоджена або зламана, не використовуйте духову шафу до її заміни. Дверцю можна знімати для того, щоб зробити процес очищення духовки зручнішим. Виконайте наступні інструкції: • Повністю відкрийте дверцю. • Поверніть два
  • Страница 50 из 65
    ДОДАТОК 1. ТЕХНІЧНІ ХАРАКТЕРИСТИКИ ГАБАРИТИ Номінальні зовнішні розміри Висота до робочої поверхні, см 85 Глибина з зачиненою дверцею духовки, см 59 Глибина з відчиненою дверцею духовки, см 100 Ширина, см 90 Корисні розміри духовки Ширина, см 75 Глибина, см 48 Висота, см 33 Об'єм, л 119
  • Страница 51 из 65
    SPIS TREŚCI WARUNKI BEZPIECZNEGO UŻYTKOWANIA SPRZĘTU......52 WYMIANA DYSZY PALNIKA DO GRILLOWANIA.........................58 INFORMACJE OGÓLNE...............................................................52 REGULOWANIE MINIMALNEGO PŁOMIENIA PALNIKÓW ROBOCZEJ PŁYTY
  • Страница 52 из 65
    WARUNKI BEZPIECZNEGO UŻYTKOWANIA SPRZĘTU • Nie wolno wykorzystywać do przenoszenia kuchenki uchwytów do drzwiczek. • Do czyszczenia szklanych drzwiczek piekarnika nie wolno stosować mocnych detergentów ściernych i ostrych przedmiotów metalowych, ponieważ mogą one zarysować powierzchnię albo
  • Страница 53 из 65
    KUCHNIE Z SERII PP96GEE50 GAZOWA PŁYTA KUCHENNA SR— palnik gazowy średni; R — palnik gazowy szybko gotujący; A — palnik gazowy mały; TC — palnik gazowy Potrójna Korona. Rysunek 1 PANEL STEROWANIA J PL I А B C D E F G H Rysunek 2 A — wyświetlacz elektroniczny ze sterowaniem dotykowym; F — pokrętło
  • Страница 54 из 65
    KUCHNIE Z SERII PP96GEE50 • USTAWIANIE ZEGARA WIELOFUNKCYJNY PIEKARNIK ELEKTRYCZNY Z TERMOOBIEGIEM Przy pierwszym włączeniu i po przerwach w dostawie prądu, na panelu sterowania będą migały cyfry i symbol A – w takim trybie kuchenka nie będzie funkcjonować. 1. Po włączeniu kuchenki należy wcisnąć
  • Страница 55 из 65
    KUCHNIE SERII PP96GGG50 GAZOWA PŁYTA KUCHENNA SR —palnik gazowy średni; R —palnik szybko gotujący; A —palnik gazowy mały; TC — palnik gazowy Potrójna Korona. Rysunek 3 PANEL STEROWANIA J PL H А B C D E F G I A — wyświetlacz elektroniczny ze sterowaniem dotykowym; F — pokrętło włączania i regulacji
  • Страница 56 из 65
    KUCHNIE SERII PP96GGG50 • PRZYCISK WŁĄCZANIA WENTYLATORA WYMUSZONEJ KONWEKCJI • Naciśnięcie tego przycisku aktywuje pracę wewnętrznego wentylatora wymuszonej konwekcji. Może on pracować jednocześnie z włączonym głównym palnikiem gazowym (tryb GAZ Z KONWEKCJĄ), lub niezależnie (tryb ROZMRAŻANIE
  • Страница 57 из 65
    MONTAŻ I PODŁĄCZANIE SCHEMAT PODŁĄCZENIA DO SIECI ELEKTRYCZNEJ SCHEMAT PODŁĄCZENIA DO SIECI ELEKTRYCZNEJ 230 V DWUFAZOWE można ustawić osobno albo między meblami kuchennymi, pod warunkiem, że ścianki owych mebli są wytrzymałe do temperatury do 100°С, a ich wysokość nie przewyższa wysokości roboczej
  • Страница 58 из 65
    MONTAŻ I PODŁĄCZANIE USTAWIENIA DLA RÓŻNYCH TYPÓW GAZU WYMIANA DYSZY PALNIKA DO GRILLOWANIA Jeśli gaz wykorzystywany do funkcjonowania kuchenki różni się od typu wskazanego, należy ustawić kuchenkę w sposób następujący: • Wymienić dyszę (patrz ZAŁĄCZNIK 1). • Wyregulować podawanie powietrza. •
  • Страница 59 из 65
    MONTAŻ I PODŁĄCZANIE • Po 5-6 minutach trzeba ustawić pokrętło regulatora w pozycji płomienia minimalnego. Poprawne odległości między końcówkami czujnika termoparowego i palnikiem zostały wskazane na rys. 11 i 12. • Następnie trzeba powoli zakręcić gwint, pilnując zmniejszanie się płomienia przez
  • Страница 60 из 65
    UŻYTKOWANIE KUCHNI UŻYTKOWANIE ROŻNA • GRILLOWANIE POTRAWY PIECZONEJ NA ROŻNIE Z OTWARTYMI DRZWIAMI PIEKARNIKA 1. OGÓLNE ZALECENIA DOTYCZĄCE UŻYTKOWANIA PIEKARNIKA • Ruszt piekarnika: używany do stawiania na nim blachy do przyrządzania wypieków, pieczenia itd. (nie są włączone do wyposażenia);
  • Страница 61 из 65
    OBSŁUGA I KONSERWACJA DEMONTAŻ DRZWI PIEKARNIKA WYMIANA ŻARÓWKI Drzwiczki można zdjąć, żeby ułatwić proces czyszczenie piekarnika. Należy wykonać następujące wskazówki: Żeby uniknąć porażenia prądem elektrycznym i/lub wyrządzenia krzywdy dla człowieka, należy przeczytać i wykonać procedurę opisaną
  • Страница 62 из 65
    ZAŁĄCZNIK 1. CHARAKTERYSTYKA TECHNICZNA WYMIARY Nominalne wymiary zewnętrzne Wysokość do powierzchni roboczej, cm 85 Głębokość z zamkniętymi drzwiczkami piekarnika, cm 59 Głębokość z otwartymi drzwiczkami piekarnika, cm 100 Szerokość, cm 90 Wymiary użytkowe Szerokość, cm 75 Głębokość, cm 48
  • Страница 63 из 65
  • Страница 64 из 65
    Istruzioni in formato elettronico e` possibile scaricare dal sito www.freggia.com This manual can be downloaded at www.freggia.com Инструкцию в электронном виде можно скачать на сайте www.freggia.com Інструкцію в електронному вигляді можна завантажити на сайті www.freggia.com Instrukcję w formie
  • Страница 65 из 65