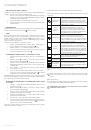
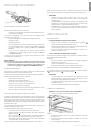
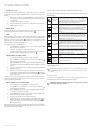
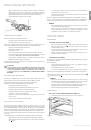
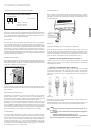
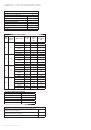
DIGITAL DISPLAY WITH TOUCH CONTROL
2.
Using the
-
and
+
buttons, set the time.
3.
A few seconds after the last depression of the buttons, the chosen time
will be automatically saved.
• TIMER
The timer produces an audio signal when the set time is up without switching off the
cooker. The maximum interval that can be set on a timer is 23 hours and 59 minutes.
When the set time runs out, the symbol will disappear from the display, and the
signal will sound. The audio signal will automatically stop in 7 minutes, or you can
stop it by pressing any button on the display.
To set up the timer, please do the following:
1. Press
the
M
button and hold for at least 2 seconds, until a fl ashing
symbol appears on the display.
2.
Using the
-
and
+
buttons, set the required interval.
3.
A few seconds after the last depression of the buttons, the timer will save
the required time and will start the count-down time. .
•
SWITCHING ON THE OVEN/THE THERMOSTAT/SWITCHING ON THE GRILL
A thermostat knob allows you to switch on the main gas injector in the oven and to set
the desired temperature for cooking.
ATTENTION!
PP96GGG50 range cookers are supplied with a gas oven with an in-built
fan and gas grill, Detailed information on switching on the gas grill and
on its functioning can be found in the “GAS OVEN” chapter.
•
INTERNAL LIGHTING ON/OFF BUTTON
Used to switch on the internal lighting.
•
IN-BUILT FAN ON/OFF BUTTON
By pressing this button, you activate the functioning of the in-built fan. It can be
switched on alongside the main gas injector (GAS WITH VENTILATION mode), as well
as independently (DE-FROSTING/DRYING mode). The simultaneous functioning of the
fan and the grill is not allowed.
GB
19
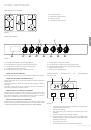
PP96GGG50 RANGE COOKERS
PP96GGG50 RANGE COOKERS
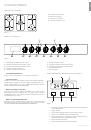
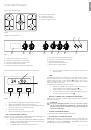
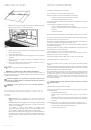
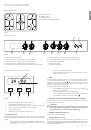
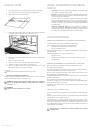
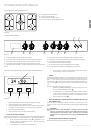
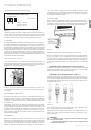
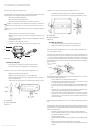
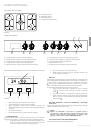
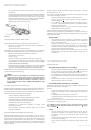
GAS BURNER PLATE
SR – Normal gas burner;
R – Rapid gas burner;
A – Auxiliary gas burner;
TC – a gas burner with three rows of fl ames.
Figure 4
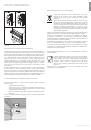
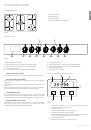
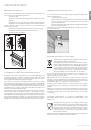
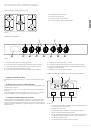
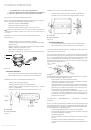
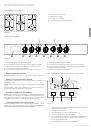
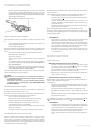
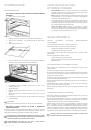
CONTROL PANEL
F — right rear burner knob – used to switch on and adjust the fl ame;
G — right front burner knob – used to switch on and adjust the fl ame;
H — internal lighting on/off button;
I — turnspit switch on knob;
J — in-built fan on/off button.
Figure 5
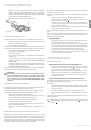
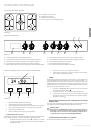
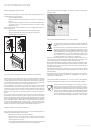
A – digital display with touch control;
B — left front burner knob – used to switch on and adjust the fl ame
C — left rear burner knob – used to switch on and adjust the fl ame;
D — central burner knob – used to switch on and adjust the fl ame;
E — switching on the oven knob/the thermostat knob/switching on the grill knob;
А
B
C
D
H
J
E
F
G
I
Figure 6
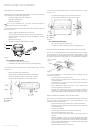
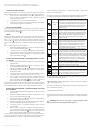
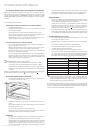
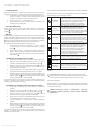
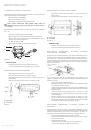
1.
This indicator fl ashes when the time is being set up
2.
This indicator shows when a timer is activated.
3.
A button used to decrease the time when a timer is being set. It is also used
to choose an audio signal level (three levels are available).
4.
Setting selection button.
5.
Button used to increase the time, when a timer is set.
• SETTING
THE
CLOCK
The fi rst time you switch the appliance on, as well as after a power cut, the digits
and the indicator
A
on the display will fl icker, and the cooker will not operate in this
position.
1.
After switching on the cooker, press the
M
button and hold for at least 2
seconds, until the symbol
A
disappears. A fl ashing
•
symbol will appear
on the display.