36
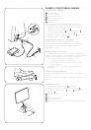
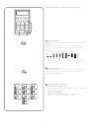
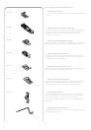
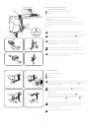
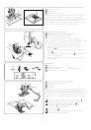
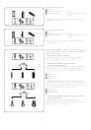
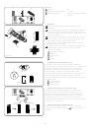
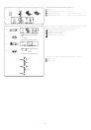
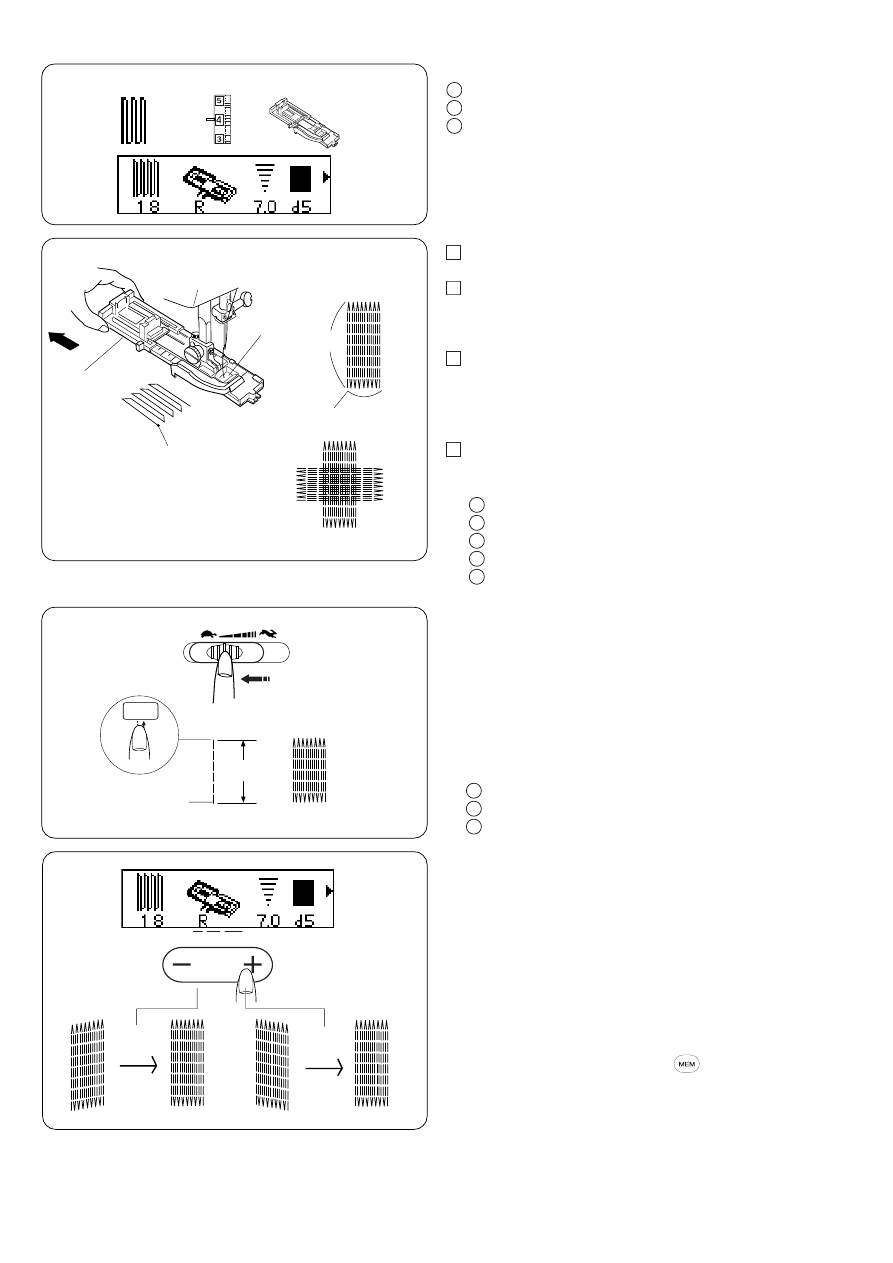
Darning Stitch
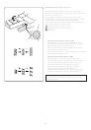
q Stitch pattern:
18
w Thread tension dial:
3 to 6
e Presser foot:
Automatic buttonhole foot: R
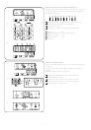
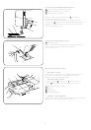
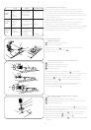
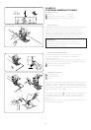
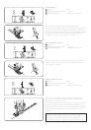
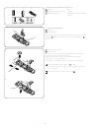
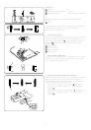
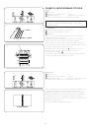
• To sew
z Pull the button holder to the rear.
x Place the garment under the foot. Press the up/down
needle position button twice. Move the fabric to the
left to draw both threads under the foot.
c Lower the foot. Press down the foot control.
The machine will lock stitch, sew 16 rows of darning,
lock stitch again and stop automatically.
v Turn the fabric and repeat sewing.
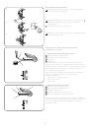
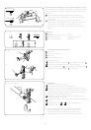
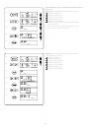
q Button holder
w Hole
e Starting point
r 3/4˝ (2 cm)
t 9/32˝ (0.7 cm)
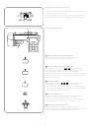
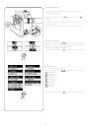
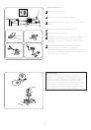
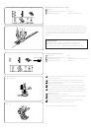
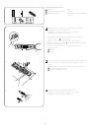
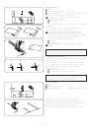
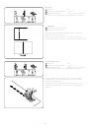
• For darning less than 3/4˝ (2 cm)
The size of the darning cycle is variable. The pre-set and
maximum size is 3/4˝ (2 cm) length and 9/32˝ (0.7 cm)
width. For shorter length, set machine to “Low” speed
setting. 4 lock stitches will be sewn first. Then sew to the
desired length and press the reverse button. The desired
length has now been determined. Continue sewing until
the machine stops automatically.
y Reverse stitch button
u Desired length
i Starting point
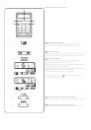
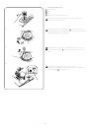
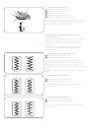
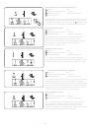
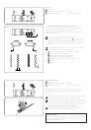
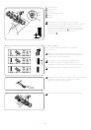
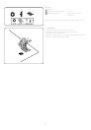
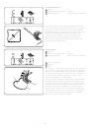
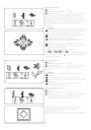
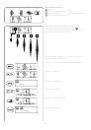
• To adjust the shape of darning stitch
If one side of the darn is higher than the other, make
them even by pressing the stitch length “+” or “–” key.
When you press the”“+” or “–” key, d5 will be indicated
automatically. You can adjust the shape of the darn by
pressing “+” or “–” key, d1 to d9.
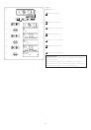
• To memorize darning stitch
When repeatedly sewing the same-size darn to repair a
side rip or belt loop, press key and restart sewing.
q
w
e
r
e
t
z x c v
y
u
i
q
w
e
36
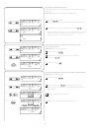
Штопка
Строчка:
18
Натяжение верхней нити:
от 3 до 6
Прижимная лапка:
лапка для автоматической
петли R
•
Как шить
Оттяните держатель пуговицы назад насколько
возможно.
Расположите изделие под лапкой. Дважды нажмите
на кнопку подъема/опускания иглы. Отведите ткань
влево и вытяните обе нити под лапку. Разместите ткань
снова под лапкой.
Опустите лапку. Нажмите на педаль. Машина сделает
закрепочный стежок, прошьет 16 рядов штопки, еще
один закрепочный стежок и остановится
автоматически. Максимальный размер штопки 2 см
в длину и 0.7 см в ширину.
Поверните ткань и повторите процедуру в различных
направлениях, пока штопка не покроет нужную
область или дырку.
Держатель пуговицы
Отверстие
Точка начала
2 см
0.7 см
•
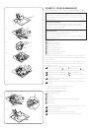
Короткая штопка (меньше 2 см)
Размер штопки может быть различным. Заданный
и максимальный размер штопки в машине — 2 см в длину
и 0.7 см в ширину. Чтобы прошить штопку меньшего
размера, установите самую малую скорость машины.
Сначала будут созданы 4 стежка закрепки. Затем
прошейте нужную длину и нажмите на кнопку реверса.
Теперь нужная длина определена. Снова запустите
машину, продолжайте шить, пока машина не остановится
автоматически.
Кнопка реверса
Нужная длина
Точка начала
•
Регулировка баланса стежков штопки
Неровность штопки может зависеть от различных
условий, таких как тип ткани, количество слоев и т.д.
Вы можете регулировать баланс стежков штопки при
помощи кнопки изменения длины стежка «+» или «–».
Если нажать «+» или «–», автоматически появится
указатель d5. Отрегулируйте форму штопки при помощи
«+» или «–», от d1 до d9.
•
Чтобы запомнить стежки штопки
Если штопка повторяется одного и того же размера
несколько раз, нажмите кнопку и снова запустите
машину.
36
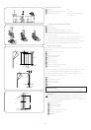
Darning Stitch
q Stitch pattern:
18
w Thread tension dial:
3 to 6
e Presser foot:
Automatic buttonhole foot: R
• To sew
z Pull the button holder to the rear.
x Place the garment under the foot. Press the up/down
needle position button twice. Move the fabric to the
left to draw both threads under the foot.
c Lower the foot. Press down the foot control.
The machine will lock stitch, sew 16 rows of darning,
lock stitch again and stop automatically.
v Turn the fabric and repeat sewing.
q Button holder
w Hole
e Starting point
r 3/4˝ (2 cm)
t 9/32˝ (0.7 cm)
• For darning less than 3/4˝ (2 cm)
The size of the darning cycle is variable. The pre-set and
maximum size is 3/4˝ (2 cm) length and 9/32˝ (0.7 cm)
width. For shorter length, set machine to “Low” speed
setting. 4 lock stitches will be sewn first. Then sew to the
desired length and press the reverse button. The desired
length has now been determined. Continue sewing until
the machine stops automatically.
y Reverse stitch button
u Desired length
i Starting point
• To adjust the shape of darning stitch
If one side of the darn is higher than the other, make
them even by pressing the stitch length “+” or “–” key.
When you press the”“+” or “–” key, d5 will be indicated
automatically. You can adjust the shape of the darn by
pressing “+” or “–” key, d1 to d9.
• To memorize darning stitch
When repeatedly sewing the same-size darn to repair a
side rip or belt loop, press key and restart sewing.
q
w
e
r
e
t
z x c v
y
u
i
q
w
e
36
Darning Stitch
q Stitch pattern:
18
w Thread tension dial:
3 to 6
e Presser foot:
Automatic buttonhole foot: R
• To sew
z Pull the button holder to the rear.
x Place the garment under the foot. Press the up/down
needle position button twice. Move the fabric to the
left to draw both threads under the foot.
c Lower the foot. Press down the foot control.
The machine will lock stitch, sew 16 rows of darning,
lock stitch again and stop automatically.
v Turn the fabric and repeat sewing.
q Button holder
w Hole
e Starting point
r 3/4˝ (2 cm)
t 9/32˝ (0.7 cm)
• For darning less than 3/4˝ (2 cm)
The size of the darning cycle is variable. The pre-set and
maximum size is 3/4˝ (2 cm) length and 9/32˝ (0.7 cm)
width. For shorter length, set machine to “Low” speed
setting. 4 lock stitches will be sewn first. Then sew to the
desired length and press the reverse button. The desired
length has now been determined. Continue sewing until
the machine stops automatically.
y Reverse stitch button
u Desired length
i Starting point
• To adjust the shape of darning stitch
If one side of the darn is higher than the other, make
them even by pressing the stitch length “+” or “–” key.
When you press the”“+” or “–” key, d5 will be indicated
automatically. You can adjust the shape of the darn by
pressing “+” or “–” key, d1 to d9.
• To memorize darning stitch
When repeatedly sewing the same-size darn to repair a
side rip or belt loop, press key and restart sewing.
q
w
e
r
e
t
z x c v
y
u
i
q
w
e
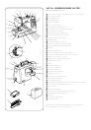
1
3
2
1
3
4
2
6
8
7
5
1
2
3
4