38
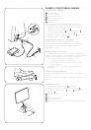
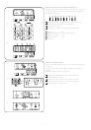
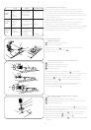
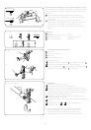
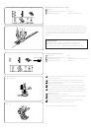
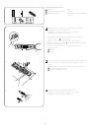
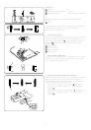
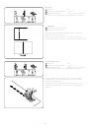
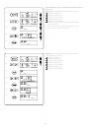
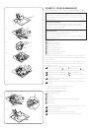
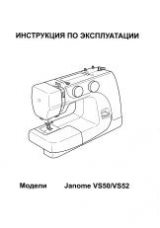
Потайной шов
Строчка:
22
Натяжение верхней нити:
от 1 до 4
Прижимная лапка:
лапка для потайного шва G
* Можно также работать со строчкой 7.
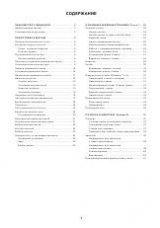
Заложите ткань с изнаночной стороны ткани с
припуском 0.4 – 0.7 см.
Изнаночная сторона ткани
0.4 – 0.7 см
(1)
Заложите складку под ткань при работе с легкими
тканями.
(2)
Тяжелые ткани, которые ложатся неровно,
сначала необходимо обработать край.
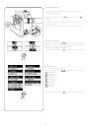
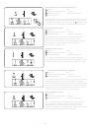
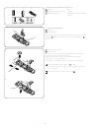
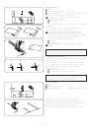
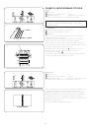
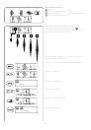
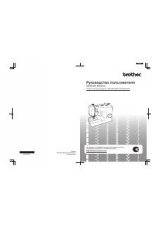
Расположите ткань так, чтобы сложенный край
подходил к левой стороне направителя на лапке.
Опустите прижимную лапку. Отрегулируйте положение
иглы при необходимости. Шейте, направляя
сложенный край вдоль направителя.
Складка
Направитель
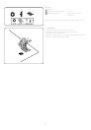
По окончании раскройте ткань лицевой стороной
наверх.
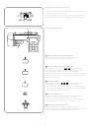
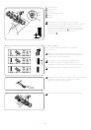
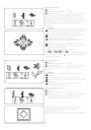
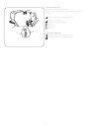
ПРИМЕЧАНИЕ:
Если стежки будут ложиться слишком далеко влево,
они будут виднеться на лицевой стороне ткани.
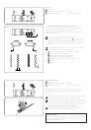
•
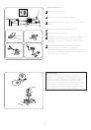
Смена положения иглы
Нажмите на кнопку изменения ширины стежка для смены
положения иглы.
(1)
Нажмите на «–», чтобы переместить иглу вправо.
(2)
Нажмите на «+», чтобы переместить иглу влево.
ЖК дисплей показывает левое положение иглы от
направителя в мм.
Направитель на лапке
Позиция иглы в левом положении
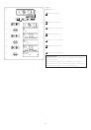
ПРИМЕЧАНИЕ:
Положение иглы меняется вправо или влево, но при
этом ширина стежка остается неизменной.
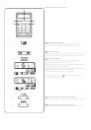
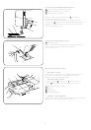
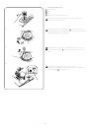
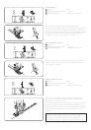
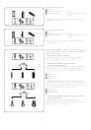
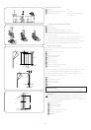
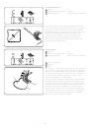
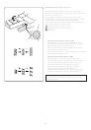
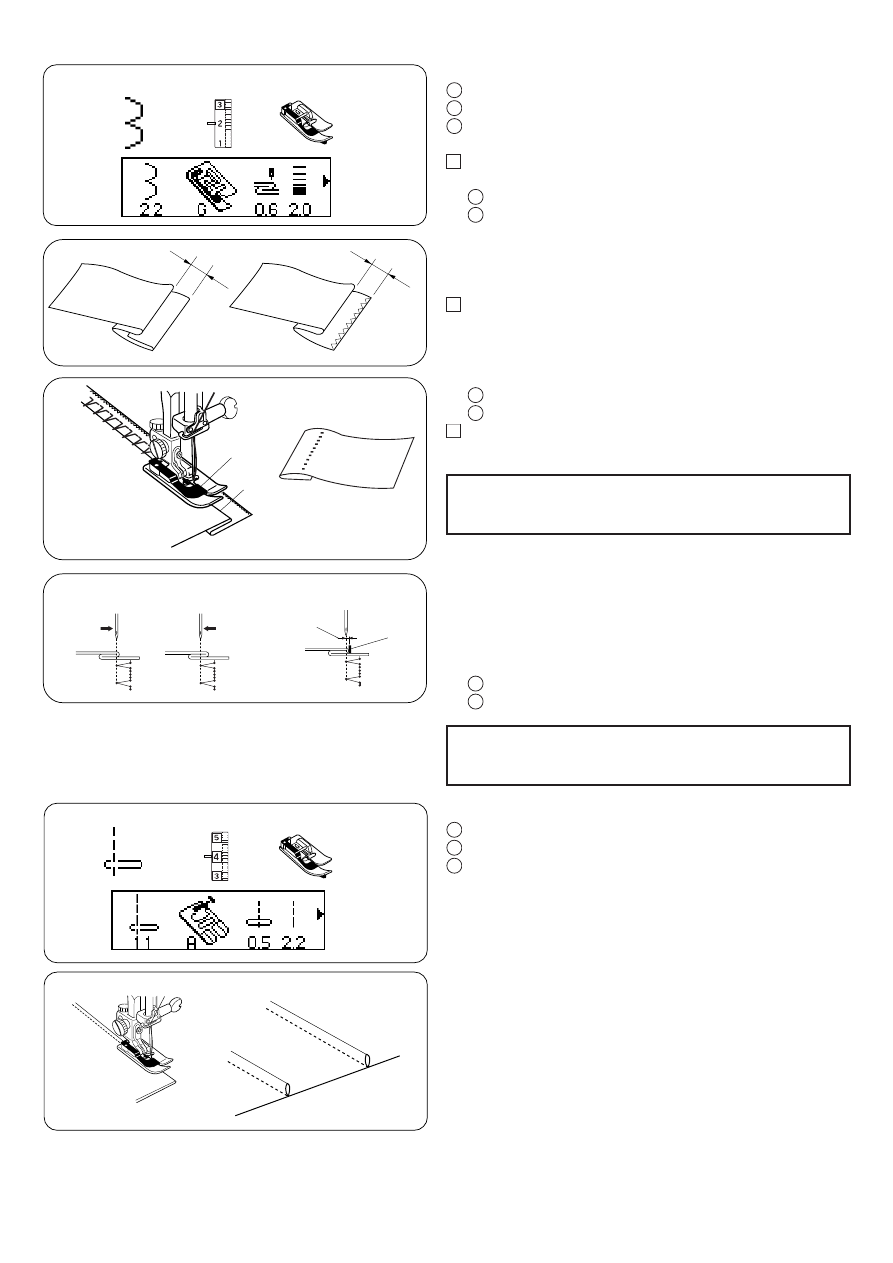
Узкие складки
Строчка:
11
Натяжение верхней нити:
от 2 до 6
Прижимная лапка:
лапка для потайного шва G
Сложите ткань изнаночной стороной вовнутрь.
Подложите сложенную ткань под прижимную рядом с
направителем лапки для потайного шва. Опустите лапку и
шейте, направляя складку вдоль направителя.
Откройте ткань и прогладьте складки на одну сторону.
38
q
w
(1)
q
w
(2)
e
r
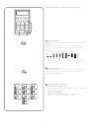
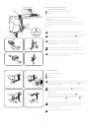
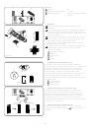
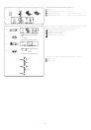
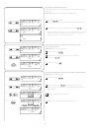
Blind Hemming
q Stitch pattern:
22
w Thread tension dial:
1 tot 4
e Presser foot:
Blind hem foot: G
* Stitch pattern 7 can also be used.
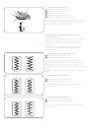
z Fold a hem with the wrong side of the fabric up to form
a 0.4 – 0.7 cm allowance.
q Wrong side of fabric
w 0,4 – 0,7 cm
(1) Fold the hem under the fabric for lightweight fabrics.
(2) On heavyweight fabrics that tend to ravel, the raw
edge should be overcast first.
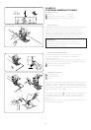
x Place the fabric so that the fold is next to the guide on
the foot. Lower the presser foot. Adjust the needle drop
position if necessary. Sew while guiding the fold along
the guide.
e Fold
r Guide
c Open the fabric after sewing is finished.
NOTE:
If the needle pierces too far left, the stitch will show
through on the right side of the fabric.
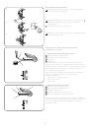
• Adjusting the needle drop position
The needle drop position can be adjusted by pressing
stitch width adjusting key.
(1)
Press the minus (–) key to move the needle drop
position to the right.
(2)
Press the plus (+) key to move the needle drop
position to the left.
The LCD display indicates the distance between the guide
and left needle drop position in millimeter.
r
Guide
t
Left needle drop position
NOTE:
The needle drop position will move to the left or right,
but the stitch width is remained the same.
z
x
c
q
w
e
t
r
(1)
(2)
q
w
e
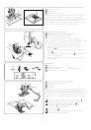
Pintucking
q Stitch pattern:
11
w Thread tension dial:
2 tot 6
e Presser foot:
Blind hem foot: G
Fold the fabric with wrong side together.
Place the fabric so that the fold is next to the guide on
the presser foot. Lower the foot and sew while guiding
the fold along the guide.
Open the fabric and press the tucks to one side.
38
q
w
(1)
q
w
(2)
e
r
Blind Hemming
q Stitch pattern:
22
w Thread tension dial:
1 tot 4
e Presser foot:
Blind hem foot: G
* Stitch pattern 7 can also be used.
z Fold a hem with the wrong side of the fabric up to form
a 0.4 – 0.7 cm allowance.
q Wrong side of fabric
w 0,4 – 0,7 cm
(1) Fold the hem under the fabric for lightweight fabrics.
(2) On heavyweight fabrics that tend to ravel, the raw
edge should be overcast first.
x Place the fabric so that the fold is next to the guide on
the foot. Lower the presser foot. Adjust the needle drop
position if necessary. Sew while guiding the fold along
the guide.
e Fold
r Guide
c Open the fabric after sewing is finished.
NOTE:
If the needle pierces too far left, the stitch will show
through on the right side of the fabric.
• Adjusting the needle drop position
The needle drop position can be adjusted by pressing
stitch width adjusting key.
(1)
Press the minus (–) key to move the needle drop
position to the right.
(2)
Press the plus (+) key to move the needle drop
position to the left.
The LCD display indicates the distance between the guide
and left needle drop position in millimeter.
r
Guide
t
Left needle drop position
NOTE:
The needle drop position will move to the left or right,
but the stitch width is remained the same.
z
x
c
q
w
e
t
r
(1)
(2)
q
w
e
Pintucking
q Stitch pattern:
11
w Thread tension dial:
2 tot 6
e Presser foot:
Blind hem foot: G
Fold the fabric with wrong side together.
Place the fabric so that the fold is next to the guide on
the presser foot. Lower the foot and sew while guiding
the fold along the guide.
Open the fabric and press the tucks to one side.
1
3
2
1
3
2
1
2
3
4
4
5
1
2
3