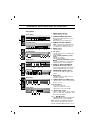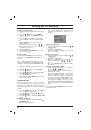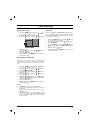
Setting up TV stations
Assigning a station name
1. Repeat the ‘Manual programme tuning’ steps
1 to 3.
2. Press the
D
D
/
E
E
button to select
Name
.
3. Press the
G
G
button on the
Name
pull-down
menu.
4. Press the
D
D
button. You can use a blank,
+
,
-
, the numeric
0
to
9
and the alphabet
A
to
Z
.
With the
E
E
button you can select in the
opposite direction.
5. Select the position by pressing the
F
F
/
G
G
button and then take your choice of the sec-
ond character, and so on.
6. Press the
OK
button.
7. Repeatedly press the
MENU
button to return
to normal TV viewing.
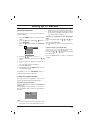
Booster (option)
In some models,
Booster
is an optional func-
tion. Only a set with
Booster
can perform this
function.
If the reception is poor at the fringe area of TV
signal, select
Booster
to
On
. When the picture
condition is good, do not select
Booster
to
On
.
1 Repeat the ‘Manual programme tuning’ steps
1 to 3.
2. Press the
D
D
/
E
E
button to select
Booster
.
3. Press the
G
G
button.
4. Press the
D
D
/
E
E
button to select
On
or
Off
on the
Booster
pull-down menu.
5. Press the
OK
button.
6. Repeatedly press the
MENU
button to return
to normal TV viewing.
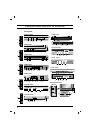
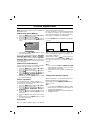
Programme edit
This function enables you to delete or skip the
stored programmes. Also you can move some
stations to other programme numbers or insert a
blank station data into the selected programme
number.
1. Press
the
MENU
button and then
D
D
/
E
E
but-
ton to select the Station menu.
2. Press
the
G
G
button and then
D
D
/
E
E
button to
select
Prog. edit
.
3. Press the
G
G
button to display the
Prog. edit
menu.
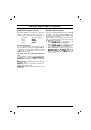
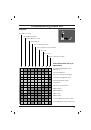
Deleting a programme
1. Select a programme to be deleted with the
D
D
/
E
E
or
F
F
/
G
G
button.
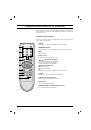
2. Press the RED button twice.
The selected programme is deleted, all the
following programmes are shifted up one
position.
Copying a programme
1. Select a programme to be copied with the
D
D
/
E
E
or
F
F
/
G
G
button.
2. Press the GREEN button.
All the following programmes are shifted
down one position.
Moving a programme
1. Select a programme to be moved with the
D
D
/
E
E
or
F
F
/
G
G
button.
2. Press the YELLOW button.
3. Move the programme to the desired pro-
gramme number with the
D
D
/
E
E
or
F
F
/
G
G
but-
ton.
4. Press the YELLOW button again to release
this function.
Skipping a programme number
1. Select a programme number to be skipped
with the
D
D
/
E
E
or
F
F
/
G
G
button.
2. Press the BLUE button. The skipped pro-
gramme turns to blue.
3. Press the BLUE button again to release the
skipped programme. When a programme
number is skipped it means that you will be
unable to select it using the
D
D
/
E
E
button dur-
ing normal TV viewing. If you want to select
the skipped programme, directly enter the
programme number with the NUMBER but-
tons or select it in the programme edit or table
menu.
Repeatedly press the
MENU
button to return to
normal TV viewing.
10
Delete
OOO
Copy
Move
OOOOO
Skip
O
O
OO
C
O
1D
OOOO
5
OO
S
O
69
O
1
OO
C
O
03
O
OOO
6
OO
S
O
17
O
2
OO
C
O
12
OOOO
7
OO
S
O
22
O
3
OO
S
O
66
OOOO
8
OO
C
O
09
O
4
OO
S
O
67
OOOO
9
OO
C
O
11
)
O
}
i
{
O
OK
O
MENU
(