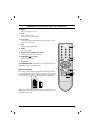
9
Setting up TV stations
Up to 100 TV stations can be stored by programme
numbers (0 to 99). Once you have preset the sta-
tions, you will be able to use the
D
D
/
E
E
or NUMBER
buttons to scan the stations you programmed.
Stations can be tuned using automatic or manual
modes.
Note :
In some models up to 200 TV stations can
be stored.
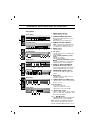
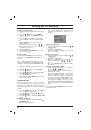
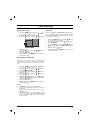
Auto programme tuning
All stations that can be received are stored by this
method. It is recommended that you use auto pro-
gramme during installation of this set.
1. Press
the
MENU
button to select the Station
menu.
2. Press
the
G
G
button and then
D
D
/
E
E
button to
select
Auto prog.
.
3. Press the
G
G
button to display the
Auto prog.
menu.
4. Press
the
G
G
button. Select a TV system with
the
D
D
/
E
E
button on the
System
pull-down
menu;
BG
: (Asia/New Zealand/M.East/Africa
/Australia)
I
: (Hong Kong/South Africa)
DK
: (East Europe/China/Africa/CIS)
M
: (USA/Korea/Philippines) (option)
5. Press the
OK
or
F
F
button.
6. Press the
D
D
/
E
E
button to select
Storage
.
7.
Press the
G
G
button. Select the beginning pro-
gramme number with the
F
F
/
G
G
button or
NUMBER buttons on the
Storage from
pull-
down menu. Any number under 10 is entered
with a numeric
‘
0
’
(or
‘
00
’
) in front of it, i.e.
‘
05
’
(or
‘
005
’
) for 5.
8. Press
the
OK
button.
9. Press
the
D
D
/
E
E
button to select
Normal
or
Turbo
.
Option:
In some models, you can only select
Start
.
Note :
a.
Turbo
is faster than
Normal
and in some
models, these searches will automatically
store all receivable stations.
b. If the programmed station has poor quality
sound, select the system again in the
Manual
menu.
10. Press the
G
G
button to begin auto program-
ming.
All receivable stations are stored.
To stop auto programming, press the
MENU
button.
When auto programming is completed, the
Prog. edit
menu appears on the screen. See
the ‘Programme edit’ section to edit the stored
programme.
11. Repeatedly press the
MENU
button to return
to normal TV viewing.
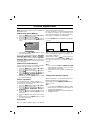
Auto programme scan
To automatically scan the pictures of stored pro-
grammes, press the
D
D
(
)
or
E
E
(
)
button for
about 3 seconds. The picture of stored pro-
grammes appears on the screen one by one.
To stop auto programme scanning, press any but-
ton except VCR buttons.
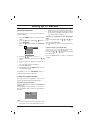
Manual programme tuning
Manual programme lets you manually tune and
arrange the stations in whatever order you desire.
Also you can assign a station name with five char-
acters to each programme number.
1. Press the
MENU
button to select the Station
menu.
2. Press the
G
G
button and then
D
D
/
E
E
button to
select
Manual
.
3. Press the
G
G
button to display the
Manual
menu.
4. Press the
D
D
/
E
E
button to select
Storage
.
5.
Press the
G
G
button to select the programme
number. Select the desired programme num-
ber (0 to 99) with the
F
F
/
G
G
button or NUMBER
buttons on the
Storage
pull-down menu. Any
number under 10 is entered with a numeric
‘
0
’
(or
‘
00
’
)
in front of it, i.e.
‘
05
’
(or
‘
005
’
)
for 5.
6. Press the
OK
button.
7. Press the
D
D
/
E
E
button to select
System
.
8. Press the
G
G
button. Select a TV system with
the
D
D
/
E
E
button on the
System
pull-down
menu;
BG
: (Asia/New Zealand/M.East/Africa
/Australia)
I
: (Hong Kong/South Africa)
DK
: (East Europe/China/Africa/CIS)
M
: (USA/Korea/Philippines) (option)
9. Press the
OK
or
F
F
button.
10. Press the
D
D
/
E
E
button to select
Channel
.
11. Press the
G
G
button. Press the
D
D
/
E
E
button to
select
V/UHF
or
Cable
on the
Channel
pull-down menu.
If possible, select the channel number direct-
ly with the number buttons. Any number under
10 is entered with a numeric
‘
0
’
(or
‘
00
’
)
in
front of it, i.e.
‘
05
’
(or
‘
005
’
)
for 5.
12. Press the
OK
or
F
F
button.
13. Press the
D
D
/
E
E
button to select
Search
.
14. Press the
G
G
button. Press the
F
F
/
G
G
button to
commence searching on the
Search
pull-
down menu. If a station is found the search
will stop.
15. Press the
OK
button to store it. The display
Stored
will appear.
16. To store another station, repeat steps 4 to 15.
17. Repeatedly press the
MENU
button to return
to normal TV viewing.
E
E
E
E
D
D
D
D
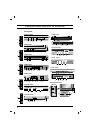
System
{
Storage
{
Normal
{
Turbo
{
System
{
BG
I
DK
M
)
O
}
i
{
O
OK
O
MENU
(