Инструкция для Loewe ViewVision 8106

(скачивание инструкции бесплатно)
Формат файла: PDF
Доступность: Бесплатно как и все руководства на сайте. Без регистрации и SMS.
Дополнительно: Чтение инструкции онлайн
background image

6

For your safety

For your safety and to avoid damage to the
video recorder, remote control and cassette,
ensure that you protect the equipment against:
• Damp and moisture
• Knocks and mechanical stresses
• Magnetic and electrical fields
• Cold, heat, direct sunlight and extreme

temperature variations

• Dust
• Blocked airways
This equipment is designed for domestic and
office environments and must not be used in
rooms with high humidity (e.g. bathroom,
sauna) or high concentrations of dust (e.g.
workshops). If the equipment is used outdoors,
ensure that it is protected against moisture
(rain, dripping, splashing, sprayed water or
dew) High levels of moisture and
concentrations of dust cause creep currents in
the equipment, which can lead to electric shock
or fire. The manufacturer’s warranty is only
valid for use in the specified permissible
environment.
This equipment must only be connected to a
mains power supply which has the same
voltage and frequency as that specified on the
rating plate. Incorrect voltages can damage the
equipment.
Lightning strikes can damage your recorder via
the antenna and the power supply. You should
therefore remove the antenna and power plugs
during thunderstorms and during long periods
of absence.
Do not open the video recorder under any
circumstances, as you could be exposed to
voltages that are life threatening. There are no
user-serviceable or exchangeable parts in the
set. Repair and servicing should only be carried
out by authorized TV technicians.
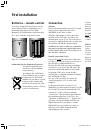
Setting up

Install the video recorder horizontally and leave
enough room for ventilation.
Please note that when the recorder is pushed
across furniture made >from softwood (e.g.
spruce, fir, pine) the feet of the equipment
could leave marks. The plastic material of the
feet contains softeners, which can occasionally
affect the surface of furniture. In this event, use
a pressure resistant pad about the size of the
video recorder.
If the equipment is moved from a cold
environment to a warm room, moisture may
condense on all parts of the equipment
(condensation). Moisture on the head drum and
the tape guides can damage the tape and the
head drum. Let the video recorder stand for
about an hour and only switch it on when it
has reached room temperature.
The mains plug of the TV set must be easily
accessible so that the set can be disconnected
at any time. Lay the cable in such a way that it
will not be damaged.  The mains cable must not
be bent or laid over sharp edges, trodden on or
exposed to chemicals. A mains cable with
damaged insulation can lead to electric shocks
and is a fire risk.
Please note that the recording of pre-recorded
tapes, DVDs, CDs, etc, could represent an
infringement of copyright.

Cleaning

Use only a soft, clean, damp cloth to clean the
video and the remote control (don’t use any
caustic or abrasive cleaning agents).
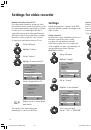
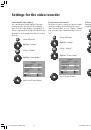
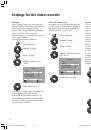
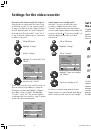
First installation

BA_VCR_31251_020EU_GB2

17.04.2003, 15:29 Uhr

6

1
2
3
4
5
6
7
8
9
10
11
12
13
14
15
16
17
18
19
20
21
22
23
24
25
26
27
28
Оглавление инструкции
  • Страница 1 из 29
    Operating instructions. Video. ViewVision 8106 H 233–31251.020 ■ 1 BA_VCR_31251_020EU_GB2 1 17.04.2003, 15:29 Uhr
  • Страница 2 из 29
    Contents Setting up 6 Recording a TV broadcast 12 Insert cassette without record protection 12 Select station 12 ...with the arrow keys of the remote control 12 ... via the station list 12 ... on video recorder 12 Select recording speed 12 Start recording 12 ... using the remote control 12 ... on
  • Страница 3 из 29
    Remote control – VCR functions During play: select sound During stop: station language selection Indicator: TV operation Indicator: DVD operation During stop: select picture and sound source DVD Select set to be operated TV/DVD/VCR Display/close ShowView-Timer Menu Control 201 VTR TV Switch on/off
  • Страница 4 из 29
    Operation from video unit Switch on/off in standby mode Stop/eject cassette Cassette compartment Rewind Pause PLAY Fast forward 20:15 P– Video Sound input REC P+ Station –/+ Open flap here (shown opened) RECORD Connections to rear panel ENTREE ANTENNE EURO AV2 DECODER AUDIO SORTIE OUT G L EURO AV1
  • Страница 5 из 29
    Welcome Thank you for choosing a Loewe product. We are happy to welcome you as a customer. At Loewe we combine the highest standards of technology, design and user friendliness. This applies equally to videos, TVs, HiFis and accessories. Neither technology nor design is an end in itself, but both
  • Страница 6 из 29
    First installation For your safety Setting up Cleaning For your safety and to avoid damage to the video recorder, remote control and cassette, ensure that you protect the equipment against: • Damp and moisture • Knocks and mechanical stresses • Magnetic and electrical fields • Cold, heat, direct
  • Страница 7 из 29
    First installation Batteries – remote control Connection To insert or change the batteries press on the arrow. Slide the battery compartment cover downwards and remove it. Insert Alkali Mangan LR 03 (AAA) batteries and ensure that the + and – ends are connected correctly. Antenna Remove the antenna
  • Страница 8 из 29
    First installation Switching on the video recorder for the first time Switch on using the blue O key on the remote control, or the O key on the video recorder. The first installation starts. 1.Inst Display on video recorder Picture and sound from the video recorder on a TV set with a Euro AV
  • Страница 9 из 29
    Daily operation Switch on/switch off video recorder Use the O key on the remote control or on the video recorder to switch on the unit. The display on the video recorder shows the last station viewed. If you press the O key again, the video recorder switches to standby. The display on the video
  • Страница 10 из 29
    Daily operation Stop playing. Play cassette If you have a pre-recorded cassette, you can now play it. If you don’t have a pre-recorded cassette refer to the ”recording” section. Insert a cassette. VHS If the record protection tab on the cassette has been broken off, play starts immediately, even if
  • Страница 11 из 29
    Daily operation Pause (still frame)/frame-by-frame advance During play, you can switch to still frame. The picture is subject to interference from the system and has no sound. To prevent damage to the video heads and the tape, the unit switches back to play after five minutes. Picture search During
  • Страница 12 из 29
    Daily operation Highlight station Recording a TV broadcast Insert cassette without record protection Insert a cassette without record protection (tab still in place) into the cassette compartment. Select station If you want to start the recording manually then you must first select the television
  • Страница 13 из 29
    Daily operation + Start recording Select socket(s), press repeatedly AV2 AVS Display on video recorder AV2 for Euro AV socket 2 AVS for Cinch sockets at the front Loewe TV sets have a video control bar that can be called up by the V= key. The video control bar allows you to control the main
  • Страница 14 из 29
    Daily operation Timer functions - Overview If you want to make recordings during your absence, your video recorder and the Loewe TV set offer easy programming facilities. If you have a TV magazine with ShowView numbers, use the ShowView Timer of the video recorder. You can programme single,
  • Страница 15 из 29
    Daily operation ShowView-Timer SV Call up ShowView menu using the numerical keys on the remote control, enter the number shown in the TV magazine. Do not enter the hyphens, they are only used to make them easier to read. If you programme several recordings ensure that you do not select several
  • Страница 16 из 29
    Daily operation Programme Timer on a Loewe TV set 16 If you have connected a video recorder to a Loewe TV set with a MediaPlus Q2500 chassis, you can programme Timer recordings on the TV set as described here. A cassette without recording protection must be inserted in the video recorder, otherwise
  • Страница 17 из 29
    Settings for the video recorder Language Special information Time and date You may remember that you selected ”your” menu language when first installing the video recorder. If the language has been inadvertently changed by you or by another user, you must re-select the language. To make it easier
  • Страница 18 из 29
    Settings for the video recorder TV stations with Digital Link Plus Search for TV stations on video recorder If you have connected your video recorder to a TV set with Digital Link Plus or a comparable system from another manufacturer (e.g.. EasyLink, Mega Logic, Project 50), the station list will
  • Страница 19 из 29
    Settings for the video recorder Sort/delete As mentioned in the introduction to this section, you can only sort and delete stations on the video recorder, if no Digital Link Plus TV set or TV set with a comparable system from another manufacturer is connected. M Call up VCR menu Highlight
  • Страница 20 из 29
    Settings for video recorder Download stations from the TV If you have made changes to antenna or cable (not satellite) stations on the attached TV set, the new station data must be transferred to the video recorder (for TV sets with Digital Link Plus or comparable systems from other manufacturers).
  • Страница 21 из 29
    Settings for the video recorder Switch on/off status display You can switch on/off the display of the tape running function, the counter, the remaining tape, etc. If the status display is switched off, it does not appear when the tape run functions are operated. It can be displayed as before by
  • Страница 22 из 29
    Settings for the video recorder Child lock In the ”Settings” menu, you can activate the child lock. With the child lock activated and the video recorder set to standby, the video recorder cannot be used. However, the remote control can still be used for operation. You must therefore store the
  • Страница 23 из 29
    Settings for the video recorder Decoder on the video recorder AV socket 2 A pay decoder is registered in the Loewe TV set, as described on page 7. If you connect a pay TV decoder to the Euro AV socket 2 (upper socket) of the VCR, mark this with ‘Yes’ in the settings for the menu item ”Decoder at
  • Страница 24 из 29
    Settings for the video recorder Switch on Digital Link on the video recorder Switch on Digital Link if you have connected the video recorder to a Loewe TV set via a Euro AV cable. The advantages are: • the video recorder can be installed in a concealed location; • the video control bar of the Loewe
  • Страница 25 из 29
    Operating other Loewe equipment with the VCR remote-control The video recorder remote control can be switched to operate Loewe TV sets or Loewe DVD players. These sets can be operated directly. Select the equipment to be operated: For TV set The TV indicator on the remote control lights up Press
  • Страница 26 из 29
    What to do, if ... Problem Possible causes Help Digital Link Plus does not function a) The video recorder has not been registered as a Digital Link Plus set b) The video recorder has been connected to the wrong AV socket on the TV set c) The Euro AV is not fully connected (Pin 10 not assigned) a)
  • Страница 27 из 29
    Technical data ViewVision VV8106H Dimensions in cm Weight Operating voltage Power consumption, operation, Standby Power save standby Video system Video colour system NTSC play Sound systems Internal transmitter Video heads Audio heads Audio head Tape speed Tracking Timer Picture format switching
  • Страница 28 из 29
    Service addresses Australia International Dynamics Australasia Pty Ltd. 129 Palmer Street AUS - Richmond, Victoria 3121 Tel. 03–94 29 08 22 Fax 03–94 29 08 33 Austria Robert Bosch AG Postfach 146 A–1011 Wien Tel 01–79 72 24 500 Fax 01–79 72 24 599 Benelux Loewe Opta Benelux NV/SA Uilenbaan 84
  • Страница 29 из 29