31
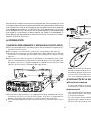
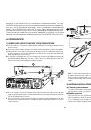
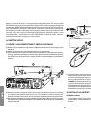
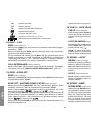
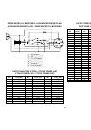
B) HOW TO USE YOUR TRANSCEIVER
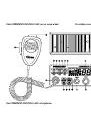
1) ON/OFF ~ VOLUME
Turn
on
radio: clockwise turn
VOLUME
knob (
1
) until radio emit beep and show
current channel, radio is
on
. Turn
Off
radio: counterclockwise turn
VOLUME
knob (
1
)until radio emit click sound ,then radio is
off
.
Volume Adjustment: Radio is
on
, rotate
VOLUME
knob (
1
) to
adjust
volume.
LCD shows
“
UOL
XX”
for 5 seconds which means volume level. Total is
36
levels.
Clockwise to increase volume. Counterclockwise to decrease volume.
2) RF POWER
In
TX
, rotate
RF PWR
knob (
2
) to
adjust
FM/AM/USB/LSB output power. Clock-
wise to increase power. Counterclockwise to decrease power.
3) ASC (Automatic Squelch Control) ~ SQUELCH
Suppresses
undesirable background noises when there is no communication.
Squelch does not affect neither sound nor transmission power, but allows a
considerable improvement in listening comfort.
a)
ASC: AUTOMATIC SQUELCH CONTROL
Worldwide patent, a PRESIDENT exclusivity.
Turn the
SQUELCH
knob (
3
) anti-clockwise into
ASC
position.
“ASC”
appears
on the LCD. No repetitive manual adjustment and a permanent improve-
ment between the sensitivity and the listening comfort when
ASC
is active.
This function can be disconnected by turning the switch clockwise. In this
case the squelch adjustment becomes manual again.
“ASC”
disappears
from the LCD,
“
SQL on
”
appears for 5 seconds.
b)
MANUAL SQUELCH
Turn the
SQUELCH
knob clockwise to the exact point where all background
noise disappears. This adjustment should be done with precision as, if set to
maximum (fully clockwise), only the strongest signals will be received. LCD shows
“
SQL
XX”
for 5 seconds which means squelch volume level. Total is
36
levels.
4) MENU
Press the
MENU
key (
4
) for 2 seconds to
enter
in the
menu function setting
.
“FUNC”
appears on the LCD.
Use
s
/
t
keys (
10
) to
select
the desired function.
Use rotary
PUSH
knob (
6
) to
set
the function.
Press any key except
PUSH
knob (
6
) or wait for 5 seconds to
store
and
exit
.
“FUNC”
disappears from the LCD.
See §
MENU FUNCTIONS
for details, page 35.
5) MEM ~ STORE
MEM
(short press)
Press
MEM
key (
5
) to
enter
into
Memory Mode
.
Press
s
/
t
keys (
10
) on to
select
the pre-stored channel (6 memories).
Press
MEM
key (
5
) again to
exit
Memory Mode
.
STORE
(long press)
Select
desired channel, band and modulation mode.
Long press MEM-
STORE
key (
5
) to
enter
into
Channel Storage Setting
, memory
blinks in the LCD.
Rotate
PUSH
knob (
6)
to
select
the storage memory
n1
~
n6
.
Long press MEM-
STORE
key (
5
) until blinking memory disappeared. Storage
finished and
exit
Channel Storage Setting
.
6) ROTARY “PUSH” KNOB
In
POWER ON
status, rotate
PUSH
knob (
6
) to
adjust
frequency. Clockwise
to increase, counterclockwise to decrease.
Press
PUSH
knob (
6
),
“-”
displayed under frequency which means adjust
frequency’s stepping.
Push or rotate the
PUSH
knob (
6
) is also used to
set
functions or parameters.
7) CLARIFIER
This
CLARIFIER
knob (
7
),
allows a frequency deviation during reception in
order to improve the clearness of your correspondent’s voice.
8) MIC GAIN
In
POWER ON
status, rotate
MIC GAIN
knob (
8
) to
adjust
microphone gain.
LCD shows
“
nIC
XX”
for 5 seconds which means microphone gain level. Total
is
36
levels Clockwise to increase, counterclockwise to decrease.
In
PA
status, rotate
MIC GAIN
knob (
8
) to
adjust
volume. LCD shows
“
nIC
XX”
for 5 seconds which means microphone volume level. Total is
36
levels. Clockwise to increase, counterclockwise to decrease.
9) RF GAIN
In
RX
, rotate
RF GAIN
knob (
9
) to
adjust
RX
gain. Clockwise to increase,
counterclockwise to decrease.
English