35
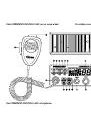
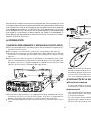
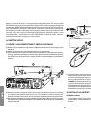
23) PTT
Transmission key, press to transmit a message,
“TX”
is displayed and release
to listen to an incoming communication.
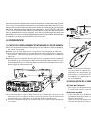
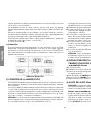
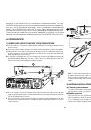
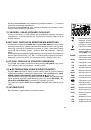
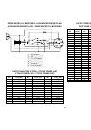
A) DC-POWER TERMINAL (13,2 V)
B) ANTENNA CONNECTOR (SO-239)
C) EXTERNAL SPEAKER JACK (8
Ω
, Ø 3,5 mm)
D) JACK FOR OPTIONAL PA (Public Address) (Ø 3.5 mm)
E) JACK FOR OPTIONAL VOX MIKE (Ø 2.5 mm)
F) JACK FOR CW DEVICE (Ø 3.5 mm)
G) USB DATA
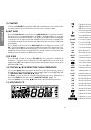
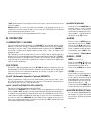
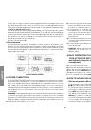
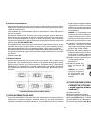
C) MENU FUNCTIONS
Press the
MENU
key (
4
) for 2 seconds to
enter
in the menu function setting.
“FUNC”
appears on the LCD.
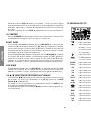
Use
s
/
t
keys (
10
) to
select
the desired function.
Use rotary
PUSH
knob (
6
) to
set
the function.
Press any key except
PUSH
knob (
6
) or wait for 5 seconds to
store
and
exit
.
“
FUNC
”
disappears from the LCD.
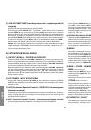
1) ROGER BEEP FREQUENCY
Set
the
FREQUENCY
of the
ROGER
BEEP
.
At
[
]
menu, rotate
PUSH
knob (
6
) to
set
the
Frequency
.
Frequency range:
300
Hz ~
3
000
Hz, stepping frequency:
10
Hz, default:
1
050
Hz.
Press
PUSH
knob (
6
) to
change
the step.
2) ROGER BEEP TIME
Set
the
TIME
(ms) of the
ROGER
BEEP
.
At
[
]
menu, rotate
PUSH
knob (
6
) to
set
the delay
Time
.
Time range
50
~
1
000
ms, time stepping:
50
ms, default:
500
ms. Press
PUSH
knob
(
6
) to
change
the step.
3) CW FREQUENCY
Set
the
FREQUENCY
of the
CW
.
At
[
]
menu, rotate
PUSH
knob (
6
) to
set
the
Frequency
.
Frequency range:
300
Hz ~
3
000
Hz, stepping frequency:
10
Hz, default:
1
050
Hz.
Press
PUSH
knob (
6
) to change the step.
4) CALL FREQUENCY
Set
the
FREQUENCY
of the
CALL
tone.
At
[
]
menu, rotate
PUSH
knob (
6
) to
set
the
Frequency
.
Frequency range:
300
Hz ~
3
000
Hz, stepping frequency:
10
Hz, default:
1
050
Hz.
Press
PUSH
knob (
6
) to change the stepping.
5) MONITOR GAIN VOLUME
Set
the
OUTPUT VOLUME LEVEL
of the microphone in your own speaker.
At
[
]
menu, rotate
PUSH
knob (
6
) to
set
the
Monitor
volume level
.
There are
32
levels.
“OFF”
disable
the function.
6) TOT (Time Out Timer)
Set
the
TOT
. If the
PTT
pedal (
23
) is pressed for more than “TOT” time, the
transmission ends.
At
[
]
menu, rotate
PUSH
knob (
6
) to
set
the
TOT
,
“
”
disable
the func-
tion
.
Time range
3
0
~
60
0
s, time stepping:
3
0
s, default:
18
0
s.
7) SWR PROTECTION
Enable
/
disable
the
SWR
PROTECTION
.
At
[
]
menu, rotate
PUSH
knob (
6
) to
enable
“
”
or
disable
“
”
the
protection
.
Default:
“
”
.
8) SWR PROTECTION SETTING
Set
the
SWR
LEVEL PROTECTION.
At
[
]
menu, rotate
PUSH
knob (
6
) to
set
the protection
Level
.
Level range:
12
~
2
00
, stepping:
1
, default:
2
00
. Press
PUSH
knob (
6
) to change
the step. The
SWR
level is useful only in the
SWR
protection function is active.
9) VOLTAGE PROTECTION
Enable
/
disable
VOLTAGE PROTECTION
.
At
[
]
menu, rotate
PUSH
knob (
6
) to
enable
“
”
or
disable
“
”
the protection
.
Default:
“
”
.
10) VOLTAGE PROTECTION HIGH
Set
the
HIGHER
LIMIT
of
VOLTAGE
PROTECTION
.
At
[
]
menu, rotate
PUSH
knob (
6
) to
set
the
High
limit
.
Voltage range:
90U
~
1
70U
V, stepping:
01U
, default:
1
70U
. Press
PUSH
knob (
6
)
to change the step. The
HIGH
limit is useful only if the
VOLTAGE
protection
function is active.
English