34
Rotate
PUSH
knob (
6
) to
set
desired CTCSS tone. There are
38
CTCSS tones
from
01
to
38
.
Continue to rotate
PUSH
knob (
6
) to
set
desired DCS code. There are 104 DCS
codes from
001
to
104
.
Select
“
oFF
”
for
disable
the CTCSS tone or DCS code.
Press MEM/
STORE
(
5
) for 2 seconds to
store
the CTCSS tone or DCS code.
Long press MODE
-
CTCSS/DCS
key (
18
) to
disable
CTCSS tone or DCS code.
See tables on page 52
19) VOX ~ VOX SET
VOX
(short press)
The
VOX
function allows transmitting by speaking into the original microphone
(or in the optional vox microphone) without pressing the
PTT
pedal (
23
). In
case of the use of an optional vox mike connected to the rear panel of the
radio -
VOX
MIC jack (
E
), the original microphone doesn’t work.
Press the
VOX
key (
19
) in order to
activate
the
VOX
function.
“VOX”
is displayed
on the LCD. A new pressure on the
VOX
key (
19
) switches the function
off
.
“VOX”
disappears from the LCD.
VOX SET
(long press)
Press for 2 second the VOX-
VOX SET
key (
19
) in order to
activate
the
VOX SET
function (if the
VOX
function is
off
, this will turn the function
on
and display
“VOX”
on the LCD).
“
”
appears on the LCD.
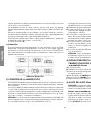
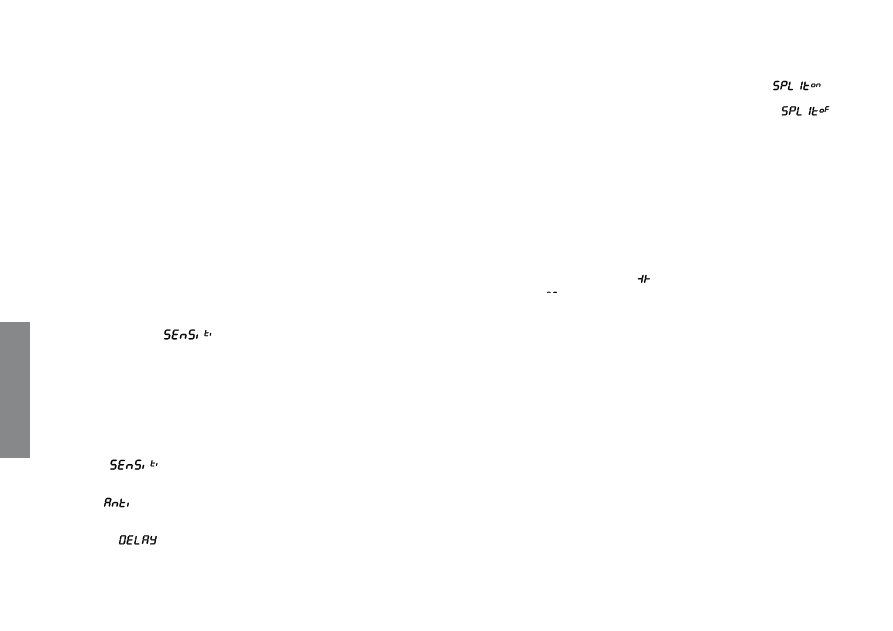
Three features are possible:
Sensiti
vity level,
Anti
-Vox level and Vox
Delay
time.
Press
s
/
t
keys (
10
) in order to
select
to the following feature. LCD shows the
feature.
Rotate
PUSH
(
6
) to
set
the feature.
Press MEM/
STORE
key (
5
) to
store
and
skip
into the next feature.
Once the adjustments are done, press the VOX-
VOX SET
key (
19
) in order
to
quit
the
VOX SET
function. If any adjustment have been done during 5
seconds, the transceiver will
quit
the
VOX SET
function automatically.
- Sensitivity
“
”
: allows the adjustment of the microphone (original one
or optional vox) for an optimum transmission quality. Adjustable level from
1
(high sensibility) to
9
(low sensibility). Default:
5
.
- Anti-Vox
“
”
: allows disabling the transmission generated by the surround-
ing noise. The level is adjustable:
0
(OFF), from
1
(high level) to
9
(low level).
Default:
9.
- Delay Time
“
”
: allows avoiding the sudden cut of the transmission by
adding a delay at the end of speaking. The level is adjustable from
1
(short
time delay) to
9
(long time delay). Default:
1
.
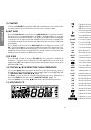
20) SPLIT ~ SPLIT SET
SPLIT
(short press)
The
SPLIT
function allows to
transmit
and
receive
on separated frequencies.
Press
SPLIT
key (
20
) to
enable
repeater function, LCD shows
“
”
for 5
seconds.
Press
SPLIT
key again to
disable
repeater function, LCD shows
“
”
for
5 seconds.
Note:
Channel, Band and Frequency are blinking if the
SPLIT
function is active.
SPLIT SET
(long press)
Long press SPLIT-
SPLIT SET
key (
20
) to
set
repeater’s OFFSET and DIRECTION
Press
s
/
t
(
10
) to
alternate
between FREQUENCY OFFSET and DIRECTION in
the menu list.
Rotate
PUSH
(
6
) knob to
set
desired feature.
Press MEM/
STORE
key (
5
) for 2 seconds to
store
and
skip
into next menu.
Press
SPLIT
key (
20
) or wait for 5 seconds to
exit
SPLIT SET
function.
- FREQUENCY OFFSET: frequency blinks on the LCD.
- DIRECTION: LCD shows
“
SPLiT
”
.
“ ”
in LCD means positive offset set in cur-
rent channel,
“ ”
means negative offset set in current channel.
21) BAND ~ +10KHz
BAND
(short press)
Press
BAND
key (
21
) for
quick
movement
skipping
200 kHz in
A
~
B
~
C
~
D
~
E
~
F
~
9
~
H
~
I
segments.
+10KHz
(long press)
Long press BAND-
+10KHz
key (
21
) to
enable
frequency +10KHZ. LCD shows
“10K
”
Long press BAND-
+10KHz
key (
21
) again to
disable
frequency +10KHZ.
“10K”
disappears from the LCD.
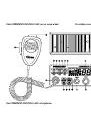
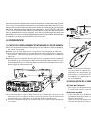
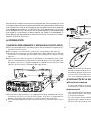
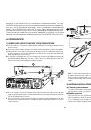
22) 6 PIN MICROPHONE PLUG
The plug is located on the front panel of the transceiver and makes the set-
ting of the equipment into the dashboard easier.
See Cabling Diagram page 52.
English