7
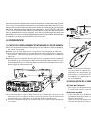
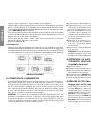
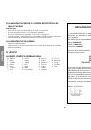
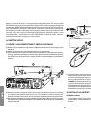
câble inférieure à 3 m.
Maintenant, votre poste est prêt à fonctionner.
B) UTILISATION
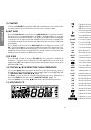
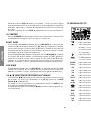
1) MARCHE/ARRÊT ~ VOLUME
Pour
allumer
votre poste : tourner le bouton
VOLUME
(
1
) dans le sens des
aiguilles d’une montre jusqu’au bip sonore et l’affichage du canal utilisé.
Votre radio est allumé
«on»
.
Pour
éteindre
votre poste : tourner le bouton
VOLUME
(
1
) dans le sens inverse
des aiguilles d’une montre jusqu’au click d’arrêt. Votre radio est éteinte
«off»
.
Pour
ajuster
le volume sonore, tourner le bouton
VOLUME
(
1
).
L’afficheur LCD indique durant 5 secondes le niveau de volume
«
UOL
XX»
.
Pour augmenter le volume, tourner le bouton dans le sens des aiguilles d’une
montre. Vous disposez de
36
niveaux de réglage. Pour diminuer le volume,
tourner le bouton dans le sens inverse des aiguilles d’une montre.
2) RF POWER
En mode
TX
, tourner le bouton
RF PWR
(
2
) pour
régler
la puissance de sortie
FM/AM/USB/LSB ; dans le sens des aiguilles d’une montre pour augmenter
la puissance, dans le sens inverse des aiguilles d’une montre pour diminuer
la puissance.
3) ASC (Automatic Squelch Control) / SQUELCH
Cette fonction permet de
supprimer
les bruits de fond indésirables en
l’absence de communication. Le squelch ne joue ni sur le volume sonore ni
sur la puissance d’émission, mais il permet d’améliorer considérablement le
confort d’écoute.
a) ASC : SQUELCH À RÉGLAGE AUTOMATIQUE
Brevet mondial, exclusivité PRESIDENT.
Tourner le bouton du
SQUELCH
(
3
) dans le sens contraire des aiguilles d’une
montre en position
ASC
.
«ASC»
apparaît sur l’afficheur. Aucun réglage manuel
répétitif et optimisation permanente entre la sensibilité et le confort d’écoute
lorsque l’
ASC
est actif. Cette fonction peut être désactivée par rotation du
bouton dans le sens des aiguilles d’une montre. Dans ce cas le réglage du
squelch redevient manuel.
«ASC»
disparaît de l’afficheur et
«
SQL on
»
s’affiche
durant 5 secondes.
b) SQUELCH MANUEL
Tourner le bouton du squelch dans le sens des aiguilles d’une montre jusqu’au
point exact où tout bruit de fond disparaît. C’est un réglage à effectuer avec
précision, car mis en position maximum (dans le sens des aiguilles d’une
montre), seuls les signaux les plus forts peuvent être perçus.
«
SQL
XX»
s’affiche
durant 5 secondes en indiquant le niveau de volume. Vous disposez de
36
niveaux de réglage.
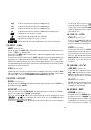
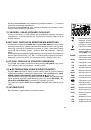
4) MENU
Appuyer pendant 2 secondes sur la touche
MENU
(
4
) pour
activer
le mode
réglage des fonctions du menu.
«FUNC»
s’affiche.
Utiliser les touches
s
/
t
(
10
) pour
sélectionner
la fonction désirée.
Tourner le bouton
PUSH
(
6
) pour
régler
la fonction.
Appuyez sur n’importe quelle touche exceptée le bouton
PUSH
(
6
) ou attendre
5 secondes pour
sauvegarder
et
quitter
le mode réglage.
«FUNC»
disparaît de l’écran.
Voir le §
MENU FONCTIONS
pour plus de détails, page 11.
5) MEM ~ STORE
MEM
(pression brève)
Appuyer sur la touche
MEM
(
5
) pour
entrer
dans le mode mémoire.
Appuyer sur les touches
s
/
t
(
10
) pour
sélectionner
le canal pré mémorisé
(6 mémoires).
Appuyer sur la touche
MEM
(
5
) pour
quitter
le mode mémoire.
STORE
(pression longue)
Sélectionner
le canal, la bande et le mode de modulation désiré.
Maintenir enfoncée la touche MEM-
STORE
(
5
) pour
entrer
dans le mode
réglage et mémorisation du canal. La mémoire clignote sur l’écran LCD.
Tourner le bouton
PUSH
(
6
) pour
sélectionner
le numéro de la mémoire
n1
~
n6
.
Maintenir enfoncée la touche MEM-
STORE
(
5
) jusqu’à ce que la donnée, qui
clignote sur l’afficheur, disparaisse. La mémorisation est terminée,
quitter
le
mode réglage et mémorisation du canal.
6) ROTATEUR «PUSH»
En mode
POWER ON
, tourner le bouton
PUSH
(
6
) pour
régler
la fréquence.
Tourner le rotateur dans le sens des aiguilles d’une montre pour augmenter
la fréquence et dans le sens inverse des aiguilles d’une montre pour diminuer
la fréquence.
Appuyer sur le bouton
PUSH
(
6
),
«_»
s’affiche sous la fréquence, afin de
régler
les pas de fréquence.
Appuyer ou tourner le bouton
PUSH
(
6
) permet également de
régler
les
fonctions ou les paramètres.
Français