Страница 2 из 41 Contents Included with your MC-8000 DSC ......................................................................................... 4 Controls and Indicators ......................................................................................................... 5 Fornt Panel/Microphone
Страница 3 из 41 Group MMSI ................................................................................................. 30 User MMSI .................................................................................................... 30 Atis ID
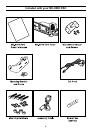
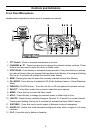
Страница 5 из 41 Controls and Indicators Front Panel/Microphone Alphanuméric keyboard for direct input of channels ans names 1. PTT Switch - Press to transmit and release to receive. 2. CHANNEL ▲ / ▼ - These keys are used to change the channel number up/down. These buttons are also used to move the cursor in Menu
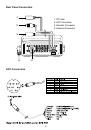
Страница 6 из 41 Rear Panel Connectors 1 1. DC Jack 2. ACC Connector 3. Remote Connector 4. Antenna Connector 2 3 4 ACC Connectors 6
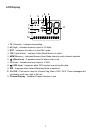
Страница 7 из 41 LCD Display 2 1 4 6 3 5 7 8 9 11 WX 10 1. TX (Transmit) - Indicates transmitting. 2. HI (High) - Indicates transmit output is 25 Watts. 3. DSC - Indicators the radio is in the DSC mode. 4. TRI (Triple Watch) - Indicates Triple Watch Mode is in effect. 5. MEM (Memory) - Indicates Memory Scan Mode
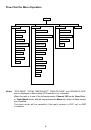
Страница 8 из 41 Flow Chart for Menu Operation MENU DSC CALL SYSTEM SETUP INDIVIDUAL ALARM CLOCK CONTRAST GROUP LOCAL TIME ADJUST LAMP ADJUST ALL SHIPS DAYLITYE SAVE KEY BEEP POS REQUEST DIRECTORY EXIT POS SEND AUTO CH SW STANDBY POS REPLY CALL WAIT CH TAG EXIT GROUP MMSI EXIT USER MMSI ATIS ID EXIT Notes: “POS
Страница 9 из 41 Installation Caution:The MC-8000 DSC will only operate with a nominal 12 volt negative ground battery system. It is important to carefully determine the most suitable location for your radio on your vessel. Electrical, mechanical, and environmental considerations must all be taken into account. You
Страница 10 из 41 Note: This HEXAGON HEAD BOLT is only for mounting the bracket with hardware. Do not use it for installing the radio in the mounting bracket. Connect the red wire of the supplied power cord to the positive (+) battery supply. Connect the black wire of the power cord to the negative (-) battery
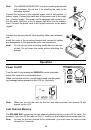
Страница 11 из 41 Squelch Turn SQUELCH fully clockwise. This raises the “Squelch Gate” so high that only very strong signals can get through. Turn SQUELCH fully counterclockwise until you hear a hiss. This lowers the “Squelch Gate” so that everything gets through - noise, weak signals, and strong signals. Turn
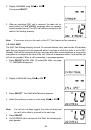
Страница 12 из 41 nications. Press 16/9/TRI a third time to return to the channel selected prior to accessing Channel 16/Channel 9 communications. The display will indicate the selected channel. To cancel Channel 16/Channel 9 communications: • Press 16/9/TRI until the previous channel setting appears. - - or - •
Страница 13 из 41 Normal Scan Normal Scan is performed only when the memory CH is registered. To turn Normal Scan On, press and hold 16/9/TRI for 2 seconds in Triple Watch Scan mode. Although Memory CH is scanned, Channel 16 and Channel 9 are not. Transmitting Note: Channel 70 is used for DSC only. All the available
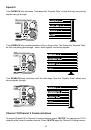
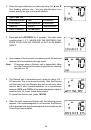
Страница 14 из 41 2. Select the type of distress you desire by using CH ▲ and ▼ (fire, flooding, collision, etc.). You may skip this step if you cannot specify the type in a hurried situation. Type Code List UNDESIGNATED FIRE FLOODING COLLISION GROUNDING CAPSIZING SINKING ADRIFT ABANDONING PIRACY/ARMED OVERBOARD 3.
Страница 15 из 41 Notes: • If you press and hold DISTRESS for 3 seconds instead of just pressing DISTRESS at step 1, the radio will transmit a Distress call with UNDESIGNATED as the default setting. • If the radio receives a Distress call, it will be displayed on the LCD display. An emergency alert will sound. The
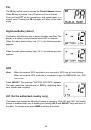
Страница 16 из 41 P.A. The PA key will be used to activate the Public Address feature. When PA key is pushed, the LCD screen will be as follows. Push and hold PTT on the microphone, and speak clearly in a normal voice. Pushing the PA key again will return to the radio mode. High/Low Battery detect This feature will
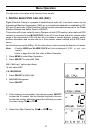
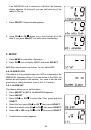
Страница 17 из 41 Menu Operation You can enter in the menu all its functions from the mic. 1. DIGITAL SELECTIVE CALLING (DSC) Digital Selective Calling is a process of establishing a radio call, it has been chosen by the International Maritime Organization (IMO) as an international standard for establishing VHF, MF
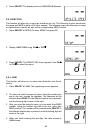
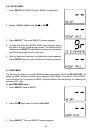
Страница 18 из 41 5. Press SELECT to transmit the DSC signal. DSC CALL is sent with high power. 6. If the CHannel 70 is busy the message BUSY CHECK appears. When the channel is free, the DSC CALL is transmitted. 1-B. GROUP 1. Press SELECT at DSC CALL (To enter DSC CALL, see page 17). INDIVIDUAL appears. 2. Press CH
Страница 19 из 41 6. If the CHannel 70 is busy the message BUSY CHECK appears. When the channel is free, the DSC CALL is transmitted. 7. When you finish calling, the radio returns to the channel display screen. Note: If the Group MMSI is not recorded, you can’t enter this menu (to enter Group MMSI see page 30). 1-C.
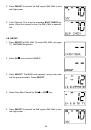
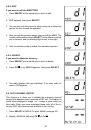
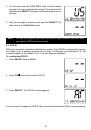
Страница 20 из 41 7. After selecting URGENCY or SAFETY, ALL SHIPS call is transmitted, the radio will switch to Channel 16. You should wait a few minutes before transmitting the ALL SHIPS call information. 1-D. POSITION REQUEST This radio has the ability to request the position of an individual vessel that is
Страница 21 из 41 1-E. POSITION SEND This radio has the ability to send the position of your vessel to another vessel using a VHF marine radio equipped with DSC. Note: Position send is only available when it is connected to the GPS. 1. Press SELECT at DSC CALL (To enter DSC CALL, see page 17). INDIVIDUAL appears. 2.
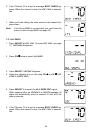
Страница 22 из 41 2. Display STANDBY using CH ▲ or CH ▼ . Then press SELECT. 3. When an individual DSC call is received, the radio will respond with the UNATTENDED message when an operator cannot answer the call. The DSC call will be recorded into the radio’s Call Waiting directory. Note: If you press a key on the
Страница 23 из 41 If an INDIVIDUAL call is received in Call Wait, the following display appears. At this point, you can call back any of the radios in the log. 7. Press SELECT. Received data appears. 8. Using CH ▲ or CH ▼ allows you to look through all of the data. If you press SELECT, the radio starts transmitting.
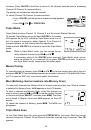
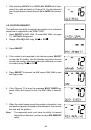
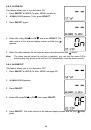
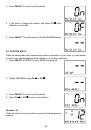
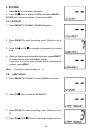
Страница 24 из 41 2-A-2. ALARM ON This feature allows you to turn the alarm ON. 1. Press SELECT at SETUP (To enter SETUP, see above). 2. ALARM CLOCK appears. Then, press SELECT. 3. Press SELECT again. 4. Select On. Using CH ▲ or CH ▼ , and press SELECT. The radio returns to the channel display screen and the icon
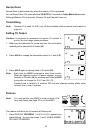
Страница 25 из 41 2-B. LOCAL TIME ADJUST This feature allows you to fine tune the Local Time for any location in Europe. The feature enables you to adjust the Local time by ±1 hour. To set LOCAL TIME ADJUST 1. Press SELECT at SETUP (To enter SETUP, see page 23). 2. Display LOCAL TIME ADJUST using CH ▲ or CH ▼ . 3.
Страница 26 из 41 4. Press SELECT. The display returns to DAYLITE SAVE screen. 2-D. DIRECTORY This function will allow you to send an individual call, etc. The Directory function memorizes the name and MMSI number of 20 other vessels. The following screen will allow you to setup an alphanumeric identity as well as
Страница 27 из 41 2-D-2. EDIT If you want to edit the DIRECTORY 1. Press SELECT at the individual you want to edit. 2. EDIT appears, then press SELECT. 3. You can now edit the person’s name using the number key pad on the mic choose the alphabet. 4. After you edit the person’s name, you can edit the MMSI. The number
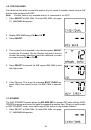
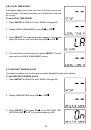
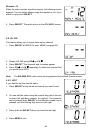
Страница 28 из 41 3. Press SELECT to enter the setting mode. 4. If you want to change this mode to off, press CH ▼ once. (Default is set as On). 5. Press SELECT. The radio returns to the AUTO CH SW screen. 2-F. POSITION REPLY When the calling radio has requested the position information of your radio, you can decide
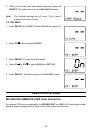
Страница 29 из 41 Example: OF When the radio receives a position request, the following screen appears. You can select whether reply the request or not. If you wants to reply press SELECT. 5. Press SELECT. The radio returns to the POS REPLY screen. 2-G. CH TAG This feature allows you to name each marine channel. 1.
Страница 30 из 41 2-H. GROUP MMSI 1. Press SELECT at SETUP (To enter SETUP, see page 23). 2. Display GROUP MMSI using CH ▲ or CH ▼ . 3. Press SELECT. The group MMSI ID screen appears. 4. You can now enter the GROUP MMSI code. Use the number key pad on the mic to display the number. The number will be entered when
Страница 31 из 41 4. You can now enter the USER MMSI code. Use the number key pad on the mic to display the number. The number will be entered when SELECT is pressed, and the blinking moves to the right. 5. After the final digit is entered, press and hold SELECT. The radio returns to USER MMSI screen. Note: You can
Страница 32 из 41 3. SYSTEM 1. Press MENU to enter Menu Operation. 2. Press CH ▼ twice to display SYSTEM, and press SELECT. SYSTEM has 3 options as follows. To exit, select EXIT. 3-A. CONTRAST 1. Press SELECT at SYSTEM. CONTRAST appears. 2. Press SELECT to enter the setting mode. (Default is set at 7). 3. Press CH ▲
Страница 33 из 41 5. When you find the most favourable brightness, press the SELECT. The radio returns to the LAMP ADJUST screen. Note: The backlight settings are off, Level 1 Dim, Level 2 medium, and Level 3 bright. 3-C. KEY BEEP 1. Press SELECT at SYSTEM.(To enter SYSTEM, see page 32). 2. Press CH ▼ twice to
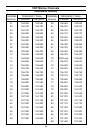
Страница 35 из 41 EXTEND CH (Hidden feature) for the authorized country only CH CH TAG S/D TX RX 30 30 D CH D 157.500 162.100 31 31 D CH D 157.550 162.150 L1 CH L1 S 155.500 155.500 L2 CH L2 S 155.525 155.525 L3 CH L3 S 155.650 155.650 F1 CH F1 S 155.625 155.625 F2 CH F2 S 155.775 155.775 F3 CH F3 S 155.825 155.825
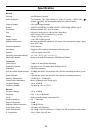
Страница 36 из 41 Specification General Controls : On-Off/Volume, Squelch Status Indicators : TX (Transmit), TRI (Triple Watch), HI (High), LO (Low), I, MEM, DSC, Channel Display : LCD with Orange backlight Buttons : 16/9/TRI, DISTRESS, PA, MEM, SELECT, STEP/SCAN, MENU, HI/LO (Alarm), (GPS), WX (Navigation Mode) and
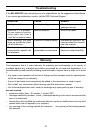
Страница 37 из 41 Troubleshooting If the MC-8000 DSC does not perform to your expectations, try the suggestions listed below. If you cannot get satisfactory results, call the GPE Technical Support SYMPTOM CAUSE REMEDY Won’t power On. No or low voltage. Check for proper voltage getting to the set. When the PTT is
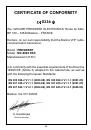
Страница 38 из 41 CERTIFICATE OF CONFORMITY 0336 We, GROUPE PRESIDENT ELECTRONICS, Route de Sète, BP 100 – 34540 Balaruc – FRANCE, Declare, on our own responsibility that the Marine VHF radiocommunication transceiver, Brand : PRESIDENT Model : MC-8000 DSC Manufactured in P.R.C. is in conformity with the essential
Страница 40 из 41 Siège Social / Head Office France – Route de Sète BP 100 – 34540 BALARUC Site internet : http://www.president-electronics.com E-mail : groupe@president-electronics.com 0336 0657/02-05 UTZZ01616ZZ(0)