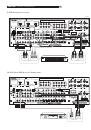
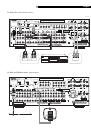
46
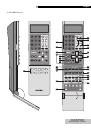
RSX-1057
Surround Sound Receiver
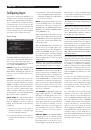
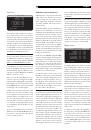
To memorize USER DEFAULT settings:
Many of the current configuration settings can
be stored as a USER DEFAULT, which can be
activated at any time from this menu screen.
To save the current settings as a USER DE-
FAULT, place the highlight on the SET USER
DEFAULT line using the UP/DOWN buttons
and use the +/– buttons to change the set-
ting to YES. Press the ENTER button to store
the new USER DEFAULT settings. To return to
the MAIN menu without saving any changes,
change all entries on the screen to NO and
press the ENTER button.
NOTE
:
If there is insufficient memory to store a
USER DEFAULT configuration file, the SET USER
DEFAULT option will not be available.
To activate memorized USER DEFAULT
settings:
After you have stored a USER DE-
FAULT configuration file, you can activate those
settings at any time by placing the highlight on
the USER DEFAULT line using the UP/DOWN
buttons. Use the +/– buttons to change the set-
ting to YES. Press the ENTER button to proceed
with activating the USER DEFAULT settings. To
return to the MAIN menu without activating
the USER DEFAULT settings, change the entry
to NO and press the ENTER button.
MORE INFORMATION
Troubleshooting
The unit does not turn on.
• Make sure the power cord is plugged into
the rear panel and a live AC outlet.
• Make sure the rear panel POWER switch
is in the ON position.
No sound from any input.
• Make sure that MUTING is off and VOL-
UME is turned up.
• Make sure that preamp outputs are con-
nected to a power amplifier and that the
amplifier is turned on.
• Make sure source inputs are connected
and configured correctly.
No sound from digital sources.
• Make sure that digital input connector is
assigned to the proper source input and
that the source input is configured to use
the digital input rather than an analog
input.
• Check the configuration of the DVD player
to ensure that the bitstream and/or DTS
digital output is activated.
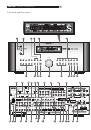
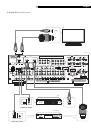
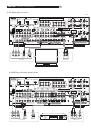
No sound from some speakers.
• Check all power amp and speaker con-
nections.
• Check
Speaker Configuration
settings in
the
Setup
menus.
No video output on TV monitor.
• Make sure that the TV monitor is connect-
ed properly. Component video outputs
can send any type of signal to the TV.
Composite video connections can only
send video from Composite sources and
S-Video connections can only send video
from S-Video sources.
• HDMI connections can only send video
signals from HDMI sources. HDMI com-
ponents must be Ver. 1.1 compatible.
HDMI cables must be 5 meters or less in
length.
• Make sure the NTSC/PAL switch is set
properly.
OSD menus are not displayed on TV
Monitor.
• Go to Setup menus and configure OSD
menus to be displayed on the TV moni-
tor.
• In some PAL systems, the menus may not
be displayed unless there is an active
video signal.
• When using progressive scan video sig-
nals, make sure that the progressive mode
is selected for that video input in the OTH-
ER OPTIONS setup menu. This allows the
display of the OSD menus on the TV mon-
itor by interrupting the progressive scan
video signal and restoring it after the OSD
menus are cancelled. The temporary in-
formation screens (such as volume, etc.)
cannot be displayed on the TV monitor
when progressive scan signals are used.
• HDMI video connections can not display
OSD menus on the TV monitor. Use other
type of video connection.
Video and Audio do not match.
• Check that the proper video source is se-
lected for each input.
• Check that the group delay (lip-synch)
setting is not misadjusted.
Clicking or popping sounds when
switching inputs.
• The unit uses relay switching to preserve
maximum sound quality. The mechanical
clicking of the relays is normal.
• During switching, it may take a split sec-
ond for digital signals to be recognized
and properly decoded. Rapid repeated
switching between inputs or settings can
result in clicks or pops from the speakers as
the unit attempts to lock on to the rapidly
changing signals. This causes no harm.
Controls do not operate.
• Make sure that fresh batteries are installed
in the remote.
• Make sure that the IR sensor on the front
panel is not blocked. Aim the remote at
the sensor.
• Make sure the sensor is not receiving strong
IR light (sunlight, halogen lighting, etc.)
• Unplug the unit from the AC outlet, wait 30
seconds, and plug it back in to reset.