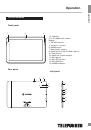
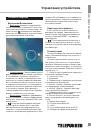
Инструкция для TELEFUNKEN TF-MID1005G

(скачивание инструкции бесплатно)
Формат файла: PDF
Доступность: Бесплатно как и все руководства на сайте. Без регистрации и SMS.
Дополнительно: Чтение инструкции онлайн
background image

Operation

9

Operation

devices (e.g. mouse, keyboard, external hard 
drives). It’s enough to connect the peripheral 
device to the tablet; the device will be 
recognized and connected automatically.

  According to the USB 1.1/2.0 Standard, 

usage of a USB device with power current 
consumption exceeding 500 mA is not 
recommended without supplementary power 
supply. Failure to use supplementary power for 
connected USB drives with power consumption 
exceeding this value as well as defective 
USB drives may cause mechanical or thermal 
changes of elements of this unit as well as 
malfunction of internal elements of the USB 
port. Such damages are not warrantee cases.

Warning: usage of external USB drives 

containing BIN files in the root directory may 
cause malfunction of the unit or damage to the 
software.

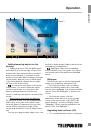
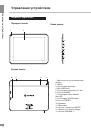
Connecting memory cards

The tablet PC is equipped with a slot for 

microSD memory cards. The maximum 
supported card capacity is 32 GB. After 
properly installing a memory card, the device 
detects it automatically. To safely remove the 
memory card, follow these steps: click the 
applications menu button (4) in the top right 
corner of the main screen, in the APPS tab 
select “Settings”, select “Storage”, click on 
“Eject SD-card” and wait for the process to 
finish. Press on the card until it clicks, then pull 
it out of the slot.

  To insert the card into the slot make 

sure it faces the proper direction and side. For 
proper operation of the device, use licensed 
microSD cards of well-known manufacturers. 
Avoid the use of counterfeit cards by dubious 
brands.

  After inserting the MicroSD memory 

card there will appear an option “SD card” 
in the DEFAULT WRITE DISK section of the 
Settings – DEVICE – Storage menu. Please 
note that this means the inner flash memory of 
the device itself and not the external MicroSD 
memory card. In order to save disk space 

it is recommended to move the installed 
applications from the device memory to the 
MicroSD memory card in the Settings – 
DEVICE- Apps menu (by pressing the “Move to 
SD” button) when choosing any application in 
this menu.

Connecting to PC

•   Connect the USB connector of a PC 

to the microUSB port of the device using a 
microUSB cable. Click “Turn on USB storage” 
at the bottom of the screen. After a while the 
device is detected as a removable USB-
drive, and you will have access to the internal 
memory of the tablet and the memory card.

•   To turn off the tablet connected in USB-

drive mode, click “Turn off USB storage” at the 
bottom of the screen.

HDMI-out

Connect the mini HDMI output of the device 

to the HDMI input of an external device (e.g., 
TV) with a mini HDMI-cable (not included). 
Now the tablet PC can be used as a source 
of high-quality digital signal for the connected 
external device.

  When you connect the tablet via HDMI 

to an external device, the screen turns off, and 
in this case, to perform operations you can use 
both the touch screen and a computer mouse 
connected to the tablet.
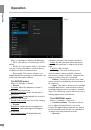
Applications

Installing applications

In addition to the pre-installed basic 

application package, you can install additional 
software on your own. Programs can be 
installed from memory cards or USB-flash 
drives, downloaded from the Internet or from 
the official Android Market (Google Store) 
online catalog.

•   Installing applications from Android 

Market: Installation of applications from 
the Android Market Internet service is only 

9

1
2
3
4
5
6
7
8
9
10
11
12
13
14
15
16
17
18
19
20
21
22
23
24
25
26
27
28
29
30
31
32
33
34
35
Оглавление инструкции
  • Страница 1 из 36
    10.1” TABLET PC/ 10.1” ПЛАНШЕТ TF-MID1005G Instruction manual Руководство по эксплуатации
  • Страница 2 из 36
    Table of contents Table of contents Dear customer! Thank you for purchasing our product. For safety, it is strongly recommended to read this manual carefully before connecting, operating and/or adjusting the product and keep the manual for reference in the future. Table of contents Before you start
  • Страница 3 из 36
    Important safeguards General provisions • Carefully read this manual to familiarize yourself with the device. • Have this manual available as a reference for operating procedures and precautions. Do not allow the use of the device by unauthorized persons who have not read and understood this
  • Страница 4 из 36
    Before you start Before you start wall pull the plug, do not pull the cable itself. • Do not connect the adapter to any other devices. • Keep the power adapter away from children. • Do not insert connector plugs into ports with force. If a plug cannot be easily inserted into the port, the connector
  • Страница 5 из 36
    Operation Operation Control elements Front panel 1 2 3 1,3. Speaker 2. Front (additional) camera Display 4. 3G SIM card slot 5. Volume +/- buttons 6. HOME button 7. Back (main) camera 8. Reset button (hole) 3G SIM card slot 9. Power button 10. Earphone 3.5mm minijack 11. Microphone 12. MicroSD card
  • Страница 6 из 36
    Operation Operation General operation Power on/off • Power on: Press and hold the power button until the logo appears, followed by the splash screen and the main screen. Hold down the icon and drag it to the right onto the icon representing an open lock to unlock the device. • Sleep Mode: Sleep
  • Страница 7 из 36
    1 2 3 Operation Operation 4 Figure 1 13 5 6 7 8 9 Adding/removing objects on the desktop • Adding a shortcut: Click the applications menu button (4) at the top right corner of the main screen, then select the item you wish to place on your desktop. Touch the icon and hold it for 3 seconds. Without
  • Страница 8 из 36
    Operation Operation and operating system (OS) updates (if any) on the manufacturer’s website. Do not use the OS updates for other models, as they are incompatible and cannot provide full and stable operation of the device. • If your device is working properly do not update the software, as it is
  • Страница 9 из 36
    devices (e.g. mouse, keyboard, external hard drives). It’s enough to connect the peripheral device to the tablet; the device will be recognized and connected automatically. According to the USB 1.1/2.0 Standard, usage of a USB device with power current consumption exceeding 500 mA is not
  • Страница 10 из 36
    Operation Operation available to users having a Google account. The Play Market application is pre-installed as standard software. At first launch of the application you will be prompted to set up a Google account. On the page «Setting up a Google account» press «Next». If you already have a Google
  • Страница 11 из 36
    close distances (macrophotography). The auto focus may not work properly when shooting at close-up ranges which may result in poor quality of the picture. This operation aspect of the camera is not a defect and shall not serve as the grounds for warranty repair, refund or replacement of the device.
  • Страница 12 из 36
    Operation Operation Fig. 2 Menu => Settings => Wireless & Networks • Wi-Fi. See section «Connecting to Wi-Fi» above. • Bluetooth. If you select «ON» for this item, you can connect the tablet to another device via Bluetooth with an intuitive menu. • Data usage. This section allows you to
  • Страница 13 из 36
    Screen lock: choose how to lock the screen (slide, face unlock, pattern, PIN, password, disable the lock). Owner info: enable/disable the display owner information on the lock screen. Device administrators: List of administrators of the device. Unknown sources: put a tick to allow the installation
  • Страница 14 из 36
    General information General information Troubleshooting guide The following information will help you identify and eliminate common hardware and software problems you may encounter when using the device. If you experience any of the following issues you should first try to resolve them yourself,
  • Страница 15 из 36
    The device cannot read the memory card • • • • Problems with file copying • Check whether the connection was established between the desktop computer / laptop and the device. • The device memory may be full; remove unused files. • The problem may be in the application which you use to copy files.
  • Страница 16 из 36
    General information Specifications Unit dimensions/Net weight CPU Operating system Display Screen resolution GPU Main camera Front camera Supported audio formats Supported video formats Supported photo formats Supported text formats Memory RAM Wi-Fi specifications frequency, MHz power, mWt protocol
  • Страница 17 из 36
    17 Table of contents
  • Страница 18 из 36
    Содержание Содержание Уважаемый покупатель! Благодарим Вас за покупку нашего изделия. Чтобы понять, как правильно и безопасно пользоваться Вашей моделью изделия, рекомендуется тщательно изучить настоящее руководство перед подключением, регулировкой и эксплуатацией изделия. Сохраняйте руководство
  • Страница 19 из 36
    Меры предосторожности Общие положения • Внимательно изучите данное руководство, чтобы ознакомиться с устройством. • Держите данное руководство под рукой в качестве справочника по правилам эксплуатации и мерам предосторожности. Не допускайте к использованию устройства посторонних лиц, не
  • Страница 20 из 36
    Перед началом эксплуатации Перед началом эксплуатации • Используйте только адаптер питания, входящий в комплект поставки. Использование с данным устройством постороннего адаптера питания может привести к его повреждению. • Адаптер можно подключать только к тому типу электрической сети, параметры
  • Страница 21 из 36
    • Литиевые аккумуляторы не подлежат длительному хранению и предназначены для активной постоянной работы; • Избегайте постоянных полных разрядов аккумулятора. Постоянные глубокие разряды сокращают срок службы батареи. Более предпочтительны частые подзарядки; • Если аппарат не используется длительное
  • Страница 22 из 36
    Управление устройством Управление устройством Элементы управления Передняя панель 1 Левая панель 2 3 4 5 6 7 8 9 Задняя панель 10 11 13 12 14 20 22 1. Фронтальная (дополнительная) камера 2. Экран 3. Разъем для адаптера 4. MicroUSB-порт 5. Разъем для наушников 3,5 мм 6. Разъем mHDMI 7. Разъем для
  • Страница 23 из 36
    Основные операции Включение/Выключение • Включение: Нажмите и удерживайте кнопку питания до появления логотипа. Затем появятся заставка и главный экран. Зажмите иконку и переместите ее вправо на иконку, изображающую открытый замок, для разблокирования устройства. утеряны. Во избежание этого
  • Страница 24 из 36
    Управление устройством Управление устройством 1 2 3 4 Рисунок 1 13 5 6 7 8 9 Строка состояния В нижней части экрана находится строка состояния, на которой расположены элементы управления, область системных уведомлений, индикаторы беспроводных соединений, индикатор заряда батареи и часы. Для того,
  • Страница 25 из 36
    Обои рабочего стола Существует 2 способа установки фонового изображения на рабочий стол и экран блокировки: • На главном экране нажмите на свободную область рабочего стола и удерживайте 3 секунды; выберите изображение из имеющихся на устройстве. Нажмите кнопку «Установить обои». • На главном экране
  • Страница 26 из 36
    Управление устройством Управление устройством продолжительной работы от аккумулятора. • Невозможность 3G-соединения может быть вызвана отсутствием покрытия 3G в месте вашего пребывания и в этом случае не является дефектом данного устройства. Подключение внешних USBнакопителей • Подсоедините внешний
  • Страница 27 из 36
    HDMI-выход Подсоедините выход mHDMI данного устройства к входу HDMI внешнего устройства (напр., телевизора) с помощью mini HDMI-кабеля (не входит в комплект поставки). Теперь планшетный компьютер можно использовать как источник цифрового сигнала высокого качества для подключенного внешнего
  • Страница 28 из 36
    Управление устройством Управление устройством предоставляемых компанией «Google». 2. Gmail (Google Mail) - услуга электронной почты от компании Google. Предоставляет доступ к почтовым ящикам через веб-интерфейс. 3. Email (Электронная почта) — технология и предоставляемые ею услуги по пересылке и
  • Страница 29 из 36
    Управление устройством Управление устройством Рисунок 2 с изображениями (кадрирование, поворот, возможность установить картинку как обои для рабочего стола и др.) доступно при нажатии на значок в правом верхнем углу интерфейса галереи. 22. Google search - приложение, позволяющее осуществлять
  • Страница 30 из 36
    Управление устройством Управление устройством 28. Explorer (проводник) - приложение, реализующее графический интерфейс доступа пользователя к файлам в операционной системе. 29. ApkInstaller - менеджер, позволяющий управлять приложениями, содержащимися в устройстве и на внешнем носителе, выполняя
  • Страница 31 из 36
    ложения пользователя с помощью беспроводных сетей, а так же синхронизировать данные с Google для оптимизации поиска и работы других служб. • Безопасность Блокировка экрана: выберите способ блокировки экрана (прокрутка, фейсконтроль, графический ключ, PIN-код, пароль, отключить блокировку). Сведения
  • Страница 32 из 36
    Общая информация Общая информация Руководство по устранению неисправностей Приведенная ниже информация поможет выявить и устранить наиболее распространенные проблемы аппаратной части и программного обеспечения данного устройства, с которыми вы можете столкнуться. При возникновении описанных ниже
  • Страница 33 из 36
    Проблемы с записью звука • Удостоверьтесь в том, что микрофон устройства направлен в сторону источника звука, а также что запись выведена на необходимый уровень громкости. Силы источника звука может быть недостаточно для отчетливой записи. • Удостоверьтесь в том, что правильно установлено
  • Страница 34 из 36
    Общая информация Общая информация Гарантийные обязательства Гарантия производителя не распространяется на: • Случаи несанкционированной переустановки внутреннего программного обеспечения, за исключением обновления ОС с официального сайта разработчика, действия вирусов, механические повреждения, а
  • Страница 35 из 36
    Общая информация Производитель: ШЭНЬЧЖЭНЬ ЦЗЕХЭНДА ИНДАСТРИ ДЕВЕЛОПМЕНТ КО., ЛТД. КИТАЙ ШЭНЬЧЖЭНЬ ВИА ГАУНЧЖОУ СИЭНДКЬЮ ТЕЛЕКОМ ЭКВИПМЕНТ КО., ЛИМИТЕД №9 ШЭНЬЧЖОУ РОУД, ГУАНЧЖОУ САЙЕНС СИТИ, ГУАНЧЖОУ, КИТАЙ. Под контролем «ТЕХНО ЭЛЕКТРИК ЛИМИТЕД» Сделано в Китае. В устройстве установлен экран с
  • Страница 36 из 36