Инструкция для VITEK VT-1768 BK

(скачивание инструкции бесплатно)
Формат файла: PDF
Доступность: Бесплатно как и все руководства на сайте. Без регистрации и SMS.
Дополнительно: Чтение инструкции онлайн
background image

4

 ENGLISH


Do not leave children unattended. Do not allow chil-
dren to use the unit as a toy.


For children safety reasons do not leave polyethyl-
ene bags, used as a packaging, unattended. 

Attention!  Do  not  allow  children  to  play  with 
polyethylene  bags  or  packaging  film.  Danger  of 
suffocation!


Never pull the power cord when disconnecting the 
unit from the mains; take the power plug and care-
fully pull it out of the socket.


Never  use  the  unit  if  the  power  cord  or  the  power 
plug is damaged, if the unit works improperly or after 
the unit was dropped.


Do not disassemble the unit by yourself, if any mal-
function is detected or after the unit was dropped, 
apply to the nearest authorized service center.


Transport the unit in the original package only.


Keep the unit out of reach o

f children and disabled 

persons.

THE  UNIT  IS  INTENDED  FOR  HOUSEHOLD  USAGE 
ONLY

BEFORE THE FIRST USE

After  unit  transportation  or  storage  at  low 
temperature  (in  winter),  it  is  necessary  to  keep  it 
for at least two hours at room temperature before 
switching on.


Unpack  the  humidifier,  remove  any  stickers  and 
package materials that can prevent unit operation. 
Examine the unit for damages. In case of damages 
do not switch the unit on.

Notes:
Use  the  humidifier  at  the  room  temperature  from 
+5°  С  to  +40°С,  and  relative  humidity  less  than 
80%.
Water temperature should not exceed +40°С. 


Before  plugging  the  unit  in,  make  sure  that  your 
home  mains  voltage  corresponds  to  unit  operat-
ing voltage.

Usage of the unit

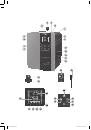
1.  Remove the water tank (13) from the unit body.
2.  Turn over the tank (13), unscrew the lid (14) with the 

cartridge filter (12) rotating it counterclockwise.

3.  Fill  the  tank  (13)  with  necessary  amount  of  water, 

insert the lid with the cartridge filter (12) and screw it 
in, rotating it clockwise.

4.  Place the filled water tank (13) on the unit body. Wait 

for some time, which is necessary to fill the process 
chamber with water.

5.  Insert  the  power  plug  into  the  mains  socket,  the 

water tank illumination (16) will light up.

6.  Switch the humidifier on by touching the touch but-

ton  (1)  « »  or  pressing  the  button  (30)  on  the 
remote  control  (19),  the  room  temperature  (27), 

the  humidity  level  and  the  mist  release  intensity 
icon (26) will appear on the display, the mist will be 
released  intensively  from  the  lid  nozzles  (9).  The 
nozzles  rotate  180°  around  the  axis,  which  allows 
sending the mist flow in any direction without mov-
ing the humidifier.

Notes:
Every  pressing  of  the  control  buttons  is 
accompanied with a sound signal.
If  no  button  is  pressed  on  the  control  panel  or  on 
the remote control within 30 seconds, the display 
brightness will decrease automatically.

7.  To  switch  the  ionization  mode  on,  touch  the  touch 

button  (3)  « »  or  press  the  button  (31)  on  the 
remote  control  (19),  the  icon  (23)  will  light  up  on 
the  display  (7).  To  switch  the  ionization  mode  off, 
touch the touch button (3) « » again, the icon (23) 
will go out.

8.  To  switch  the  water  heating  mode  on,  touch  the 

touch button (6) « » or press the button (32) on the 
remote control, the icon (25) will light up on the dis-
play (7). In this mode the water is preheated before it 
is evaporated, which helps to disinfect the water and 
facilitates its evaporation.

Note:
Switching this function on may slightly change the 
room temperature (27) and humidity (21) indication 
on the display (7). If the room humidity is less than 
20%, the indicator (27) will show this value as «20», 
this is not a malfunction. 

9.  You can set the humidifier operation time using the 

timer touch button (5) « » on the control panel or 
by pressing the humidifier on/off button (30) on the 
remote control (19) consequently, the icon «TIMER» 
will  be  flashing  on  the  display.  Set  the  required 
humidifier operation time from 1 to 12 hours, the time 
will be shown with the digital indication (27) on the 
display (7). In this mode the digital indicator (27) will 
show the room air temperature and timer operation 
time by turn with an interval of 30 seconds.

10. To set the mist release intensity, touch the touch but-

ton (4) « » or press the button (28) on the remote 
control; you can set the required intensity, which will 
be  shown  as  a  changing  mist  release  icon  (26)  on 
the display (7).

11. To switch the automatic humidity maintenance mode 

on,  touch  the  touch  button  (2)  « »  or  press  the 
button  (29)  on  the  remote  control  (19),  the  icon 
«HUMID»  will  be  flashing  on  the  display;  press  the 
button repeatedly to set the required humidity in the 
room (from 45 to 90%, the setting step is 5%). When 
the preset level is reached, the humidifier is switched 
to the stand-by mode, if the humidity level decreases 
within 10%, the unit will resume operation automati-
cally. In the automatic humidity maintenance mode, 
the  icon  «HUMID»  flashes  on  the  display  (7),  the 

VT-1768.indd   4

20.01.2014   12:26:12

1
2
3
4
5
6
7
8
9
10
11
12
13
14
15
16
17
18
19
20
21
22
23
24
25
26
27
28
29
30
31
32
33
34
35
36
37
38
39
40
Оглавление инструкции
  • Страница 1 из 41
    VT-1768 BK Air humidifier Увлажнитель воздуха 3 7 11 15 19 23 27 31 35 1 VT-1768.indd 1 20.01.2014 12:26:10
  • Страница 2 из 41
    VT-1768.indd 2 20.01.2014 12:26:11
  • Страница 3 из 41
    ENGLISH AIR HUMIDIFIER Insufficient room humidity negatively affects human health and pets’ health, worsens plants’ growth conditions and affects furniture appearance. The recommended comfortable room humidity level should be within 50% - 60%. The unit is intended for air humidifying. Using this
  • Страница 4 из 41
    ENGLISH •• Do not leave children unattended. Do not allow children to use the unit as a toy. •• For children safety reasons do not leave polyethylene bags, used as a packaging, unattended. Attention! Do not allow children to play with polyethylene bags or packaging film. Danger of suffocation! ••
  • Страница 5 из 41
    ENGLISH TROUBLESHOOTING Failure Possible causes Troubleshooting The water tank illumination (16) No power supply. doesn‘t light and there is no mist release. Connect the unit to the mains. Plug another, known good appliance into the socket to make sure that the socket works properly. The indicator
  • Страница 6 из 41
    ENGLISH Note: As a cleaning agent for the sprayer you can use descaling agents for kettles. •• Do not immerse the unit body into water or other liquids. Note: Non-observance of rules for cleaning the sprayer from mineral deposits may affect the overall performance of the unit. In this case clean
  • Страница 7 из 41
    DEUTSCH LUFTBEFEUCHTER Unzureichende Raumfeuchtigkeit wirkt sich auf menschliche Gesundheit und Haustiere schlecht aus, verschlechtert die Bedingungen, in den Hauspflanzen gedeihen, und wirkt ungünstig aufs Aussehen der Möbelstücke. Das empfohlene Behaglichkeitsniveau der relativen
  • Страница 8 из 41
    DEUTSCH 6. Schalten Sie den Befeuchter ein, indem Sie die Sensortaste (1) « » berühren oder die Taste (30) an der Fernbedienung (19) drücken, dabei wird die Raumtemperatur (27), die Raumluftfeuchtigkeit (21) und das Piktogramm der Dampfintensität (26) auf dem Bildschirm angezeigt, der Dampf beginnt
  • Страница 9 из 41
    DEUTSCH STÖRUNGSBESEITIGUNG Störung Mögliche Ursachen Störungsbeseitigung Die Beleuchtung des Keine Wasserbehälters (16) leuchtet nicht Versorgungsspannung und es gibt keinen Dampfablass. Schließen Sie das Gerät ans Stromnetz an. Die Anzeige (24) leuchtet auf Wasserbehälter ist leer. dem
  • Страница 10 из 41
    DEUTSCH •• Gießen Sie Wasser aus dem Behälter und der Arbeitskammer des Zerstäubers vor der Aufbewahrung ab. •• Bevor Sie das Patronenfilter zur Aufbewahrung wegnehmen, reinigen und trocknen Sie es ab, bewahren Sie das Patronenfilter an einem kühlen und dunklen Ort auf. •• Bewahren Sie das Gerät an
  • Страница 11 из 41
    русский УВЛАЖНИТЕЛЬ ВОЗДУХА Недостаточная влажность в помещении негативно сказывается на состоянии здоровья человека и домашних животных, ухудшает условия, в которых развиваются комнатные растения и неблагоприятно действует на внешний вид предметов мебели. Рекомендуемый комфортный уровень
  • Страница 12 из 41
    русский Примечания: Используйте увлажнитель при температуре в помещении от +5 до +40°C и относительной влажности менее 80%. Температура используемой воды не должна быть выше +40°С. •• Перед включением в электрическую сеть убедитесь в том, что напряжение электрической сети соответствует рабочему
  • Страница 13 из 41
    русский индикаторе (27) будет отображаться как «20», что не является неисправностью. 9. Вы можете установить время работы увлажнителя с помощью сенсорной кнопки таймера (5) « » на панели управления или последовательными нажатиями кнопки включения/выключения увлажнителя (30) на пульте ДУ (19), при
  • Страница 14 из 41
    русский УСТРАНЕНИЕ НЕИСПРАВНОСТЕЙ Неисправность Возможные причины Устранение неисправностей Не светится подсветка резервуара Отсутствует напряжение питания. для воды (16) и нет выхода пара. Включите устройство в электрическую сеть. На дисплее горит индикатор (24), Нет воды в резервуаре. нет выхода
  • Страница 15 из 41
    Қазақша құрылғысын (ҚСҚ) орнатқан дұрыс, ҚСҚ орнату үшін маманмен хабарласыңыз. АУАНЫ ЫЛҒАЛДАҒЫШ Бөлмедегі ылғалдың жеткіліксіздігі адамның және үй жануарларының денсаулық жағдайынан жағымсыз көрініс береді, бөлме өсімдіктері дамитын жағдайларды нашарлатады және жиһаз заттарының сыртқы түріне
  • Страница 16 из 41
    Қазақша •• Құрылғыны тазалауды үнемі жүргізіп отырыңыз. •• Құрылғы жұмыс жасап тұрғанда балалардың аспаптың корпусына және желілік сымға тиісуіне рұқсат бермеңіз. •• Бұл құрылғы жасы 8-ге толмаған балалардың қолдануына арналмаған. •• Бұл аспап дене, жүйке немесе психикалық бұзылыстары бар немесе
  • Страница 17 из 41
    Қазақша «TIMER» жыпылықтаған белгісі пайда болады. Ылғалдағыштың 1 сағаттан 12 сағатқа дейінгі қажет жұмыс уақытын орнатыңыз, уақыт дисплейде (7) сандық индикациямен (27) бейнеленетін болады. Бұл тәртіпте сандық индикатор (27) 30 секунд қашықтықпен кезектесіп бөлмедегі ауа температурасын және
  • Страница 18 из 41
    Қазақша АҚАУЛАРДЫ ЖОЮ Ақау Ықтимал себептер Ақауларды жою Суға арналған резервуардың (16) көмескі жарығы жанбайды және бу шығуы жоқ. Қуат көзі кернеуі жоқ. Құрылғыны электр желісіне қосыңыз. Дисплейде индикатор жанып тұр (24), бу шығуы жоқ. Резервуарда су жоқ. Суға арналған резервуарға су құйыңыз.
  • Страница 19 из 41
    romÂnĂ/ Moldovenească UMIDIFICATOR DE AER Umiditatea insuficientă din încăpere acţionează negativ asupra sănătăţii omului şi a animalelor de casă, înrăutăţeşte condiţiile în care se dezvoltă plantele de cameră şi acţionează nefavorabil asupra aspectului exterior al mobilierului. Nivelul confortabil
  • Страница 20 из 41
    romÂnĂ/ Moldovenească 5. Introduceţi fişa cablului de alimentare în priza electrică, se va aprinde iluminarea rezervorului pentru apă (16). 6. Porniţi umidificatorul atingând butonul senzorial (1) « » sau apăsând pe butonul (30) de pe telecomandă (19), pe display va fi vizualizată temperatura din
  • Страница 21 из 41
    romÂnĂ/ Moldovenească umidificatorul trece în regimul de aşteptare, iar la scăderea nivelului de umiditate în limitele a 10% aparatul va începe să funcţioneze în mod automat. În regimul de menţinere automată a temperaturii pe display (7) clipeşte semnul «HUMID», este vizualizată temperatura (27),
  • Страница 22 из 41
    romÂnĂ/ Moldovenească ÎNLĂTURAREA DEFECŢIUNILOR Defecţiune Cauze posibile Înlăturarea defecţiunilor Nu arde iluminarea Lipseşte tensiunea Conectaţi aparatul la reţeaua electrică. rezervorului pentru de alimentare. Conectaţi la priză un alt aparat vădit funcţional pentru a vă asigura de capacitatea
  • Страница 23 из 41
    Český ZVLHČOVAČ VZDUCHU Nedostatek vlhkosti v místnosti má negativní dopad na zdravotní stav lidí a domácích zvířat, zhoršuje podmínky, v nichž rostou pokojové rostliny a nepříznivě ovlivňuje vzhled nábytku. Doporučená komfortní úroveň relativní vlhkosti vzduchu v místnostech se pohybuje v rozmezí
  • Страница 24 из 41
    Český •• Tento přístroj není určen pro použití dětmi mladší než 8 let. •• Tento spotřebič není určen pro používání osobami (včetně dětí nad 8 let věku) s fyzickými, neurologickými, psychickými poruchami, nebo bez dostatečných zkušeností a znalostí. Použití přístroje takovými osobami je povoleno
  • Страница 25 из 41
    Český baterii do držáku, přísně dodržuje správnou polaritu, vložte držák baterie do pultu dálkového ovládání. kovém ovladači, tak můžete nastavit požadovanou intenzitu, která se zobrazí na displeji (7) měnící se ikonou výstupu páry (26). 11. Pro zapnutí režimu automatického udržování vlhkosti v
  • Страница 26 из 41
    Český ŘEŠENÍ MOŽNÝCH ZÁVAD Problém Možné příčiny Řešení Nesvítí podsvícení nádrže na vodu (16), pára nevychází. Není zajištěno napájení Zapojte kabel do elektrické sítě Na displeji hoří indikátor (24), pára nevychází. Není voda v nádržce. Doplňte vodu do nádrže. Pára má nepříjemný zápach. První
  • Страница 27 из 41
    УКРАЇНЬСКа (ПЗВ) з номінальним струмом спрацьовування, що не перевищує 30 мА, для установки ПЗВ зверніться до фахівця. ЗВОЛОЖУВАЧ ПОВIТРЯ Недостатня вологість в приміщенні негативно позначається на стані здоров’я людини та домашніх тварин, погіршує умови, у яких розвиваються кімнатні рослини, та
  • Страница 28 из 41
    УКРАЇНЬСКа •• Регулярно робіть чищення пристрою. •• Не дозволяйте дітям торкатися корпусу приладу і мережевого шнура під час роботи. •• Даний пристрій не призначений для використання дітьми молодше 8 років. •• Цей пристрій не призначений для використання людьми (включаючи дітей старше 8 років) з
  • Страница 29 из 41
    УКРАЇНЬСКа верхньому клапані, так як у цьому стані випуску води з бака у камеру розпилювача не відбувається. цифровий індикатор (27) буде чергово з інтервалом 30 секунд відображати температуру повітря у приміщенні та час роботи таймера. 10. Для установлення інтенсивності виходу пари торкніться
  • Страница 30 из 41
    УКРАЇНЬСКа УСУНЕННЯ НЕСПРАВНОСТЕЙ Несправність Можливі причини Усунення несправностей Не світиться підсвічування Немає напруги, резервуара для води (16) і електроживлення немає виходу пари. відсутнє Увімкніть пристрій в електричну мережу. Увімкніть в мережеву розетку інший, свідомо справний
  • Страница 31 из 41
    Беларуская намінальным токам спрацоўвання, які не перавышае 30 мА, для ўстаноўкі ПАА звярніцеся да спецыяліста. УВІЛЬГАТНЯЛЬНІК ПАВЕТРА Недастатковая вільготнасць у памяшканні негатыўна адбіваецца на здароўі чалавека, на здароўі хатніх жывёл, пагаршае ўмовы, у якіх развіваюцца пакаёвыя расліны і
  • Страница 32 из 41
    Беларуская •• Не дазваляйце дзецям дакранацца да корпуса прыбора і да сеткавага шнура падчас працы. •• Дадзеная прылада не прызначана для выкарыстання дзецьмі, малодшымі за 8 гадоў. •• Дадзеная прылада не прызначана для выкарыстання людзьмі (уключаючы дзяцей, старэйшых за 8 гадоў) з фізічнымі,
  • Страница 33 из 41
    Беларуская (27) будзе па чарзе з інтэрвалам 30 секунд адлюстроўваць тэмпературу паветра ў памяшканні і час працы таймера. 10. Для ўсталёўкі інтэнсіўнасці выхаду пары дакраніцеся да сэнсарнай кнопкі (4) « » ці націскам кнопкі (28) на пульце ДУ, вы можаце ўсталяваць неабходную інтэнсіўнасць, якая
  • Страница 34 из 41
    Беларуская Ухіленне няспраўнасцяў Няспраўнасць Магчымыя чыннікі Ўхіленне няспраўнасцяў Не свеціцца падсвятленне рэзервуара для вады (16) і няма выхаду пары. Адсутнічае напружанне сілкавання. Уключыце прыладу ў электрычную сетку. Уключыце ў сеткавую разетку іншую загадзя спраўную прыладу, каб
  • Страница 35 из 41
    O’zbekcha EHTIYOT CHОRАLАRI Elеktr jihоzini ishlаtishdаn оldin qo’llаnmаsini diqqаt bilаn o’qib chiqing, kеyinchаlik kеrаk bo’lgаndа o’qib bilish uchun qo’llаnmаsini sаqlаb оlib qo’ying. Jihоzni fаqаt bеvоsitа mаqsаdigа muvоfiq, qo’llаnmаsidа аytilgаndеk ishlаting. Jihоz nоto’g’ri ishlаtilsа
  • Страница 36 из 41
    O’zbekcha •• Bоlаlаrni ehtiyot qilish uchun o’rаshgа ishlаtilgаn pоlietilеn хаltаlаrni qаrоvsiz qоldirmаng. Diqqаt! Bоlаlаr pоlietilеn хаltа yoki o’rаshgа ishlаtilgаn plyonkаni o’ynаshlаrigа ruхsаt bеrmаng. Bo’g’ilish хаvfi bоr! •• Jihоzni elеktrdаn аjrаtgаndа elеktr shnuridаn emаs, elеktr
  • Страница 37 из 41
    O’zbekcha NАMLАGICHNI TОZАLАSH Nоsоzlik Bo’lishi mumkin bo’lgаn sаbаbi Nоsоzlikni tuzаtish Suv idishining chirоg’i (16) Elеktr quvvаti yo’q yonmаyapti, bug’ chiqmаyapti Jihоzni elеktrgа ulаng. Displеydа аlоmаt (24) yorishib, Suv idishidа suv qоlmаgаn bug’ chiqmаyapti. Suv idishigа suv quying.
  • Страница 38 из 41
    O’zbekcha Sаqlаsh •• Ko’p vаqt ishlаtilmаsа yoki оlib qo’ymоqchi bo’lsаngiz jihоz qismlаrini, shu jumlаdаn, purkаgich ish bo’lmаsini hаm, tоzаlаb оling. •• Suv idishi bilаn purkаgich ish bo’lmаsidаgi suvi to’kib tаshlаnmаgаn jihоzni sаqlаshgа оlib qo’ymаng. •• Filtr kаrtrijini оlib qo’yishdаn оldin
  • Страница 39 из 41
    gb A production date of the item is indicated in the serial number on the technical data plate. A serial number is an eleven-unit number, with the first four figures indicating the production date. For example, serial number 0606ххххххх means that the item was manufactured in June (the sixth month)
  • Страница 40 из 41
    © ООО ГОЛДЕР-ЭЛЕКТРОНИКС, 2014 © GOLDER-ELECTRONICS LLC, 2014 VT-1768.indd 40 20.01.2014 12:26:20
  • Страница 41 из 41